Alumacraft 1436LT Conversion

TinBoats.net

Help Support TinBoats.net:

This site may earn a commission from merchant affiliate links, including eBay, Amazon, and others.

onthewater102

Well-known member
Joined
Mar 15, 2014
Messages
2,266
Reaction score
2
Location
CT
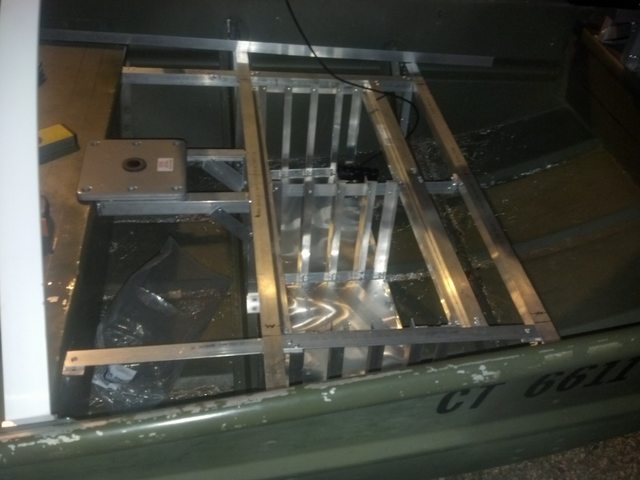
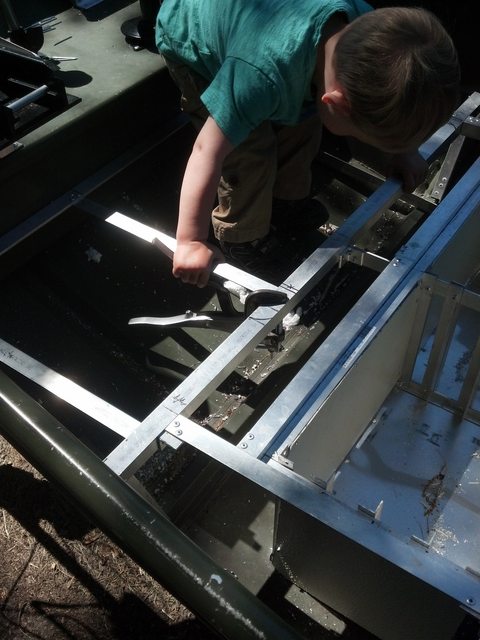
Ok, here we go - this is why I signed up here so that I could pick the brains of so many experienced folks...I'm decking a 1436LT - plan is to put a livewell inside of the middle seat (replacing the foam), framing the decking with aluminum and topping everything using FRP backed by expanding urethane foam. In the end the deck will be coated in Tuff Coat rubberized marine coating.

The final product (sans accessories alla trolling motor, battery, fuel, motor etc.) should weigh in under 230lbs - this is important as there is only carry-in access to the river behind my house where I will keep this tied up. I'm looking for suggestions on the design/layout or issues that other people encountered in their builds or after the fact that caused them to revisit something...

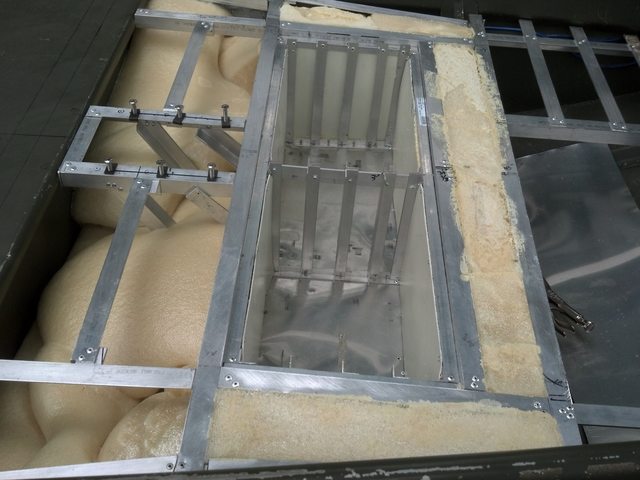
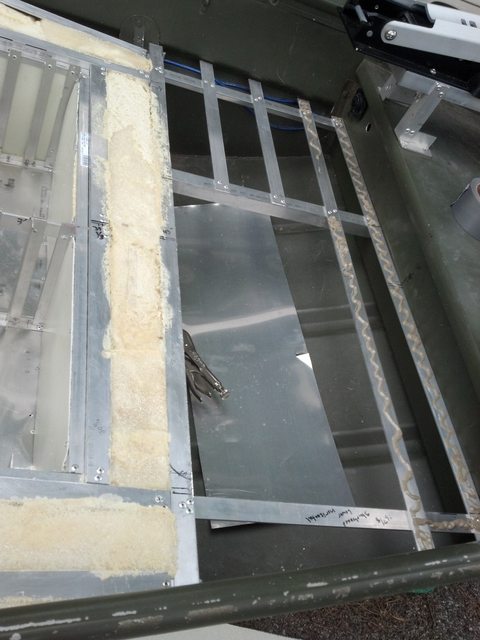
The volume of foam behind the decking is almost double that removed from the center seat - though I plan on filling all non-storage areas in the bow section with 2# expanding urethane (overkill is underrated.) Ok, so the plans at the moment look like this:

GzvBHtnl.jpg


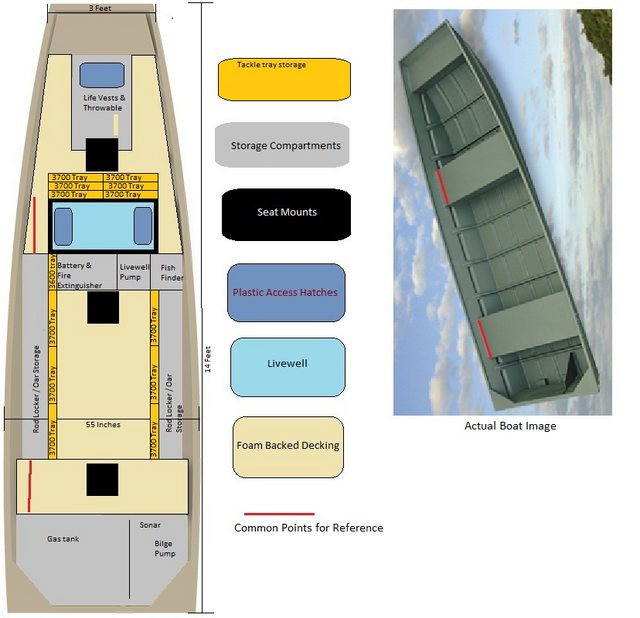
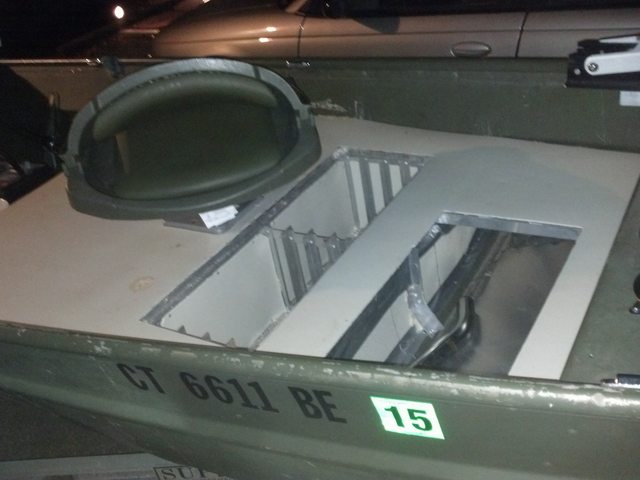
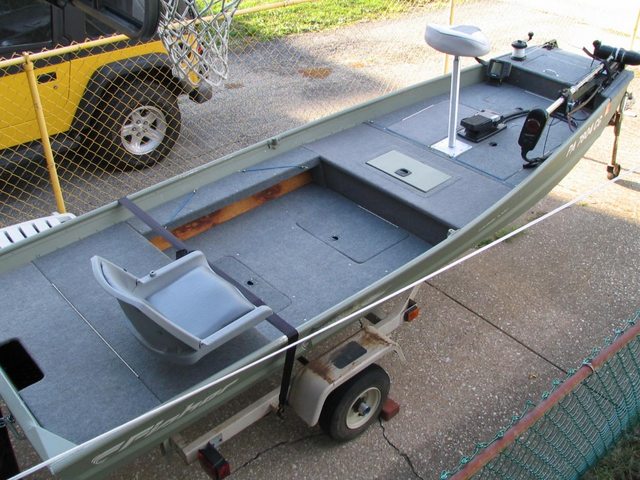
Finished product's decking layout will loosely resemble this - major differences being the side rod-lockers rather than shelves and the layout of the hatches / livewell & hardpoints for seats. I will use a hole-saw to cut through the middle and rear bench seats and install PVC tubes extending up under the bow flooring and through the rear bench to allow for storage of 2, possibly 3 clearances permitting, 7' rods on each side of the boat. I live in a remote area, so being able to lock the rods in the boat and not have to lug everything up and down the bank would be nice.

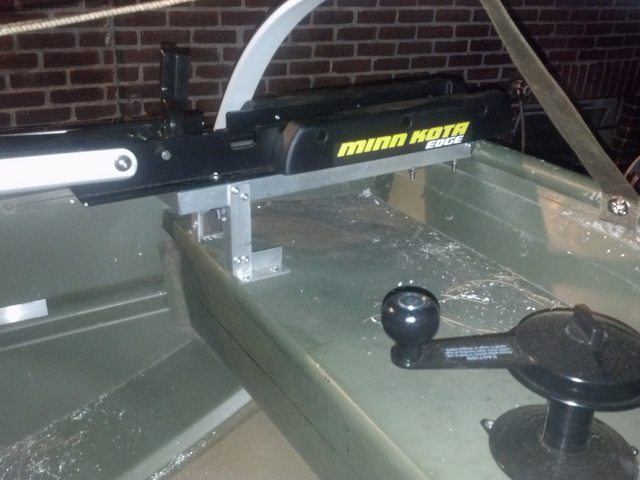
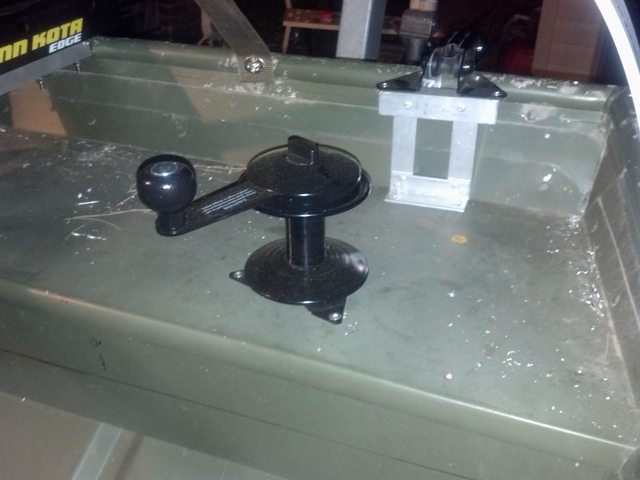
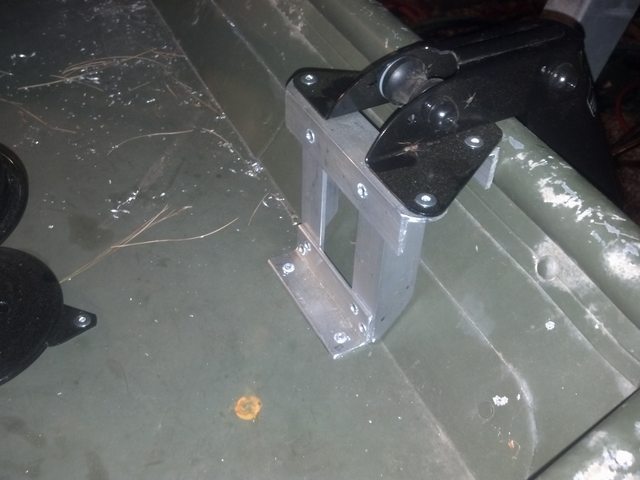
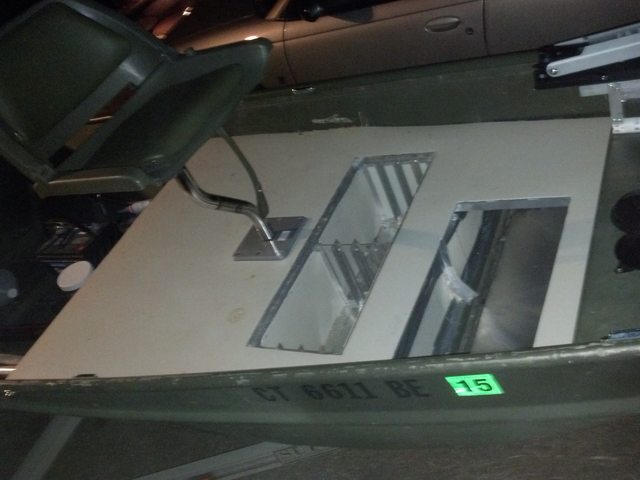
Also - my flooring between the aft and middle bench seats will be anchored flush to the top of the structural ribs - all other decking surfaces will be roughly 1/2" higher than the plane of the middle and rear bench seats - with a step up to the bow bench which will be topped with the trolling motor mount, anchor mate (mechanical) and receptacle for the 12" pole-mounted bow-light (for visibility clearance above the trolling motor when stowed.)

27tXO4ol.jpg


I apologize for not referencing this builder and giving them credit - I saved the image during my research and didn't save the source.
 
Livewell and forward tray rack are complete - rack actually fits 8 (4x2) 3700 trays rather than 6 in my rough schematic. Pics will have to wait for a day when I'm working on it during daylight hours. Getting ready to frame the rear bench and hatch over the gas tank area...nervous b/c there's very little clearance above the fuel line fitting to the underside of the hatch - I'll have to line the underside with aluminum chimney flashing with a bead of caulk down the joists to ensure even if gasoline splashed it cannot get to the polystyrene board above.
 
I'll be interested in seeing how your project goes. I have a platform built on the bottom of the upper section of my 14' between the middle seat and front "deck" and I am just so skeptical that it won't be extremely tippy when putting the deck that high above the water line.
 
While I'm fortunate that there isn't access for motor boats on the waterway behind my house I still didn't want to push my luck with elevating the front deck.

I wish I could have worked with something wider but the 1436 LT (base of 145lbs for my 2002 model) was the biggest size I could work with so that once I add the weight of the decking to it my brother & I can still carry over the barricade at the car-top launch. I'll have to run back and forth to add the trolling motor, battery, fuel tank & gas motor afterwards...and all our gear...but once it's in the river it'll stay for the season - so I want materials that can take a lot of exposure and still last me a long time (I'll cover it but it only protects so well.)

If it weren't for the fact that it will barely clear the fuel tank in the back and needs the ~1/2" foam backing for support I'd be level with the tops of the benches. Very lucky my father is an engineer - by his math this setup should save half the weight that I otherwise would have added using 1/8" aluminum angle and sheeting, with similar cost savings too.
 
Picked up a 50' roll of 10" wide thin gauge aluminum flashing from the roofing department at Lowes - I'm going to lay this beneath the foam under the main deck to keep any splashed gasoline from floating around and getting under the foam.

Also going to use it to reinforce the underside of all hatch covers which won't have the same support lattice as the rest of the decking (the rear hatch, rod lockers and hatch over the front tackle tray storage.)

Tackle tray rack used a piece of angled aluminum 1/2"x1/2"x8' and two pieces of 3/4"x3/4"x8' (all 1/16th thickness) cut as follows:

1/2" x 1/2" x 8'

2 pieces 29 1/4" long
4 pieces 9" long

3/4" x 3/4" x 8'

each piece cut into 10 9" sections for the vertical dividers between the trays (20 total)

I riveted a piece of the aluminum sheeting (cut to be 29 1/8" x 8 7/8" with a pair of tin-snips) to make a rectangular base bordered by the two 29" sections of 1/2" angle and two of the 9" sections forming the outer border of the rectangle. The rectangle was bisected by the remaining two pieces of 9" long 1/2" angle set back to back denoting the separation of the left and right trays. This formed 2 smaller rectangular sections the equivalent of 4 3700 trays standing on end. Then I riveted the 9" sections of 3/4" angle on end standing up to act as dividers between the trays creating the slots for each tray to sit in. These will ultimately be hung riveted to the floor supports outlining the cutout for this storage compartment.

Pics to come tonight. Now to work on framing the deck supports in the front of the boat - design change here - a friend found a stash of 1/8" thickness 1" x 1" aluminum angle in a barn he was hired to demolish so he brought it home and is allowing me to as much as I need...can't beat free so my latticed 1/16th support design won't get to prove itself on this boat...
 
Wow - I knew I was in for a project when the carb to the motor that came with my boat was in a child's beach-toy pail...figured no problem, $75 rebuild kit and I'm back in business...WRONG

Took a piece of general advice to heart, that being with any used outboard before you start it up, if you don't know the history - replace the impeller! Well, I did, and when I opened it up there was an EXTRA GASKET between the impeller housing and the face plate ( parts #28 & 33 on this diagram https://www.boats.net/parts/search/MercuryMarine/06535686/274/180/GEAR%20HOUSING%20%28DRIVER%20SHAFT%29/parts.html ) - mind you I'm not talking about the large O-ring seal for the housing - no - an entire sheet gasket which invariably was all chewed up and clogging up the outlet port from the water pump housing leading up to the motor. Add insult to injury - only one of the impeller washers was even there - and it was on the OUTSIDE of the impeller housing!!!!! On top of it all the bushings which align the impeller cover to the base plate were missing, and the housing looked as though it'd been hit with a hammer.

Somewhere, sadly, there is a person who put this together presumably thinking (and I use the term EXTREMELY lightly) they'd done this correctly... Considering there was a diagram with the correct order to assemble these parts along side the parts list...yike...some people are so dumb it's amazing their brains can keep their hearts beating.

Be ware - this mystery person has the right to VOTE!!!
 
Been a while since I updated - progress is SLOW - too my reality in my life.

I've got the front framing 80% done. I still need supports from the framing to the front bench seat (if you can call it that) to support my Tempress access hatch, along with more vertical load supports all around but on the whole it's taking shape. The tackle tray is in - though the hatch is yet to be completed. Seat mount is set in place but not secured yet until the decking is installed. I still need to attach the thin chimney flashing material to enclose the sides of the tray area and block out the expanding foam - for the money i deeply regret not purchasing one of the injection molded plastic tray liners such as this one:

https://www.amazon.com/Plano-Molding-974-StowAway-Organizer/dp/B000CRHD6K/ref=sr_1_cc_2?s=aps&ie=UTF8&qid=1400123066&sr=1-2-catcorr&keywords=plano+3700+rack

although it might not have fit in the tight confines of this space - as it was my home-grown version only has 1/4" clearance to the underside...oh well, making it is half the fun right? It'd better be - it took WAY too long...

1KSn18tl.jpg


While I was at it I setup the trolling motor mount

6C2OA36l.jpg


I flip-flopped the position of the tackle trays and the seat mount to give the seat mount a sturdier mounting position. I will be adding a second 45deg support to each side of the seat mount abutting the rib so the rivets won't be carrying load in shear. I will need similar supports for the sides of the tackle rack - then 4 vertical supports on the front cross-member. So much time spent cutting and grinding. The trickiest part to this project is figuring the order you need to attach the various pieces so that you have room to drill and get the rivet gun in there - I think I've drilled out 25% or more of the rivets I've installed.

Hooked up the anchormate:

QKE2eZ4l.jpg


KjJDKDYl.jpg


Hopefully the front decking will be done soon - need to run conduit through the sides and get the wiring for the trolling motor and fish finder set...the front is by far the most intricate part to the project - the rear deck will be much simpler - as will the rod lockers - OH which reminds me - I need to get pics but I found oars which have an aluminum tube with a plastic insert blade - I was able to make the plastic blades removable so they are retained by a hitch pin, but they come apart for easy below deck storage. I was pretty happy knowing I'll always have an emergency propulsion option available (I don't trust 2 strokes).
 
After the expanding foam set-up I realized I'd gone way too far with the aluminum angle up front - two trusses capping off the manufacturer's ribs level to the middle bench seat would have been fine. The FRP backed by 2# expanding marine urethane foam is like concrete - no flex what-so-ever. And it's super light. Had I just run the 2 trusses (as it's all I really needed) the aluminum would be the same as what I'd needed to use a conventional 1/2" plywood deck, but the plywood would have weighed 25lbs whereas the foam/FRP combination weighs 17lbs and stiffens the entire front of the boat. Cost works out to be about the same. I should have just set a pair of Plano 974 tray organizers flush with the deck surface rather than fabricate the tray slots myself.

I anchored the seat mount to the framing by first installing U-Nuts to the aluminum angle or into the rear bench(I've seen them called Fender Nuts, J-Nuts or Speed nuts online) which allows me to unscrew the seat plates if I ever needed to. I foamed the deck in separate stages - first blocking off the front cavity to be a storage bay with some FRP scraps sealed together with tape. I ran a hose down the center channel so the front can drain, and blocked the side channels with pieces of aluminum flashing tapped on so I can still run wires through there as needed. I foamed between the trays and the front compartment with a piece of scrap FRP capping the compartment (held down by hand pressure) so the excess foam would spill out to the sides of the trays - then I foamed the sides capping them to spill back into the area around the seat base. Lastly I glued down the FRP deck and filled the cavity below the seat mount with foam through a hole cut in the FRP which will be covered by the seat mount. All that's left to finish the front now is to primer & paint on the Tuff Coat rubberized top. This will give me traction and prevent the FRP from being exposed to any UV light.
 
My helper hard at work with the rivet gun:

MhKkQGdl.jpg


Then foaming the bays from the front back along the sides toward the rear (aft most-compartment incomplete):

Fxzwhewl.jpg


Beginning of the gluing down of the FRP:

zjUkzsXl.jpg


And finally with the deck surface (unpainted) installed:

yGwPAWzl.jpg


F9J3MSql.jpg


Now for a bit of fiberglass touch-up, install the tempress hatch for the front compartment, fabricate a hatch for the tackle tray and a shot of Tuff Coat and I'll be done with phase 1 - Phase 2 is the mid-deck, oar compartments and livewell.
 
For anyone interested - I weigh 240 lbs +/- and there is absolutely no flex in the FRP decking (bathroom wall board panel from Home Depot or Lowes) backed by the 2 lb density marine grade closed cell expanding urethane foam (from US Composits) And the best part is my wife and I could still easily lift the boat up off the trailer, once the two motors, gas tank, battery, and anchor were removed of course...
 
2lb expanding closed cell urethane from https://www.uscomposites.com/foam.html - Oh, and I ran a piece of 1/2 hose through the channels stamped in the floor from the rear compartment to the front so the front cavity can drain. You can see in one of the pics I've got a pair of vice-grips keeping the hose from getting pulled rearward.

Despite my efforts to block the foam from filling the channels it did spill through and fill them in. Had I not added this I would've been in big trouble the first time I took water over the bow.
 
how did front deck hold out great idea I been lookin into ways to raise front deck just worried about how stabile it is let me know im also using tempress hatch how easy is it to se up
 
excellent so far. Nice & stable - I'll get a video up when I can of me taking it out on the water. PM sent with more info on the hatch & framing.
 
I recently came into an 80lb thrust 24v bow-mount w/ foot control that I'm tempted to install in place of my traxxis/edge setup...apart from the weight of a heavier motor & extra battery does anyone have any reason why I wouldn't want to do this? I realize it'll be like a monkey F'ing a football on my boat, but the pond by my house is SOLID weeds - so the heavier chopping power will be nice.
 
Pulled the trigger & bought the quick release mount for the trolling motor and the prop to finish the rebuild on the motor itself. I need the release as this motor is considerably heavier than the 12v and would make carry-launching the boat a PITA. So tonight's plan is to run another wire under my front deck to feed 12v power to the bow light so I can send 24v through the trolling motor wiring (previously I had the bow drawing power off the trolling motor socket...) I've got to grab a momentary switch from radioshack for the bilge, even the small float switch isn't useful until the boat is **** near submerged.

I'm debating making a compartment in the middle bench to relocate the batteries so they'll be out of the way. I've added so much foam supporting my decks that emergency flotation is a non-issue. I've still got more to add to the floor space between the rear and middle benches. I'm constantly pulling trays out of my in-deck rack while fishing so the material I had for making a cover for it would probably be better spent making a cover for a motor compartment instead.

Other than that, I decided I'm going to build a support frame with three seat mounts (one centered for fishing, the other two equidistant to the sides for riding) forward of the rear bench seat so I can install the livewell in the bench. I found having both people sit on the rear bench while under way on the gas motor the boat rides much higher on the plane & runs faster and smoother through the waves. This made long runs up the river much more comfortable.
 
With a live well in the rear bench, plus 2 seats plus motor etc. is that going to be too much weight in the rear? :wink:
 
I'm going this route as I found when the 2 people in the boat sit on the rear bench it planes better - I will have 2 size 29 batteries in the middle bench and a 80# trolling motor up front - so it's not like there isn't any weight forward.

I don't like the idea of batteries that far forward, but they'll weigh less than a full livewell - and I don't want to give up what little floor space I've got in a 14' boat. Plus this way I can use 3/4" square tubes for the rear seat frames and run them across the top of the rear bench livewell (parallel to the keel line) to support a deck above. I was struggling trying to design support for the floor that keeps a low profile but would be strong enough to allow me to cut from the top down into the bench to install the livewell. I'll need some foam boards under there too, but I should be able to get it together. I'm filling underneath the seat framing with expanding foam to replace what I'm taking out of the bench seat.

Materials ordered yesterday - should be here in time for the weekend.
 

Latest posts

Top