1542 MonArk - WingClipper

TinBoats.net

Help Support TinBoats.net:

This site may earn a commission from merchant affiliate links, including eBay, Amazon, and others.

derekdiruz

Well-known member
Joined
Jan 6, 2015
Messages
272
Reaction score
0
Hey everyone, thought I'd share progress of my most recent build. Sold my last boat, the 14ft v bottom. With that, I learned a lot, but I didn't care much for the shallow V versus a flat bottom, and with the sale of the boat and trailer, I about traded even for my current boat after purchasing this.

It's a 1542 flat bottom, riveted hull, with oh so many rivets. It's beat up, has seen better days, but I'm hopeful in that I can restore it like many I've seen here. Having owned it for a few months, today and yesterday I started my build. I began with the trailer. I retrofitted the current boat to my old trailer, as it was in much nicer shape than the other trailer that the flat bottom had come on. New bunks, new winch (as the old one was shot), and a new bow stop, and bada-bing, now I'm ready to roll.

Today I then began with the actual hull of the boat. I tore down the transom, because the old wood was SHOT. For the love of God, the wood was held in place with SO many bolts; and every single bolt had SO much putty or JB weld or whatever else on both sides. Therefore, it took way too long. Finally though, after grinding welds and rivets off, I've managed to get it apart. My close friend will be welding closed most of the holes, and rewelding the corner braces on.

My plans are for a completely aluminum transom, though that may change. I've been swaying that direction, but I guess I could do wood again like I did on my previous boat. I just don't want it to be insanely difficult like this was to remove when it rots. Fun fact, there were three big plates of aluminum on the transom, two on the outside, one on the inside. See pics attached. All plates were 3/8". I doubt they'll be going back on because they looked to be non OEM.


My plans for this boat include:
-New Transom
-Rear Bench turned into a gun box/battery box
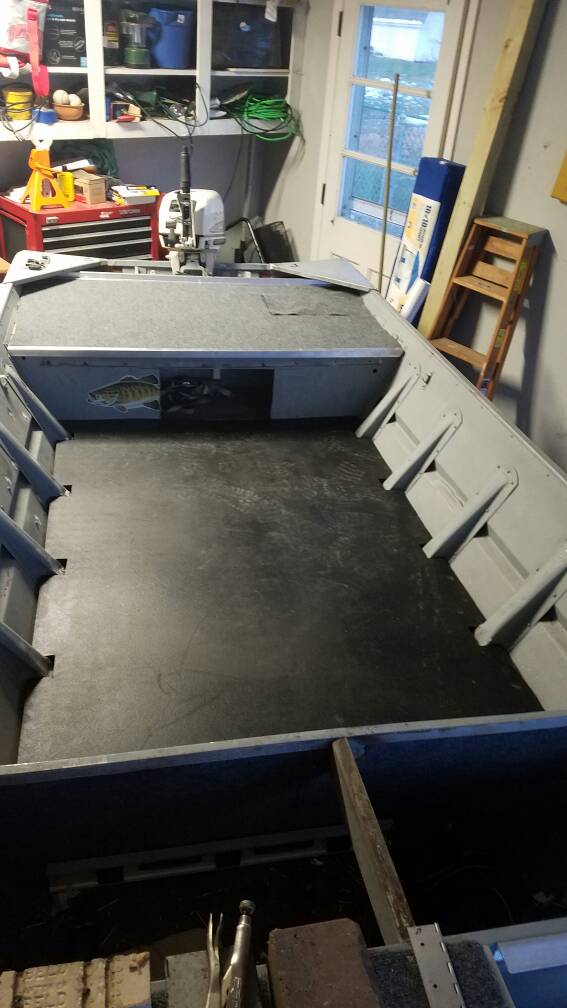
-Big wide open Aluminum Floor
-Front bench turned into large deck to the front
-reattach bow mount electric motor
-9.9 outboard or 8hp longshaft motor (not sure how much I would need a longshaft/surface drive vs. normal outboard)
-Steelflex
-lighting, etc.
 

Attachments

  • 20170120_161159.jpg
    20170120_161159.jpg
    66.2 KB · Views: 2,935
  • 20170120_162653.jpg
    20170120_162653.jpg
    51 KB · Views: 2,935
  • 20170120_164803.jpg
    20170120_164803.jpg
    46.9 KB · Views: 2,935
  • 20170120_172435.jpg
    20170120_172435.jpg
    75.3 KB · Views: 2,935
Finished gutting the boat completely today. Also figured out my design I think. I was glad to see that when I pulled most of the stuff out, that I'd be able to reuse plenty of the hinges on the current hatches (on the bench seats), and also that things would work out very conveniently.

Here's a picture of what I'm thinking. The rear deck will be roughly 54x33 while the front will be roughly 64x54. Both are quite a bit bigger than what I had expected, and I'm very excited for the space. Finally I'll be able to walk around on a deck while my girlfriend hog up the front! Lol. It'll also fare quite well with duck hunting. A blind will be coming for the winter, much after this is completed.
 

Attachments

  • 20170121_170336.jpg
    20170121_170336.jpg
    35.7 KB · Views: 2,851
c5d5a3e5e6dd3ce15c8a99653f8020cb.jpg


Got the new transom installed today. I hate doing these because it's sit and wait for sealant to dry. I did the old timers formula for 3 coats all around followed by 2 coats of just spar varnish. First time using the old timers formula so I'm interested to see it in action. Previously I've just done 2 coats or so of spar varnish.

Also I got in some solid rivets. I'll be replacing the rivets on the bottom that were previously replaced with small hex bolts and nuts. Fortunately I believe there's only 4 or 5 of them, but tons of little holes above the waterline that will get a rivet in them as well. Then, steel flex time with coat it inside. It's difficult to find time to do this with school and crappy north east Ohio weather, but it'll get applied in a week or so. After all the stuff is done, it'll finally be time to deck it out. I believe I'll change a bit of how it'll be laid out, styling it a bit more towards fishing rather than hunting. I've come to this conclusion because I don't spend much time in the boat for duck hunting, but I spend all day in it fishing!

Also, another thing I'd been doing lately was searching for a bigger motor. I have a 6hp motor that will suffice to push me around for now, but I've been intending to sell it to fund a newer 9.9 or so. Also considering building a surface drive for it.

More updates to come.

Sent from my SM-G930V using Tapatalk
 
54d9f2cbcb9ab54d26130fb54d71d922.jpg
4fb550cbafaa9662c3d16e618f6daa90.jpg
ac7337f41d8bc2a8b7c3eb26d93018e0.jpg


Spent the entire morning grinding every rivet there was.. I'd guess there were roughly 75 covered in what looks to be jb weld. Took a wire brush and took it all off, then filled the boat with water. To my surprise, only 4 leaked.. 1 rivet, and 3 small bolts that replaced a rivet at some point. Also found a 2 inch long by about 1/2 inch hole in the rear near the transom that was covered with bondo?

It will be visiting the welder next week to have everything sealed up. So far, I'm very impressed. I initially thought that with as much jb weld on the bottom as there was, I'd have 100 rivets to fix.

Steel flex has also been ordered. I got 1 gallon of regular with 4oz of olive drab. That will go on the boat next weekend if time permits then the week after I'll likely put coat it on the interior seams. Then, finally, I can build the interior. This boat will be 100% watertight and I'll have peace of mind knowing so.

Sent from my SM-G930V using Tapatalk
 
Been down the rivet lane before. Do yourself a favor, if a rivet is even questionable go ahead and re-buck it now. While you've already sanded around each one, if you want that piece of mind I'd do every one. I know it sounds like a lot of work, and it is but 2 people could buck every rivet in that boat In a day. That plus the steel flex, you will have a dry boat.

I always liked the old Monarks, built like tanks, Look at the knee braces, they don't build um like that anymore! Looking forward to the finished product.
 
Thanks. Every rivet that didn't look perfect I tapped with the gun. I'm confident on it now, just hope that I can get it welded this week so the weekend I can apply steel flex

Sent from my SM-G930V using Tapatalk
 
099978d03fcb28f618b155cd4e1ad5e5.jpg


Boat is at the welder now. Coming back in an hour. I'll be getting all the dumb little odds and ends welded up today, then steel flex is going on this afternoon. I've got the garage heated to 80 degrees, ready to roll! Things are going smoothly and progress is being made despite the 40 degree weather in northeast Ohio

Sent from my SM-G930V using Tapatalk
5d81bd6b4c887250b7962554daee88dc.jpg
 
Got the steelflex applied today! This stuff was a freaking mess and difficult to work with, however for 70 bucks how can I complain.
f85ef2bc45ad2747bd6f5b7b8904b222.jpg
f8d8c2840674e30ee12db634c38ee35d.jpg
be86bc9352dba56980301450b4bada3e.jpg
f7db7b0d5a509c5c8eb01af906344f7b.jpg
d97d64cc090bd03b5e17784623ca57a3.jpg


Sent from my SM-G930V using Tapatalk
 
Question for everyone, before I put the boat back on the trailer is it alright to do so when the coating is still semi tacky? The steelflex is quite solid, however when touching it my fingers will slightly stick to it, like when skin sticks together haha. I'm afraid that it'll be damaged from the carpet on the bunks. Also, when I poured a small amount of water on it, after 15 or so seconds the spot became cloudy, then I wiped off the water and the spot was now more tacky to the touch than before.

Should the coating be 100% un tacky and solid prior to the trailer?

I did the boat in my garage, at 77 degrees. The garage stayed about 75 degrees for the 1st 12 hours after application, then gradually dipped down to about 55 where it stayed for another 24 hours. Did the temperature affect something? Also when applying I was not formal in measuring the pigment added. I spilled about 1/4 of the pigment and used about half of the remaining for the full gallon of mixture.

Sent from my SM-G930V using Tapatalk
 
Just finished framing the rear deck. I'll be adding a single hatch for a gas tank in the port side behind the existing bench. Otherwise, I'm going to cut the side of the front of the bench to open below the deck for throwing quick items there. Tonight, or maybe Sunday, I'll continue working on the rear deck, and when that's concluded I'll begin on the front! ...at least that's the plan! I'm still struggling with how exactly I want to lay out the front, but I'm thinking it'll just end up being framed over the existing benches, sort of like the rear deck.

With the back corners of the framing near the transom I had to get creative... I really didn't want to put holes in the hull, but, ended up drilling four.. ah well.


The angle used is 1.5x1.5 1/8" wall 6063. I've got about 20ft of 1x1 1/8" wall left from a previous project, so that'll tie in somewhere. All in all, 50ft of the 1.5" angle and 20ft of 1.5" 1/8" bar stock was purchased today and cost me only $80. Pretty happy considering that I've got plenty of 1/8" sheet left over to do the rear deck. Only things left to purchase are two more sheets of 4x8' 1/8" sheet for the floor and the front deck, and about 1000 more rivets.
 

Attachments

  • Aluminum Angle.jpg
    Aluminum Angle.jpg
    44 KB · Views: 2,530
  • rear deck framing 2.jpg
    rear deck framing 2.jpg
    48.4 KB · Views: 2,530
  • rear deck framing 3.jpg
    rear deck framing 3.jpg
    52.9 KB · Views: 2,530
e4c1b31625ad9a7a966aa002093fb256.jpg


Got some framing done up front. Will be adding more cross beams for the hatches and such. Hoping to have the decks cut this weekend if time permits. Will be painting next week, I think.

Sent from my SM-G930V using Tapatalk
 
with the steelflex, were you able to see what the color was going to look like before you applied it?
and did you have any left over?
 
The color looked exactly the same pretty much as the pigment. I didn't see the pigment though until I opened it.

I had some left over, but I mixed it in two batches, half and half. The left over amount was about 1/4 of the total amount and I just pitched it since it was already mixed. Being 73 dollars to my doorstep, I wasn't worried with trying to save any. Also, I put on a single very thick coat.

For any other time I use this product, I'll use a spatula to spread it. It was miserable with a foam roller even and all I did was push it around. Something solid like a spatula or scraper would have been easier.


I wouldn't go less than a gallon kit for a boat this size though. But with a 12ft boat I would consider a quart kit.


Sent from my SM-G930V using Tapatalk
 
60928c7dfe1d84a6245ef9ee3c296701.jpg


Got the rear deck cut and in place. Used a jig saw to cut the plate, and used .125 plate. So far I'm loving it, and it's structurally perfect. Super solid! I laid carpet too, but no pics of the glue drying.

Front deck, floor and paint to come tomorrow, I hope!

Also, you can see my new power on the rear end too! Scored a 2000 Johnson 9.9 this evening from a local for 800 bucks. I'm anxious to get this thing on the water and cruise!


Sent from my SM-G930V using Tapatalk
 
d6be042308760cc3c1b71d2f16c06222.jpg
35c54f6238fdac68b503e05de0655438.jpg


Today's update:

As you can see in the first pic, the back deck is done. All that's left is a little bit of finishing touches around the hatch that's there (i.e. gluing carpet and fitting the lid better), as well as widening the opening below the bench. The floor was put in today too, it's a 1/2" horse stall mat from tractor Supply with pink insulation foam below. I saw it on YouTube and loved the idea for how simple it'd be to clean from hunting. So far, it looks like it'll be a winner but dang was it a pain to cut to size lol.

The second pic shows the front deck. The side with everything piled up is one hatch that's been cut and glued. The other hatch was also cut and glued but is on the floor drying. Tomorrow will come the other, and final hatch, over the existing bench. That area will also house the battery and switch panel at some point. The trolling motor will likely go back on soon too! Cannot wait to get it out, but it's finally looking usable and not filled with crap.

Sent from my SM-G930V using Tapatalk
 
Finally got some weather above freezing to install the final hatch lids this morning! The boat, is finally looking like a boat again, and just in time: NE Ohio is supposed to be 60 this weekend with light rain, so needless to say I'll be out if I can!

The decks are primarily done. There are gaps that I need to fill with carpeted aluminum to the sides of the deck, as you may be able to see. Also, I have to paint the boat, and grind a few spots still, and that'll come likely tomorrow or this weekend. And, I have to frame a few tiny spots and add finishing aluminum, just for looks. Lastly, install the front trolling motor; I simply placed it for pictures this morning.

I have a friend helping me with electrical, as I know nothing about it. There will be a four switch panel, with LED lights in the floor and hatches. Also, depth finder, TM, and Bilge. I did pick up a 40lb minn kota for the transom, in the event that I want to fish a few of the local electric only lakes too, it was free and lightly used!

Apologies for my rambling and jumbled thoughts. Enjoy the pics.
 

Attachments

  • Bow Overview.jpg
    Bow Overview.jpg
    61.6 KB · Views: 1,355
  • Hatches Closed.jpg
    Hatches Closed.jpg
    60.6 KB · Views: 1,355
  • Hatches open.jpg
    Hatches open.jpg
    59.3 KB · Views: 1,355
  • Overview Decks Finished.jpg
    Overview Decks Finished.jpg
    63.8 KB · Views: 1,355
  • Transom Overview.jpg
    Transom Overview.jpg
    53.5 KB · Views: 1,355
15853920ecd12b745e3678ebd9d03299.jpg
8eea5cdac83b92cf79f5af431031b827.jpg


Got the front and rear pedestals cut and in place. I still have yet to drill and bolt them down, but for now they're in place. Also, I got the trolling motor reinstalled. Everything needs painted up, so don't judge yet, but overall it's starting to look like a comfortable fishing boat again! Northeast Ohio has given me some beautiful weather to work with, so I took advantage. Hoping to register her this week and hit the water next weekend!

Sent from my SM-G930V using Tapatalk
 
Thank you. I have the completely installed the pedestals now, and I added two cup holders...the most important touch to add to the boat lol. This week I intend to foam out every inch I can, fill the gap on the decks, add electrical, and prep for paint.

Sent from my SM-G930V using Tapatalk
 

Latest posts

Top