Alumacraft MV1448 Seadoo IB jet, Still jetting

TinBoats.net

Help Support TinBoats.net:

This site may earn a commission from merchant affiliate links, including eBay, Amazon, and others.

Ranchero50

Well-known member
Joined
Apr 29, 2009
Messages
1,651
Reaction score
1
Location
Hagerstown MD
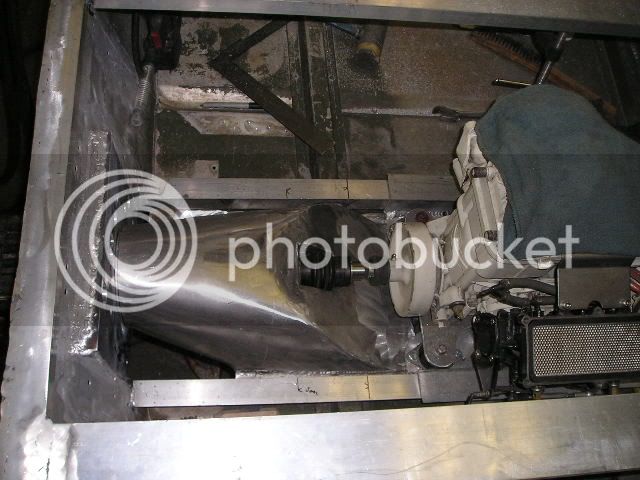
Hey guys, first post. Got an invite to post my seadoo conversion as a thread here from one of your members. I bought a '92 Alumacraft MV1448 hull that was converted to a decent bass boat, 9.9 merc prop, 33lb Minn Kota trolling motor, decents seats etc. last July 4th to fish the Potomac River around Washington County, Maryland. The river is shallow so a prop boat doesn't go very far. A couple months before getting the 1448 I had a '95 Seadoo XP given to me to play with (no title, missing peices)... I have a early '90's Bridgeport CNC vertical machining center in my garage to make the cool parts and an aluminum spool gun for my Miller 210 to put stuff together. Taking a 1448 and turning it into a 1648 with an 85hp IB jet. I did the boat build on riversmallies.com which is hard to view without being a member. Here's a link to the build on PWC today where I went for the motor info and put the rest of the build up for their pleasure.

So, grab some popcorn, relax and enjoy.

Basic link; https://pwctoday.com/f15/seadoo-powered-bass-boat-210903.html

If requested I'll copy and repost either thread here.

Teaser...
P1010102.jpg~original


Thanks,
Jamie
 
OK, from the beginning, dated 3-22. I'll try to flesh this out this weekend as I get time.


Decided last summer to do this to my boat after having a 1995 Seadoo XP given to me as dead. Spent the last month getting the motor up and running. Missing the starter, exhaust, and the flywheel was broken free from the hub so the timing was a bit off. Motor is a Rotax 720, 718cc two cylinder two stroke, oil injected 85hp beast. Pump is a 140mm with vertical trim stability. No reverse though...

Boat is a basic MV1448 Alumacraft that the PO wooded down pretty heavy that had a Merc 9.9 that struggled to get it on plane.

Oldest son Matt taking the rear swivel seat off. He wanted to go fishing instead of work on it...
P1010039.jpg~original


The water lines show 7-8" at rest as it was. Hope to lose an inch in the water when done.
P1010040.jpg~original


We stripped thirty odd lake and state stickers off the sides from the PO and then polished it out last summer. Note the ramp skis too. I have some fenders from a 55 gallon plastic drum to install sometime too.
P1010041.jpg~original


Two hours later... Removed 100 odd deck screws (the wood kind) to get the old wet plywood and composite boards up and gone. Used a flap wheel on a grinder to buzz the rivet heads off for the rear bunk seat and got it out of the way.
P1010042.jpg~original


Only real limit on where the controls go is the steering cable from the Doo. I have 59" from the pump flang to play with. I want to fab up a mini center console and mount it to the back of middle bunk similiar to Kory's setup. I can do a universal and steering shaft to the floor and keep the cable out of the way. Planning on using an old go cart wheel for steering and a custom throttle setup. Of course I had to put the seat in and make motor noises to see how it'll 'feel' when done.
P1010043.jpg~original


Pump mocked in place. I have a 1" thick junk chunk of aluminum to make the mounting flange out of. I have a CNC mill in the garage to make the custom parts.
P1010044.jpg~original


I'm going to use the original Doo water box muffler in the back corner to keep it somewhat quiet. Just need a 2" 90` bent chunk of 304 stainless and some clamps.
P1010045.jpg~original


I'm going to reuse the stock tank since it has a level gauge and reserve switch. I have all the guages and even a tach from eBay for this.
P1010046.jpg~original


More to come. Hope to have it in the water towards the end of April. Then I want to strip the front half and redo it too.

Jamie
 
From 3-24. Some of the text is wierd because I didn't put in others comments.

Mocked Kory's old console up to the back of the middle bench on top of a 6x6 chunk of wood this afternoon. Figured out where the seat would fit best and it turns out it's on the front edge of the motor cover so my oldest and I ended up cutting the old back bench in half to act as the front ledge of the engine cover / rear deck. Made some quick measurements so I can buy some metal in the morning.

Making engine sounds with the console mocked up. Funny how small a 14' boat looks when you're sitting in it, especially with the 15" sides.
P1010050.jpg~original


P1010051.jpg~original


Standing up it's almost manageable, kind of hard being 6'8" too.
P1010052.jpg~original


We ended up sitting the seat section on top of the rib to get the deck height the same as the transom. When finished it'll have an overhang and possibly floatation pods around the pump assy to save it from the rocks etc.
P1010053.jpg~original


I did start the program for the pump flange this evening, but made the file name to long and ended up losing the whole dang thing so maybe tomorrow. I also snagged a 1/4" chunk of aluminum for the motor plate.

Jamie
 
3-25...

Today I did manage to get the mill program setup and cutting some of the old composite wood the PO used for the boat.

Most of the ports worked out, the water drain is on the wrong side, needs to go over by the steering cable and the big port on the top for the vertical trim system needs moved over some more so it'll bolts up.
P1010055.jpg~original


P1010056.jpg~original


P1010057.jpg~original


P1010058.jpg~original


It's supposed to rain tomorrow so I'll probably put a 302 together for a guy instead of play with the boat. I did get most of the aluminum for the rear deck frame. I need to get the garage emptied out to bring the boat in anyways.

Jamie
 
3-26

Fine tuned the program today and transferred the template to the peice of 3/4" scrap I have. Had to flip the template around to avoid some holes already in the metal...

The center bolt holds the puck once the mill cuts it out completely.
P1010059.jpg~original


Cut out...
P1010062.jpg~original


Mocked back up. Everything fit really well and I' really happy with the part.
P1010063.jpg~original


P1010064.jpg~original


P1010065.jpg~original


Tomorrow if I get some time I'll trim the excess material off and start thinking about the transom install. I kind of want to remove all the wood out of the transom, but it's not bothering anyone and I think it'll make the boat stronger in the end. Opinions?

Jamie
 
Further along. Morning was invested in finishing the pump flange plate. Spent part of the afternoon getting the transom stripped out, then my boy got home from school and we stripped out the front of the boat. Finally dropped in the motor and mocked some angle for motor mounts and finally trimmed out the transom for the flange install.

Virgin metal, light as it'll ever be. We picked it up off the trailer it's so light stripped down.
P1010066.jpg~original


P1010067.jpg~original


Four little motor mounts are around 1" tall and need sandwiched between the motor plate and the hull framework. The new stringers will be recessed 1/2" into the ribs and gussets fabbed and welded in to make the new floor supports.
P1010068.jpg~original


I'm going to reuse the green angle brackets on the transom. The motor is in the right spot, just need to come up 1/2" to clear the bottom.
P1010069.jpg~original


Basic idea for the flange was to mark the opening with the flange plate, then draw some diagonals from the middle of each vertical mark to the top and bottom line 1" in so the port side looked like a 'K' and the other a mirrored 'K'. Idea was to bend the flaps in on top and out on the bottom so the side flaps would make a plate that would line up vertically and darned if it didn't actually work out. I cut the top 1/2" below the mark and bent that flap in and it worked out pretty good. I have two wood screws holding the flange in in the pictures. Little hammer and dolly work and it's a lot further than I expected today.
P1010070.jpg~original


One thing I may do is drill and tap the bottom corners of the flange plate for drains. I need to make a precision alignment shaft Sunday too before I weld the flange plate in. Tomorrow I may start welding fitting the frame sections and mocking all that stuff up.

As always, more to come.
 
3-28...

For the pump flange I actually reverse engineered it using the mill to plot the X,Y coordinates of each hole in relation to the impeller centerline.

Pretty cool little tool, shows deflection between the mill spindle and the probed hole. All the holes were plotted down to .010"
P1010033.jpg~original


For the welding I have a spool gun for my miller 210. It's not a nice as a push pull production setup or as finicky as a Tig. I only hope it does well on the thinner stuff because momma don't want to hear about needing a $2500 Tig to finish the boat...

All the parts are from the ski, they just lined up really well so far. Only real concern right now is the steering cable because if I keep everything on the floor it may seep water. On the good side, this thing has twin eductors to draw any water in the hull out while running the jet.

For progress I'm working on the motor base plate CAD/CAM program now and may run it this evening. I have to work tomorrow...

Jamie
 
3-28 ...

Went ahead and made the motor plate this evening. Doesn't look like much but it took forever to program the slots in G-code. Should work out well. It does hit two spots on the motor so I need to tune it in a little.

P1010071.jpg~original


Jamie
 
4-2...

Another small update. Spent some time tonight playing with the mill and did the stringer notches so they'll sit down 5/8" over the ribs so the floor will be flat.


The mill has clean out doors on each side so I removed them and ran the part through the machine. Each notch took a minute to mill out and fit the boat really well.
P1010072.jpg~original


Mocked in place. the 2" angle sits flat all the way across.
P1010073.jpg~original


Finally, motor plates vs the new stringer. I need to make up the difference, then do a preliminary alignment before welding everything together.
P1010074.jpg~original


Maybe tomorrow I'll power up the welder and start tacking things together.

Jamie
 
4-3-09...

Motor frame plate finished up. Ended up trimming the angle so it was .55" shorter on one end. Made the angle finder show a 1` up towards the front which matched the driveshaft and pump flange. Now I can fine tune the alignment between the saddle and the stringers. it actually turned out pretty good once I remembered how to weld aluminum with a spool gun...

P1010076.jpg~original


I also mocked up and welded the console stands onto the middle bench. Ran a couple wood screws to hold the console on and it really feels sturdy. The stringers are welded in along with the front angle for the floor.
P1010077.jpg~original


Finally tonight I zipped in the pump flange to the transom. It still flexes a little but now I don't have to worry about it falling out while fitting the pump inlet and grate setup.

It was a good day,
Jamie
 
4-3-09

'nother day in the garage. Spent a good part of the morning playing with a big electrical heat sink (8" x9"), may be turning it into the first inlet grate.

A couple pics showing what was accomplished this evening. Filled some of the hull rivet holes from the back seat and started installing the deck framing. Figured out that the drivers seat was going to hit the expansion pipe so I fabbed a little extension for it to sit on.
P1010078.jpg~original


The long 'U' shaped frames are going where they're sitting to extend the deck out over the original transom.
P1010079.jpg~original


Mocked the electrical box into position. It'll sit on a little platform in front of the motor. I also mocked the gas tank in place and of course the fuel level thingie is real close to the deck height so I'll either make a new setup or come up with a bunch of 90's to keep the hoses from kinking.
P1010080.jpg~original


Most of the cockpit floor framing is done too. I used some of the extruded stuff like I mounted the console with that I scrounged and cut it in half length wise because each half has the correct bend for the floor and side panels to screw into. For the outside deck angles I just welded the bottom lip so they sat flat where the deck will go.
P1010081.jpg~original


I'm not sure what I'll work on tomorrow, I'm pretty whooped now so I may take a day off from the boat and get some other projects closer to being done. We'll see...

Jamie
 
4-11-09

Another small update since the server crash...

Spent some time getting the transom cap and corner braces removed, welded some more frame sections in and finally made the fuel selector plate and mounted it on the front bulkhead of the rear deck. Made a recess out of 1" angle and left the top chunk missing so I could put a green light up above the switches that will shine down on the floor at night, but not be visible, so no glare from the bulb. Did the same on the port side.
P1010082.jpg~original


I also welded in a plate for the electrical box to mount to and started on the fuel and oil tank installation. I made a plate for the fuel and oil fills to mount in and have to mount it to the side of the hull above the decking. I'm thinking about fabbing a 2" stainless pipe for the fuel fill and just mounting the oil tank below the oil fill. So many little things to think about...
P1010083.jpg~original


More to come, still looking to splash it by the end of the month. I have a seven off next week so I hope to get the hull tunnel work done and get it painted.

Jamie
 
4-17-09

Finally got back into the boat. Spent the day actually finishing a 302 build for a guy. Went out and spent $380 on three sheets of aluminum (two .063 x48 x96" and one .80 x48 x120") and some flat stock to do the access doors.

And I did the top half of the pump inlet...

Basic shape on an old peice of salvaged conveyor section.
P1010084.jpg~original


Very basic hammer and dolly work. The hammer was a 3lb dead blow and the dolly was a chunk of 2" galvanized pipe held in the vise. Hold the plate against the pipe and hit just above the centerline of the pipe while pushing on the top of the plate.
P1010085.jpg~original


A bale or rags were used as a cushion to pound the pump radius into the metal. Same deal, put some pressure on it and whack where you want the curves.
P1010086.jpg~original


The bottom edge had to be trimmed around 2" to get the correct fit around the impellor. Same deal in the back, just traced around a spray can cap to get the whole works about 2" further back. All the saw work was done with a sawzall with a 10" metal blade.
P1010087.jpg~original


Welded and sanded. Actually welded it inside and out, then cut the side tabs off and sanded the rest smooth with a flap wheel. Turned out pretty decent. I'm going to elininate a good bit of the center strake when finished.
P1010088.jpg~original


Still have around 1/4" of motor plate clearance.
P1010089.jpg~original


Motor in place. It's wide in the front to allow for a pretty big grate / grill.
P1010090.jpg~original


I may end up putting a second wall inside to reduce the angle at the front of the tunnel and give the seal pipe another wall to be welded too.
P1010091.jpg~original


I'd like to have the inlet done by the weekend.

More to come.
Jamie
 
4-18-09

Inlet round 2...

Spent most of the day working on everything except the boat. Finally after super this evening I tore back into the inlet. Decided to do the grate framework with some 1" angle. Then I decided to use the existing walls to wrap around the impellor inlet instead of make a new peice that would have to fit really well to be welded in. I needed something that was 5.5" in diameter to hammer form the aluminum walls to. Ended up throwing a chunk of 2"x8" into the mill and made a plug. Held the plug with a big F clamp, then formed the walls around it and finally marked the plug where the walls ended up to make the bottom of the ring.

P1010092.jpg~original


P1010093.jpg~original


Using the form from the ring I transferred that to a 12" x 3" peice of scrap conveyor and bandsaw cut it and then formed it around the plug and butt welded everything together.
P1010094.jpg~original


P1010095.jpg~original


I hope to spend more than three hours on it tomorrow.

Jamie
 
4-20-09

Pump inlet round IV

Working on the shaft seal now. Had cutout the inlet with a 2.5" hole saw, then elong it so 'U' shaped piece of metal would sit in and then made a end cap on the mill this morning and finally welded everything together and mocked it in place. Notice all the metal dust on the rag in the first picture... Lots of grinding.

P1010100.jpg~original


P1010101.jpg~original


P1010102.jpg~original


P1010103.jpg~original


This evening I hope to notch the front of the inlet under the shaft seal and put another chunk of 1" angle in there to act as a receptical for the front of the rock grate. I really truely hope to have it welded in tomorrow, but I may make the rock grate first while it's still out. Then flip the boat and finish the hull welding.

Jamie
 
4-21-09

Upside down pics, flipped it over this morning with a rope through the bow eye and me in the back, very light hull.

P1010104.jpg~original


P1010105.jpg~original


I'm about done the pump setup for now. I want to flip the boat end for end so I can extend the nose out some more before flipping it back upright. The welder works so much better with shielding gas. I can't believe I didn't troubleshoot it earlier...

Jamie
 
Yes, just as soon as the cloning machine shows up and I can double the size of my garage...

Nose Job, Round I

Why? Because the PO liked to ram the trailer winch head bumper with the bow, denting it and eventually cracking the metal out. And I like the long pointy nose that Triton puts on there boats. I hope it helps keep the trolling motor out of my face and get some more weight forward.

Original stuff. Pictures are from the same angle to show the difference.
P1010106.jpg~original


P1010107.jpg~original


1" angle welded into the center strake from the pump inlet to the tip of the new bow.
P1010108.jpg~original


12" longer
P1010109.jpg~original


Sanding dust from the original noses welds.
P1010110.jpg~original


Some scrap pieces of round stock welded in place. For the height fit I just kept looking down the sides of the rub rails and moving the stands until everything looked straight.
P1010111.jpg~original


P1010112.jpg~original


In the morning I intend to flip the boat back over and make sure I like the nose like this, then skin it out. May end up with some adjustable headlamps in the new nose too since I like to fish after dark...

More to come.
Jamie
 
4-22-09

Nose Job Round II

Measured the lengths I needed for the skins and plotted them out on a sheet of graph paper, scaled them up on the sheet of .080" on a couple skids and cut them out with a Skillsaw. Little loud, but it cut like butter and had a nice finish in the cut.
P1010113.jpg~original


From the drivers seat. Once the center console is back in the bow will dissapear.
P1010114.jpg~original


From the side, notice the mill fixture I used to hold the sheets to do the bends. Hammer and dolly work, again.
P1010115.jpg~original


Nose shot
P1010116.jpg~original


Of course I ran out of wire when doing the port side so I need to finish that up and then flip the boat to perimeter weld the panels in. Overall it was pretty painless mod. I trial fit the trolling motor and I'm still not sure where it's going to end up. I may just shove it over against the port side to get it out of the way. PITA.

I have to work through Sunday so check back Monday for more.

Jamie

Oh yeah, comments welcome (feel like I'm talking to myself...)
 
Top