1956 Evinrude Lark 30 HP Tear down

TinBoats.net

Help Support TinBoats.net:

This site may earn a commission from merchant affiliate links, including eBay, Amazon, and others.
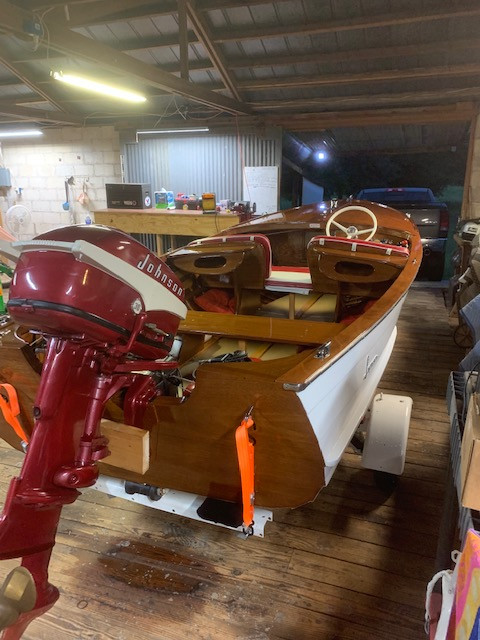
Hello boys! Remember me? I’M BAAACK!!!

1696832159083.jpeg

Sorry, stupid movie reference lol. It’s been 2 years since I was on this thread but in the last month or so I have purchased a new (to me) boat! I have a 1957 Alumacraft “Deep C” that this old Lark will be gracing the back of. That said I am back at it with this old motor. I’ve been posting quite a bit on the AOMCI Facebook page and gotten some good help (some of it from some of you)! Problem with Facebook is that there is no archive to go back and reread the good advice that has been given. So here I am yet again.

Today I started rebuilding the gear box. A member on the FB page gave me a sweet deal on the lower unit seal kit and a full ignition kit. I got the drive shaft put back together and it’s just sitting in the lower half of the gearcase. Tomorrow I will get it into the actual lower unit. Question…how much of the old marine grease needs to be cleaned out of the lower unit before I put it back together? Will leaving it there hurt anything?

Another question…what will be the best way to seat the new shift rod o-ring and bushing? I attempted to get them in today but cannot get them to fully seat. Advance there is appreciated.
 

Attachments

  • 5E3A6659-45AD-4E00-B837-87BBFC92DA25.jpeg
    5E3A6659-45AD-4E00-B837-87BBFC92DA25.jpeg
    61.8 KB · Views: 0
  • 0BF09A07-7E79-41C9-A352-B5C86FA35DA8.jpeg
    0BF09A07-7E79-41C9-A352-B5C86FA35DA8.jpeg
    152.9 KB · Views: 0
  • 1228391E-6DA6-4FEC-B05D-E34791F9699C.jpeg
    1228391E-6DA6-4FEC-B05D-E34791F9699C.jpeg
    276.5 KB · Views: 0
Last edited:
Only one way to do the job....do it right. completely clean out the old grease. As far as the shift rod oring goes I don't completely understand the not fully seating part. There should be a relief the oring goes in at one end of the bushing. There should be a fiber washer that goes in before you seat the bushing then seat the bushing roughly flush with the gearcase casting. You can feel the oring compress the closer you get to flush if you install the shift rod occasionally and feel it. That's it. Lots of grease!
Nice to see you back here again. Almost scared to ask what brand parts you purchased to do your ignition........by all means keep your original OMC points and clean them up and re-install them.
 
There is no fatal flaw in a 1956 30hp!! They were good engines. I have a 1956 30hp Johnson on the back of one of Lesa's boats.
When I was a kid I ran one for hundreds of hours along with my neighbor on his boat. Have never heard of any kind of internal flaw with this engine and I consider myself to be pretty well informed and involved with the antique/vintage engine world.


Lesa's Lyman.


Cook pics, many thanks, brings back many fond nemories ! Back in the mid 60's I owned a 15' Lyman rear steer with that same motor on her. Had years of enjoyment with that as a teenager !! My friends and I cruised the marina's and their parties , no need for bars or drugs !!
 
Only one way to do the job....do it right. completely clean out the old grease. As far as the shift rod oring goes I don't completely understand the not fully seating part. There should be a relief the oring goes in at one end of the bushing. There should be a fiber washer that goes in before you seat the bushing then seat the bushing roughly flush with the gearcase casting. You can feel the oring compress the closer you get to flush if you install the shift rod occasionally and feel it. That's it. Lots of grease!
Nice to see you back here again. Almost scared to ask what brand parts you purchased to do your ignition........by all means keep your original OMC points and clean them up and re-install them.
You will be happy…They are OMC points, condensers, and coils. I also am confused. When I pulled the o-ring and bushing the first time there was no fiber washer in there. I also don’t see what you mean by a relief that the o-ring goes into. The brass bushing for my shift rod linkage is just a solid brass bushing and I didn’t see any recesses or anything that would indicate the o-ring was supposed to go there.

Also, with the lower unit inverted should the bushing go in first or the o-ring? I put it in o-ring first followed by the bushing. It was at that point that the bushing went in about halfway and stopped firm…now I also can’t get them back out lol and I can’t seem to find the mushroomed all-thread I used the first time.
 
Last edited:
I’m confused…the parts diagrams I have for this motor says #301878 for the bushing. Though when I looked closer the number you gave me is listed on a similar model but not the same model.

As for the felt washer does that need to be special purchased or can I make one out of simple felt (admittedly stupid question I know).
 
Last edited:
Pappy, this is the bushing I took out of my motor (I got it back out tonight and the pictures are showing each side). There is no recess for the O-ring. What will be the proper way to get that o-ring fully seated down in the recess for the bushing? Same question for getting the bushing down in the hole after. Should I be putting the more chamfered side in first?
 

Attachments

  • C3D3D3E1-9BC0-4F94-BCCE-19EF897FFA9C.jpeg
    C3D3D3E1-9BC0-4F94-BCCE-19EF897FFA9C.jpeg
    67.4 KB · Views: 0
  • 54AA3B1C-7686-4FC9-9B07-4673111382E4.jpeg
    54AA3B1C-7686-4FC9-9B07-4673111382E4.jpeg
    79.6 KB · Views: 0
You will be happy…They are OMC points, condensers, and coils.

580148
580321
580416
(I never ordered a timing bar, so I don't know its part number :-( )
I wish I could clean these things out and make room for new thoughts...
ROTFLMAO
-W
 
580148
580321
580416
(I never ordered a timing bar, so I don't know its part number :-( )
I wish I could clean these things out and make room for new thoughts...
ROTFLMAO
-W
P.S. I did order a coil setting ring once, but only once. Don't remember its number either...
 
If you want to re install the earlier one in your pic the way I have done that, in order to insure everything lines up, is to bring the shift rod up from through one side and install the felt, the oring, and the bushing. The rod will keep everything lined up as you tap the assembly into place in the gear housing. Use a deep well or something similar to start the assembly. To set the squish on the oring go by feel. You should be able to tell when you start expanding and compressing the oring. The later one I showed you can also be installed in yours. Yes you can make a felt washer.
The new 580148 points may or may not be NOS. If they are, great, if not by all means keep your old points and polish and re use.
 
Finally got back after it today! Boys were down for a nap, mama took our daughter to a birthday party and Daddy got to work on that gear case. Gear case went together easily. Pappy, your suggestions for installing the shift rod bushing worked great! Just for kicks and giggles I dropped driveshaft back in to see if it would seat in the pinion gear and I cannot get it to slip into place. I got a light down there and I can get it into gear, but the driveshaft just doesn’t want to go in. I’m a little ways from expressly needing to have it installed but I’d still like to know the procedure to getting it lined up and seated.

Also, how do I remove the screen for the water pump? It desperately needs to be either cleaned or replaced.
 

Attachments

  • ABE9B214-9F51-46BE-8062-9E06691A4D9B.jpeg
    ABE9B214-9F51-46BE-8062-9E06691A4D9B.jpeg
    140 KB · Views: 0
  • BFDC8E34-0394-4842-99EA-043E17036441.jpeg
    BFDC8E34-0394-4842-99EA-043E17036441.jpeg
    131.6 KB · Views: 0
  • C045B7BB-A62F-4423-9A11-885841520D70.jpeg
    C045B7BB-A62F-4423-9A11-885841520D70.jpeg
    140.4 KB · Views: 0
  • C170CD81-E2F9-4536-96FF-BA31308ECCF0.jpeg
    C170CD81-E2F9-4536-96FF-BA31308ECCF0.jpeg
    127.2 KB · Views: 0
  • E13B13FA-A565-40D6-8900-0030A02AAEF1.jpeg
    E13B13FA-A565-40D6-8900-0030A02AAEF1.jpeg
    60.7 KB · Views: 0
Last edited:
There is a pressed in aluminum plug that will have to be pulled if you really want to remove it.
As far as the driveshaft goes you need to pull the propshaft/gearset and see whats going on. Pull the pinion out of the housing and pass the shaft through and then install the pinion on it and see if it will go back in place.
You WILL be changing the spagetti seal I take it......and the propshaft bushing housing oring......the only answer here is yes by the way.
That photo of the screen?? What on Earth happened to the gearcase? Looks like the housing is shot in that pic?
The spaghetti seal is brand new and I have already replaced the o-ring on the bushing.

I was going to have to split it anyways as I forgot to add sealant to the prop shaft bushing. So I broke it apart again and got the driveshaft onto the pinion gear no problem. Slipped it right in and got it all put back together with new sealant (including the bushing this time).

As for that housing…no idea. It’s definitely bent out of shape a little but that’s the only place it’s bent and everything else lined up just fine so I don’t know if it’s just cosmetic or not but it seems ok. As for the paint and light scratches, that was me. I was getting some greasy caked on mud off of it and I got a little too aggressive.
 

Attachments

  • 9693C39F-745E-4C82-B117-63F11B709D4D.jpeg
    9693C39F-745E-4C82-B117-63F11B709D4D.jpeg
    121.6 KB · Views: 0
  • 999CF0A0-AEA6-4149-A9A8-B0D79E0FDF4E.jpeg
    999CF0A0-AEA6-4149-A9A8-B0D79E0FDF4E.jpeg
    139.7 KB · Views: 0
Last edited:
Got my magneto plate put back together I’ll get the points gapped later, my main goal was just to get all of the parts and pieces put back in the right place.
 

Attachments

  • 4362DCFC-6372-4A72-9098-FFD53BA5CFC4.jpeg
    4362DCFC-6372-4A72-9098-FFD53BA5CFC4.jpeg
    190.6 KB · Views: 0
Ok so is the first motor I have had that uses both of these items. Is there anything special I need to do to service or clean the silencer?

1703991633865.jpeg

Likewise, what is the best way to go about servicing the starter? Should I even attempt to service it myself or just assume it’s bad and take it to a starter shop for servicing/rebuilding?

1703991449566.jpeg

Also, I am trying to get my mag plate reinstated on my 56 Evinrude Lark. What is the best way to line up those screws since it has to be done blind? I also noticed for the first time that the silver retaining ring has a key hole notch on one side but I cannot find what it is supposed to lock into. Any guidance is appreciated.

1703991585705.jpeg
 
Just clean the air silencer to make sure there is no debris in it.

The starter is easily serviced. There are probably NOS brush sets out there still as well. Mark the case with a couple lines to keep the parts lined up. Mineral spirits for cleaning. There is kind of a trick to keep the brushes in place while installing the bottom. Some folks use tape, tywraps or a thin plate of aluminum bent to keep the brushes in that can be slid back out once you are lined up and close. Maybe some other folks will chime in. I made the plate and it has worked well for decades.

Not sue about the notch in the magneto pivot but from here it looks like it may be upside down beneath the brass collar. Flat side up. Clean and lubricate and reassemble. The magneto base holes will line up with the rectangular spacing on the pivot holes.
 
Top