1970-14' Richline aluminum V-Hull conversion

TinBoats.net

Help Support TinBoats.net:

This site may earn a commission from merchant affiliate links, including eBay, Amazon, and others.

ThinBlue

Member
Joined
Mar 24, 2016
Messages
13
Reaction score
0
Location
Lincoln, NE
In January 2016 I bought this 1970 Richline for $500 from a guy who bought it brand new in 1970 from Sears. The boat came with a trailer and a 20hp Mercury Kiekhaefer motor, along with some odds and ends. The boat and motor were well cared for and had always been stored inside. It even came with the original heavy canvass fitted cover. The internals of the motor literally look brand new. I was told the boat hadn't been used in a few years and that the motor was last started in the fall of 2015 and immediately turned off after it didn't have a stream of water, indicating the water pump was bad. I kind of felt like I stole it from him.

Since getting the boat, I have read hundreds of posts on this site trying to figure out what I wanted to do with it. The first thing I did was replace the water pump (old impeller was in pieces) and changed the gear lube. The motor started in 4-5 pulls and ran great. I took a video of the first start up. I then cut out the middle seat and started stripping off the old floor paint. I used a wire brush around all the rivets and cleaned them off good. My brother and I took the boat out to a local lake and checked for leaks and took it for a test run. It had a few small leaks around some loose rivets. The rivets were re-bucked and we then put Gluvit on all the rivets and all the seams. We took it back out after the Gluvit sat for a week and it was dry with no leaks.

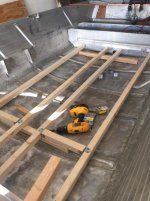
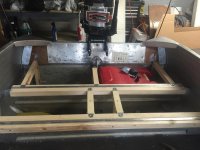
After being sure there was no leaks, I started the framing for the floor and the front casting deck. My plan is to have a front and rear casting deck with side storage running the length of the boat on both sides, and carpet throughout. I will mount a bow mounted trolling motor up front. Once I have everything fitted I will coat the plywood with spar urethane. I also plan to paint the insides of the boat grey, prior to putting carpet in for a nicer look. I will also paint the outside above the rub rail probably a royal blue.

I have attached photos of my progress so far. Let me know what you think and if you have any questions or comments/ideas that would help me out. This is the first time that I have done this and pretty much everything I have done, I have learned from this site.
 

Attachments

  • image.jpeg
    image.jpeg
    41.6 KB · Views: 3,674
  • image.jpeg
    image.jpeg
    46.3 KB · Views: 3,674
  • image.jpeg
    image.jpeg
    40.5 KB · Views: 3,674
  • image.jpeg
    image.jpeg
    47.8 KB · Views: 3,674
  • image.jpeg
    image.jpeg
    31.2 KB · Views: 3,673
  • image.jpeg
    image.jpeg
    56.7 KB · Views: 3,673
  • image.jpeg
    image.jpeg
    54.7 KB · Views: 3,674
  • image.jpeg
    image.jpeg
    39.1 KB · Views: 3,674
  • image.jpeg
    image.jpeg
    40.8 KB · Views: 3,675
  • image.png
    image.png
    422.7 KB · Views: 3,674
Progress continued. My next step is to cut the plywood for the front deck.
 

Attachments

  • image.jpeg
    image.jpeg
    40.9 KB · Views: 3,476
  • image.jpeg
    image.jpeg
    32.8 KB · Views: 3,476
  • image.jpeg
    image.jpeg
    36.5 KB · Views: 3,476
  • image.jpeg
    image.jpeg
    32.6 KB · Views: 3,476
  • image.jpeg
    image.jpeg
    31 KB · Views: 3,476
  • image.jpeg
    image.jpeg
    45.4 KB · Views: 3,476
  • image.jpeg
    image.jpeg
    45.6 KB · Views: 3,476
  • image.jpeg
    image.jpeg
    33.7 KB · Views: 3,476
perchjerker said:
looks great so far, similar to my build

Are you going to do anything to replace the middle bench as far a supports are concerned?


No I'm not. The boat is solid without the middle bench or any of the side braces screwed in. The side storage compartments running the length of the boat will offer some support as well once I get those done. The only thing I might do additionally if there is room is to add those side braces back on in a couple spots along the side, but I really don't think they're necessary.
 
I got the front deck cut out. Next I will probably work on the rear deck and painting the inside sides of the boat for a better look.
 

Attachments

  • image.jpeg
    image.jpeg
    49.8 KB · Views: 3,309
  • image.jpeg
    image.jpeg
    43.3 KB · Views: 3,309
cj_tiz said:
Looks great. I got a similar boat and plan on doing something along this.

Thanks! I'm having fun with it. I wish it was done though. Little by little... If only I had more time to work on it.
 
Today I primed and painted the inside sides of the boat. The color I used was "aluminum" and it does look very close to bare aluminum, but much cleaner.
 

Attachments

  • image.jpeg
    image.jpeg
    58.9 KB · Views: 3,234
  • image.jpeg
    image.jpeg
    63.6 KB · Views: 3,234
  • image.jpeg
    image.jpeg
    28.6 KB · Views: 3,234
Today I started with the first coat of Helmsman spar urethane. Once this part is over with, it shouldn't be to much longer before the interior is done...hopefully.
 

Attachments

  • image.jpeg
    image.jpeg
    71.6 KB · Views: 3,153
It's been awhile since I have posted. I have been trying to fit the boat into my busy life. I have finished with the spar urethane, cut storage compartments for the front deck, and completed the rear deck (still needs compartments cut and carpet). I also ran a 1" Pvc pipe from front to rear for easy feeding of wires. I started carpeting as well. My wife bought me a Humminbird Helix 5 for my birthday and I also got a MinnKota Powerdrive v2 50. I am anxious to get done so I can install those. I will be covering the nose of the boat with a piece of plywood on top of the piece of aluminum that is already there so I can more easily mount the trolling motor. Here are some more progress pics.
 

Attachments

  • image.jpeg
    image.jpeg
    48.1 KB · Views: 2,953
  • image.jpeg
    image.jpeg
    64.7 KB · Views: 2,953
  • image.jpeg
    image.jpeg
    62.3 KB · Views: 2,953
  • image.jpeg
    image.jpeg
    61 KB · Views: 2,953
  • image.jpeg
    image.jpeg
    41.9 KB · Views: 2,954
  • image.jpeg
    image.jpeg
    43.5 KB · Views: 2,954
  • image.jpeg
    image.jpeg
    30.8 KB · Views: 2,954
  • image.jpeg
    image.jpeg
    44.3 KB · Views: 2,954
  • image.jpeg
    image.jpeg
    46.6 KB · Views: 2,954
Looks great, I like the deck framing, gives me some ideas. I mostly stick to large boats but since I have downsized the house, I have started thinking about doing my own build on a 14-16 tin boat, something that would fit in the garage, HOA doesn't allow it on the driveway, besides, I seem to be the only fisherman in the family so something small would be fine.

Have you considered an on-board charger for the battery?
 
Thank you. It has been a fun project, but I'm ready for it to be done. I can't take credit for the floor design as I learned a lot from this site. I made some changes here and there though. I am pretty much finished with everything except for the side storage I will be eventually adding. I mounted the trolling motor today and I am just working on getting the storage hinges put on and pedestal bases secured. I will be installing the fish finder soon. I'll be posting some more photos soon.

I have thought about an on board charger. I will eventfully mount one, probably to the very rear starboard side of the lid that stores the fuel tank. So essentially I will be able to back the boat in, flip the lid up, and plug it in.
 
I have finished with pretty much everything except for the side storage which I will complete eventually. The most important thing is that the boat is ready to fish. I will add on little things here and there such as rod holders, cup holders, ect. I also got a RAM mount for the fish finder that still needs to be installed. Here are some photos as it sits in the garage. I will post more photos later on the water.
 

Attachments

  • image.jpeg
    image.jpeg
    61.8 KB · Views: 2,762
  • image.jpeg
    image.jpeg
    48 KB · Views: 2,761
  • image.jpeg
    image.jpeg
    68.3 KB · Views: 2,761
  • image.jpeg
    image.jpeg
    68.8 KB · Views: 2,762
  • image.jpeg
    image.jpeg
    41.2 KB · Views: 2,761
  • image.jpeg
    image.jpeg
    63.8 KB · Views: 2,761
  • image.jpeg
    image.jpeg
    64 KB · Views: 2,762
  • image.jpeg
    image.jpeg
    70.8 KB · Views: 2,762
  • image.jpeg
    image.jpeg
    49.3 KB · Views: 2,762
  • image.jpeg
    image.jpeg
    52.3 KB · Views: 2,762
did you use just untreated 2x2's and what kind of brackets did you use? im in a project of my own right now with a 16' richline and im "adopting" some of you brilliant ideas!
 
woodrow2929 said:
did you use just untreated 2x2's and what kind of brackets did you use? im in a project of my own right now with a 16' richline and im "adopting" some of you brilliant ideas!


Yes, I used untreated 2x2's for the floor framing. You can choose to coat them in Helmsman spar urethane if you want, however, I chose not to and I only coated both sides of plywood floor. The brackets I used to connect the 2x2's are 2x2 strong ties that I got from Home Depot, also called "2x2 Rigid Tie Bracket", Home Depot model #RTB 22, Store SKU # 909266. Here is a link: https://www.homedepot.com/p/Simpson-Strong-Tie-RTB22-20-Gauge-2x2-Rigid-Tie-Bracket-RTB22/100375289

The only other 'bracket' I used was the angle iron that I riveted to the front and rear seat as you can see in the first photo of my second post. I would recommend putting the main floor as low as you can in the boat. To get it even, I measured down from the top of the rear seat frame 8" and then did the same on the front seat and that is where I riveted the angle iron (if that makes sense).

Once the angle iron was riveted I secured the 2x2's going the length of the boat and then tied them all in together using the strong ties over each floor rib. The last thing I did was put the bottom supports in that actually rest on the floor ribs. I think it was easiest doing it that way because you can take a small piece of 2x2, rest it on the floor rib under the supports that you already tied in above, and push it as far over to each side as you can, keeping the top of the small 2x2 flush with the bottom of the support you already secured above each rib. Draw a line to show where the bottom support stops on top of the 2x2 that is already secured on each side. Measure the distance between the two lines and this is how long your bottom support resting on the floor rib needs to be. Then you just have to wedge that piece in and secure it using a long screw. I hope that makes sense. It's hard to explain it good when typing it. If not, just ask.
 
woodrow2929 said:
did you use just untreated 2x2's and what kind of brackets did you use? im in a project of my own right now with a 16' richline and im "adopting" some of you brilliant ideas!

Also, I forgot to mention.. I made sure the center of the two middle 2x2's running the length of the boat were the same width as the holes in my seat mounts so I had more wood to screw into than just the width of the plywood when it came time to secure them.
 
awsome! thank you so much for the information, how is everything holding up over time?
Also did you just use the rust oleum high performance enamel to paint the inside?
 

Latest posts

Top