1991 1648 Tracker Sportsman 16

TinBoats.net

Help Support TinBoats.net:

This site may earn a commission from merchant affiliate links, including eBay, Amazon, and others.
After looking at your drawing again, I got your question now... Will the pumps run in forward and reverse, I dont believe they will?

The recirculating pump will not pickup water from the top and pump it back threw the fill pump to pump out.. Unless you primed it...

Your better off to fill to the top side, recirc to the topside then make a valve to close off the topside so it pumps back out...
 
Thanks Bugpac, but your first post was working off the correct understanding of what I'm asking. I came up with this layout in an effort to avoid 3 things.. 1) cutting another hole in the hull. 2) having pumps &/or plumbing inside the livewell. 3) Having to sling a bilge around whenever I want to fill or drain. I included two pumps in my design because I couldn't find any evidence that aerator pumps can be run in reverse. the only time Pump two would run is for pump-out. Pump 1 fills and recirculates.

Here's the hull port I was refering to.. It's obviously below the water line.

P1040454-1.jpg


Here's the area it would all be mounted in..

Roughdraft-2-1.jpg


Without consideration of priming or overflow, I'm very confident it would work, but I know little to anything of how these pumps operate. Are they self-priming? I suspect this boat will have a very shallow draft and I am concerned about whether or not they will "pull" water up to themselves if you turn it on and the water in the line only comes part way up to the pump. Put another way, does the plumbing and pumps all need to be below the water line so that when you put the boat into the water, the lines all fill up with water and the pumps are automatically "primed"? How necessary is an overflow? I'm not sure how to go about implementing an overflow, but I'm not completely convinced I'd need one.

Here's a layout that's been updated for clarity.

LivewellSchematic-1-1.jpg


Thanks again!
 
I got ya now... Do you have the pumps now? I would try to pump water out threw a pump to make sure it will go, as far as I know there isnt any checking device built into them... You definitely have to have water in the pump housing for it to prime on its own tho..
 
No, I don't have the pumps yet. I wanted to make sure I knew what I needed before running out and buying the necessary supplies. I did order the cooler though as that will determine my framing to a degree.

It seems that so long as my fill pump is below the water line and pump-out pump is below the bottom of the livewell, I should be good to go.

Oh, by the way, I thought I'd pass this on.. I found this site that offers all the parts you need for your livewell plumbing piece by piece. Pricing seems VERY reasonable too. Probably a lot cheaper than any kit from BPS or wherever. They have everything you can imagine and then some. I found it helpful to just browse.
 
I am trying to avoid adding holes in my boat as well and this is what I have in mind to try. It is unproven, but here it is.
To fill livewell,open valve 1,valves 2&3 closed, Turn on pump 1
After filling, Turn off pump 1 and close valve1 and open valve 2
Pump 2 is now used to recirculate your livewell water.
To drain the livewell, close valve 2 and open valve 3
Pump 2 is now used to pump out livewell.

livewell.jpg

I do not know how easily you can pump out livewell with drain below waterline. you may need to run drain line over the transom instead of teeing into the line between hull and pump 1. Also, If the livewell was close to the back of the boat, you could almost use one pump to do everything.
Looking forward to seeing what you come up with.
 
Stalker, Looks good to me, but don't let that influence you in any way.. lol I'm a total noob when it comes to this stuff.
It looks like we are thinking pretty much the same thing except you're circulation runs off the drain pump rather than the fill.
I don't think there would be a problem with pumping out below the water line. If it were a gravity drain, then it would only drain to the water level.

The more I think about this, the more I think I'd like to implement some sort of an overflow, but I'm clueless as to how to implement one. Might have to go with some baffling that leads back into the recirculate loop. It would really suck to get distracted by something, leave the fill on too long and have a boat full of water. I was browsing BPS, and saw a couple of float switches. Was thinking this might be handy too. I'm sure there's a couple of different ways it can be accomplished.

Anyway, I added the design (minus overflow) into my sketch just to get an idea of scale and layout specific to the area I will have to work with.

LivewellPlumbing.jpg
 
Google SketchUp was the best free option I could find. There are others out there, but some will not allow you to save, others won't allow you to dimension, etc..
It's fairly intuitive if you have at least some CAD experience and probably still is even if you don't. As I said before, I'm no CAD master by any stretch, but I do have a little Autocad and Solid Works experience and I worked with ESPRIT regularly for a number of years. As it was, it took me a good solid day to get comfortable with it. I had to start over a couple of times before I was somewhat satisfied with what I had.
Also, there's a lot of on-line help available. Hope this helps and GL!
 
IMHO your making it too complicated to try and not drill holes. I would suggest drilling a hole to fill and drill a hole for drain. You can then pump into the sprayer, and have a gravity drain that has a 2-way valve that can either drain or recirculate.

You don't need an overflow. You can let the livewell fill and overlow into your bilge if you like. :)

Based on your original design this is what I would do if I was trying to stick to your plan.

Move Pump 1 to where Valve 1 is. Remove valve 2, valve 3 and pump 2. Place a 3-way valve at the T. Use a livewell timer that has on, off and timed on/off. Then you can use one timer/switch and one pump to handle both pump out and recirculate depending on what position your three way is in.

You will also need to get a self priming pump. The standard "live-well" pump is not self priming and any air in the line between the pump and the water will air lock it.
 
Dan/Bug - I am in reluctant agreement. Lol.. My buddy and I went round and round about it Sat night over many beers. He won. :roll: I'll never hear the end of it.

In the end, it will not only simplify the design, but free up time on the water that would otherwise be spent baby-sitting my livewell.

So I have a thru hole mid-boat below the water line and a hole for the bilge near the transom above the water line. Now it's back to the drawing board to try to come up with a layout that will utilize both. If not, I will drill another hole as needed.

The livewell cooler came in today. It has a built-in drain that has standard garden hose OD threads on it. I might try to incorporate that if the flow rate is high enough.
 
Well, it's been a while.. between finding the time and the $ required, things have been a slow-go, but there has been some progress.

I have managed to pick up a bunch of the things I'll be needing though. 3 "31" Batteries, on-board charger, switch panels, aerator timer, seat bases, etc.. On that note, I thought I'd mention that if you guys make a shopping list and plan on getting any of it at BPS, you can go to the store, get a BPS Visa and get 10% off your first purchase. I saved just shy of $100. (almost one of my 3 batteries free!)

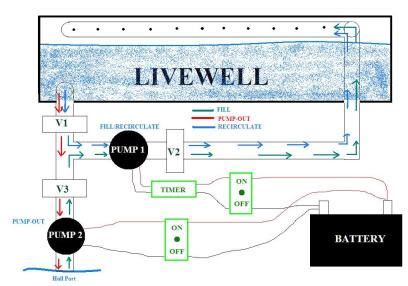
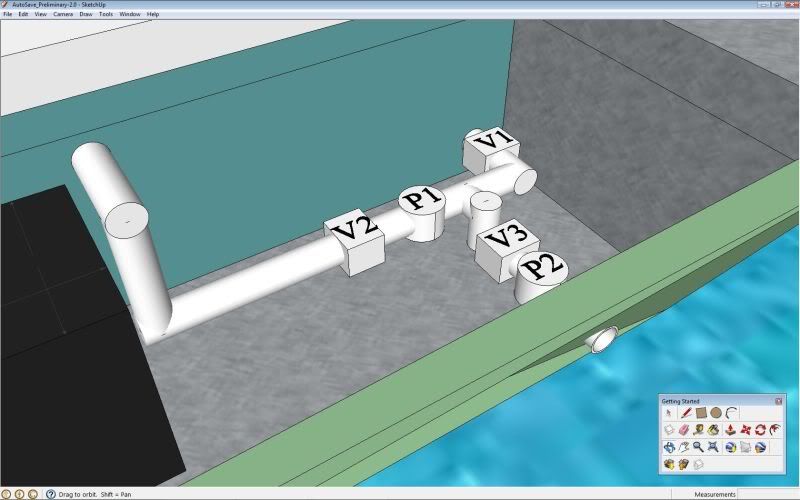
As far as the livewell thing goes, I've been working with flowRite on my design, and I'm just going to get everything I need from them. Gonna go with their system #3 and integgrate it into the 70qt cooler. Very slick system. Pump, plumbing, valve, fittings, and all hoses are estimated at $160. Will be ordering VERY soon as I need to install it before I can do a whole lot more on my framing layout.

Decking material will be Ramp Armor. It's a composite material made by Iten Ind. that's used to deck ramp surfaces in outdoor skate parks. It's UV neutralized, doesn't absorb water, and it's strong as what. I have a sample piece that's 1/4" x 8" x 12", and I can't bend it. I think 1/4" sheet will be fine, but I still might upgrade to 3/8" just to be on the safe side. I have some spans that are 16" centers. The 1/4" runs $75 per 4' x 8' sheet... Well, for me anyway. My Mother works there and they're local; I can get "2nds". =D>

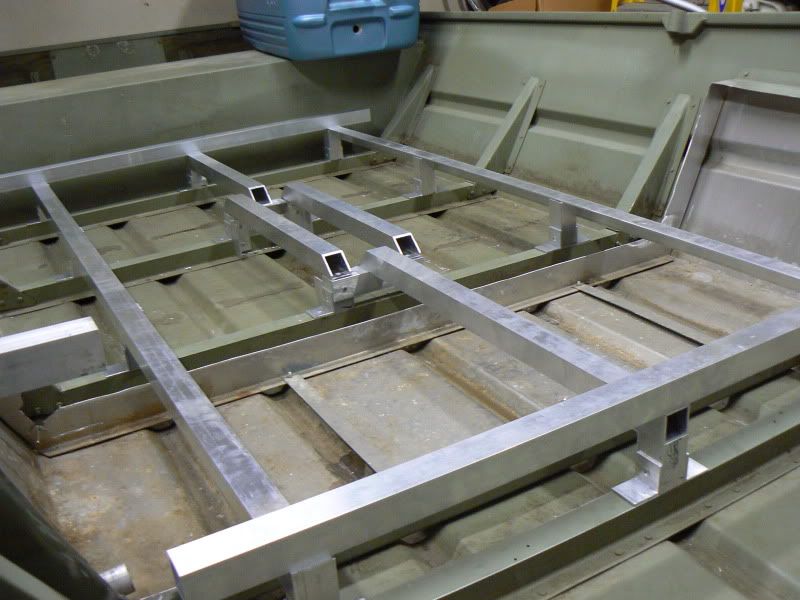
Anyway, here's where the framing is...

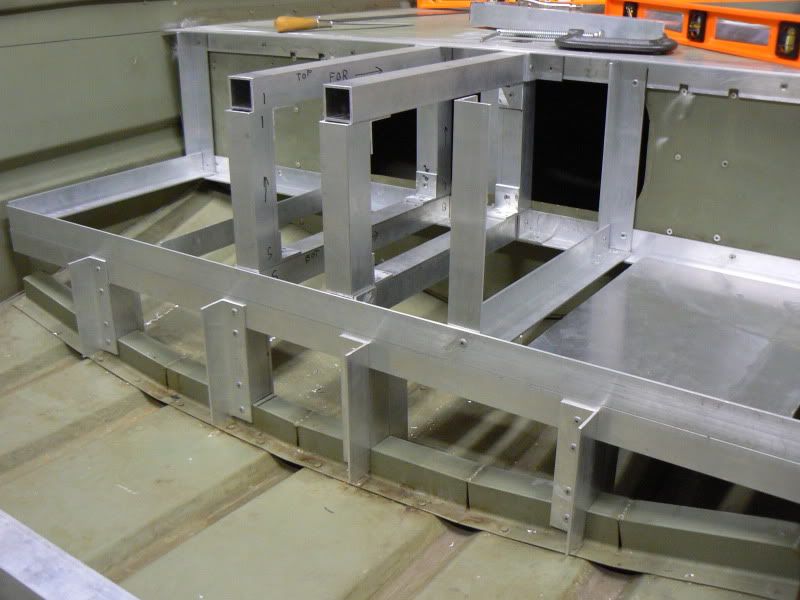
Bow deck seat box with tackle hatch framing on either side.. there's still some work to do on this section as there will be a battery tray on each side in front of the tackle hatches and I couldn't tie the two together until I finished my main deck.
P10404772.jpg


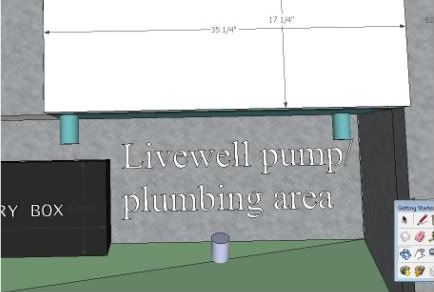
Another of front section with extension mocked-up and in place. There will be a sq tube that drops from under this down to the main deck level. The livewell will be nestled up against the "wall" that will be created, then will be framed around at the same level as the flange that remains from the middle bench that was removed.
P1040484.jpg


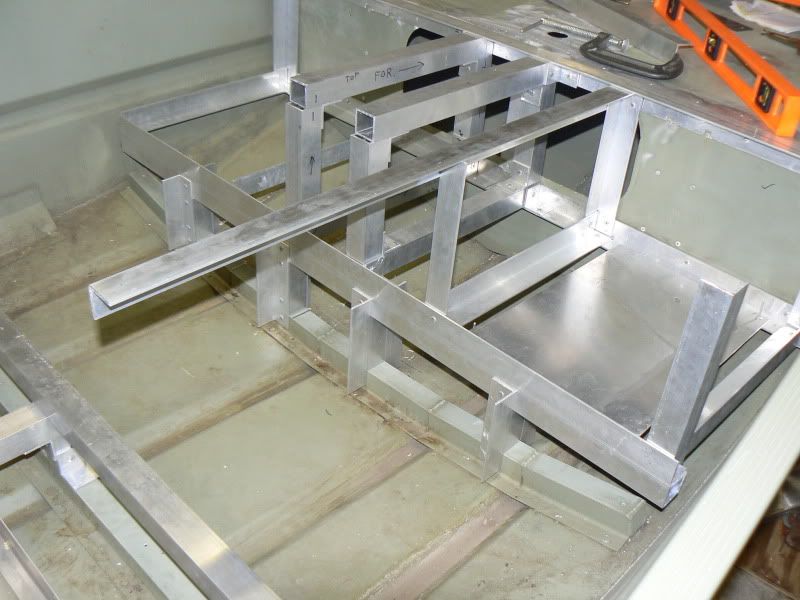
Main deck area showing stern seat box
P10404812-1.jpg


Close up of main deck seat box support
P1040473-1.jpg


Some random thoughts..
Don't use a cut-off wheel. I thought it'd work great, but only makes a massive mess. A power miter saw with a regular carbide tipped blade works great.
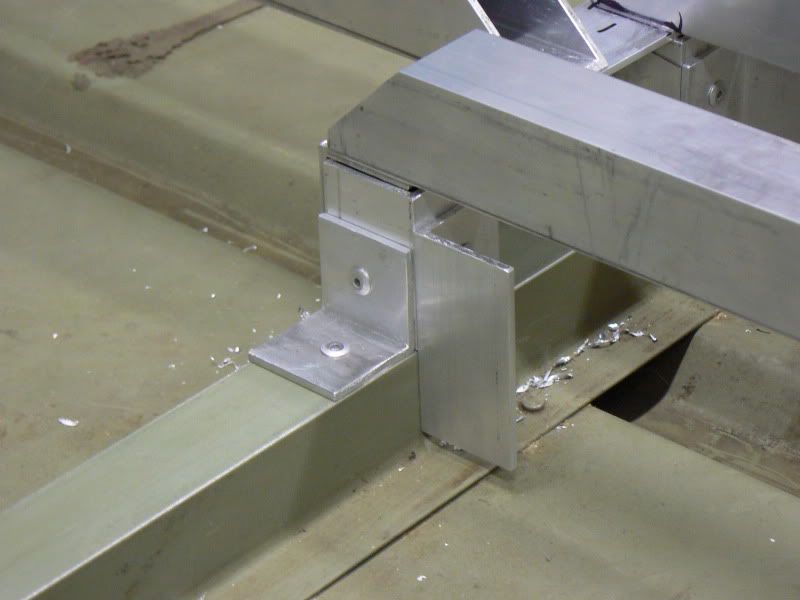
When riveting, whenever possible, deburr both sides of your drilled hole. If you clamp your pieces together real tight first, the inner faces won't need it, but the entrance and exit still will.. especially the exit side. It makes the joint a lot stronger.
Even with a power miter saw, it's still very difficult to get each joint perfectly square. Cut a little long and "massage" it in where load bearing posts need good fluch contact.
Aluminum angle is not excatly 90deg. It's an acute angle. More like 87deg or so. This can impact squarenesss. Just be sure to rivet in an order that will allow your supports to remain square after fastening.
The inside corner of the angle has a small radius in it.. probably about .050" or so If you are looking for good, solid, flush contact (for ideal weight distribution maybe), be sure to break the edge of the piece that will be on the inside of the angle.
Don't just cut and start riveting. You want to basically do a complete layout, then start riveting from the inside out, otherwise, you may end up with a situation where you are unable to drill a hole for lack of drill clearance.

I'm sure most of you guys already know that stuff, I just thought I'd throw it out there in case there are more noobs like me. :wink:

Tight Lines!
 
Your build looks great and I think you got a good deal on your boat.

You weren't joking about building your frame out of aluminum. Top Quality!!!!!
 
I'm looking forward to seeing the rest of this build!!! Love the aluminum framing.....that's got to be a little pricey...but you won't ever have to worry about it rotting.
 
Here is how I am going to route my livewell piping and wiring. this way only uses one pump and a three-way switch.

Livewell diagram.JPG

Filling:
Valve 1 - closed
Valve 2- open
Valve 3 - open

Recirc:
Valve 1 - open
Valve 2 - closed
Valve 3 - closed

Drain:
Valve 1 - open
Valve 2 - open
Valve 3 - closed

Transfer:
Valve 1 - closed
Valve 2 - open
Valve 3 closed
Water exits through overflow, overflow should be 1.5-2 times the inlet pipe size

For power drain using the pump you will need a 4 th valve installed downstream of the bypass Tee

You could also get real fancy and install electric three-way valves and have it all switched from the panel, no turning manual valves.
 
Rat said:
Here is how I am going to route my livewell piping and wiring. this way only uses one pump and a three-way switch.


Filling:
Valve 1 - closed
Valve 2- open
Valve 3 - open

Recirc:
Valve 1 - open
Valve 2 - closed
Valve 3 - closed

Drain:
Valve 1 - open
Valve 2 - open
Valve 3 - closed

Transfer:
Valve 1 - closed
Valve 2 - open
Valve 3 closed
Water exits through overflow, overflow should be 1.5-2 times the inlet pipe size

For power drain using the pump you will need a 4 th valve installed downstream of the bypass Tee

You could also get real fancy and install electric three-way valves and have it all switched from the panel, no turning manual valves.


wow, you just cleared up a lot for me...

email me when you get it installed so I can see how you have it with the actual pieces!
 
I just got off the phone with Flow-Rite and ordered their system 3. I decided after all the messing around, I could just order it all in a package and ready for install. It's not really meant for a cooler mod though. I'll need to c'bore the outside surface of the cooler to get the wall down to 1/2" cross-section, but that's really about the only inconvenience (probably lots of silicone goop to seal it all up after). 800gph pump and all, it was a couple hundred bucks, but I'll only need 1 pump, and won't have to mess with turning valves everytime I want to pump in fresh water, recirc, pump out, etc.. I figure screw it, in 6 months I will have forgotten about the $200, but if my livewell is a pain in the ***, it'll be bug me every single time out. :wink:

Another option might be to just order their 3 way valve and actuator and build the rest yourself. That would probably only be about $50. Check out the pdf's on the valve and pump-out aerator head designs.

To add to what Rat was saying, in addition to your overflow being larger than your fill, it should also be placed about 2" lower in the livewell. The water level will still rise above the entire overflow opening.. this is according to Roger Miller, the marine systems specialist at Flow-Rite who was extremely helpful. I emailed him links to my mod and he was happy to go over everything with me step by step and answered all my questions.
 
Well, I'm nearing the point in my conversion where I will need to be laying my decking and I had a quick question for you guys. I'm kind of stuck when trying to figure out an order of operation. If cut and fasten the decking panels prior to carpeting them, the screw heads won't show, but then I'll have to carpet after installation, and I won't be able to wrap and fasten the carpet under the edges, which I REALLY want to be able to do. I'm hoping to keep it as clean looking as possible. If I carpet the deck panels outside the boat, I can wrap all the edges, but then I will have screw heads exposed, and that would bug me something fierce.
I won't have access to the underside of the framing once the deck is on either, so..

I had thought about carpeting the decking panels outside the boat, laying them in place on the framing, and then wherever I want to install a decking screw, I could use a utility knife and cut a little "X" in the carpet, screw it down, then glue the little flaps back down. Only thing with that is that should I ever decide I'd like to remove the screw for any reason, the head would be filled with glue. Basically, it'd be permanent unless I just went crazy with a sawz-all. :shock:

I guess another option would be Hydro-Turf. That just gets glued down right?

I apologize if this has been addressed before and for the overall noobness of the question. ;)
 
Top