Alumacraft MV1448 Seadoo IB jet, Still jetting

TinBoats.net

Help Support TinBoats.net:

This site may earn a commission from merchant affiliate links, including eBay, Amazon, and others.
4-27-09

Nose Job Round III

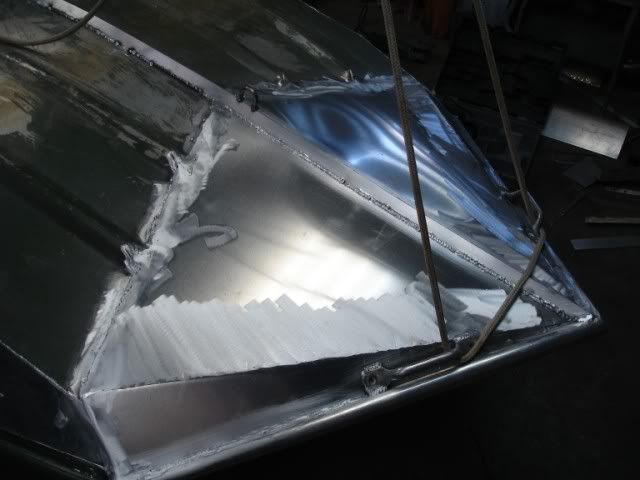
Finally got a day off to get back into this. Shame it's so flippin' hot out. Nothing like working around hot aluminum, makes welding go much faster to prevent burnthrough too... Funny thing is I was talking to one of my coworker about how poorly the pictures were looking with the old camera I was using and this morning I found a Sony Cybershot in it's bag in the fire wood pile back by the alley. Wierd, put some batteries in and it even worked, plus it does video...

Finished nose, still has some pin holes here and there, but I'll fix them before painting the hull again. The bow eye is back where it was originally.
DSC06548.jpg~original


DSC06549.jpg~original


Front Deck Round I

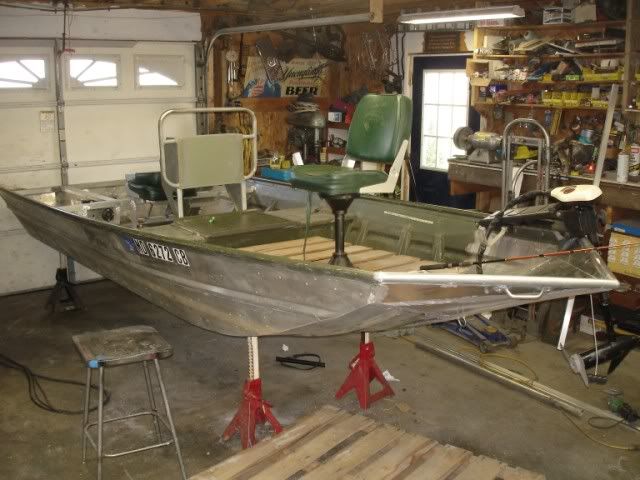
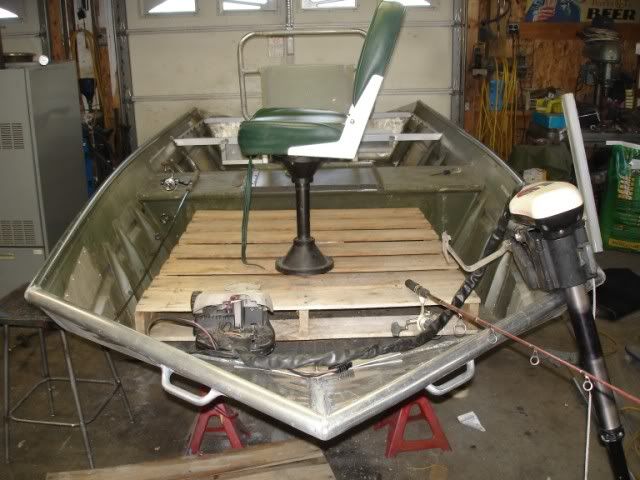
Still trying to figure out what I want for a front deck, kind of ties into the new nose and where the trolling motor is going to end up. I kind of like this setup, a mid deck right level with the top of the side strakes with the seat forward enough that I can fish another person by the console (may make a slide in receptical for another temporary seat on the front of the console (thinking out loud)

The skid is there for perspective and it gives me a chance to hold a rod and feel how the boat is going to end up. Seating position is about 8-10 inches higher than last year with a lot more leg room. Just going through the motions of handling a fish or reaching for gear, or trying to work the trolling motor shows it should work out really well. I hope the CG doesn't get too out of balance with this setup though. I know it'd be whacked with a high deck and I don't have any storage for the battery with a rib level deck so this shoud be a decent compromise.

DSC06550.jpg~original


DSC06551.jpg~original


Back to it, need more wire, gas, more aluminum angle etc for the front deck,

Jamie
 
4-28-09

Today was interesting, spent just about all of it trying to get the misc. stuff for the boat. Ended up at three Walmarts and Dick's Sporting goods and almost got enough stuff. I got three seat bases and two 14" posts, one seat mount, the nav and anchor lights and the battery boxes, all for $160 thank you Walmart (and China too)...

Did also score some seats;

https://cgi.ebay.com/ebaymotors/ws/eBayISAP...T&viewitem=

Finally this evening I started on the front deck. Decided to put the batteries in a storage compartment ahead of the middle bench because there wasn't enough height under the deck further forward (I can toss my tackle bags in between the batteries). Most of the decking is 1"x3"x .125" C channel and I made a 3" deep tray for the trolling motor that's about half done. I really want to end up with most of the heavy cord tucked under the front deck so I have to be creative with the framework, more on that tomorrow... Also notice the trolling motor went from a 42" shaft to around a 30" shaft last week.
DSC06552.jpg~original


Basic layout for the batteries, seat and trolling motor. The seat feels a little high right now, but I want to water test it with the new cushions before cutting the posts down any. I'm also going to do another storage area for the anchor and rope, possibly opposite the trolling motor controls.
DSC06553.jpg~original


More to come. I'm hoping for a water test within two weeks with a bare bones running hull so I really need to work on the center console next week when I'm off again.
Jamie
 
Talked to Kevin Turner, owner of https://www.riverpro-boats.com/ today. Our conversation just confirmed what the little voice in the back of my head was saying after looking at the finished pump inlet design. For Leo and others, the jist of the conversation is that in Kevin's experience, wide short inlets have troubles. One being the leading edge angle is too abrupt (angle from the hull to the top of the inlet) causing aeration that leads to cavitation in the pump (basically the sharp angle change cause a pressure loss in the water column that will lead to aeration that causes the pump to cavitate. Comparing my inlet to the Seadoo setup shows mine too wide and not deep enough. The seadoo hull also is designed to help the water flow into the pump (narrow width, short length, heavy so it sits in the water deeper)

I was more worried with getting the impellor funnel smooth and should have worked on the inlet design some more. I was also concerned about clearing the motor mounts and flywheel and by focusing on getting as much height as quick as possible may have ended up making the leading edge angle too tight. The Seadoo inlet is angled so the seal housing is completely out of the water stream, my inlet has to be notched for the seal bellows to clear (raised a big red flag when I had to do that). Looking at mine since it is too wide I can narrow it down and or install some guide plates to flatten the inlet angles. The trailing edge with the C channel for the grill also isn't the greatest setup now and will cause more grief if I have to work on the front side. The top of the C channel is too high and looks like it will pinch off the flow.

Another cavitation problem I may end up with is the impellor being partially out of the water. The old scum lines are right at the top of the pump housing so I hope I will be ok. This boat will really need a good working inlet design to pull water up into the impellor. One thing I decided was that since it was made and was made so simply I would see if it would work as is and mod it a little too as needed before cutting it all out and starting over. I have other boats to fish out of so there is no rush to get it done wrong. Kevin said back in the day they would use Bondo to try and tune inlet designs too...

On to today's work. The new Sony ate the batteries so it's back to the Olympus... And the pictures suck again...

Front Deck Round (something)

Front deck frame work just about done. The trolling motor mount is in, the foot pedal tray is installed and I did the battery mounts too. Going to have a 15x48" lid over the batteries and tackle and two smaller compartments beside the seat for the anchors to sit in, all out of the way. Should end up with around 200lbs up there all down low. My namesake '68 Ranchero in the background.
P1010119.jpg~original


The best part about this design is there is nothing in the way when you sit in the front seat now. I can even stretch my legs.
Another 12'x36" john in the background. Going to sell it to finance some of this project...
P1010120.jpg~original


P1010121.jpg~original


The mess... I'm going to keep the boat outside this week so I will concentrate on the center console.
P1010122.jpg~original


Finally the trolling motor tray. I'm pretty proud of this thing. I made it so the cord will come out of the little trough to the side and it stays low down and out of the way both stowed and in the water. I had around two hours into just it this morning. The back wall is partially open so I can stuff another light under the deck to help see what's going on down there in the dark.
P1010123.jpg~original


More to come,
Jamie
 
I've been going over to that site to watch your build frome the start.Even if I had the tools,there know way I could do what your doing.Great work and I'll still be watching.
 
All I can say is WOW!!

When you get done, I know of a place in Va where you can leave it stored at... :D
Looking forward to the test run video's. :shock:

Great work!!
 
Thanks for the compliments.

Not much accomplished today. Spent most of it cleaning the garage and then getting the console stuff gathered up and finally making motor noises while putting the stuff in different positions. I did finally settle on the steering setup and fabbed a 2x2" tube so it would hold the pillow bearing inserts and even cut out the face of the old console to start fabbing the new stuff tomorrow.

For the console, I want the electronics and gauges out of the direct sun and rain and the same for the switches. I cut the face out and plan on recessing everything under the original top.

Should be an interesting day.
Jamie
 
Dang hoss... you're a regular fab-aholic! Welcome to the site. Once you get that done you'll be able to drive it from McCoy's Ferry to Paw Paw and back. What rocks? I live in Hagersbush myself and typically fish the Potomac from Shepardstown to McCoy's. Please let me know when you plan to test drive that thang, I'd love to see it when done. Oh, and how much were you thinking of selling that extra jon for? I have a buddy who is looking for one like that.

Do you do any side work? My current boat project has two small cracks in the welds that attach the corner brackets to the top of the transom.
 
Cheeseball, Pm me. The boat and all the work has been paid for through sidework. Feel free to stop by, I'm down off MD ave.

I usually fished Williamsport up to the quarry, pulled a C class smallie out of there last September on a Rapala floater playing topwater dead minnow, twitch twitch bam.

09-16-08_1855.jpg~original


Currently working with BobCAD (fighting) to get the guage holes plotted for the mill. Bombadier had to put the indexing tits at weird angles so I have to plot them instead of just doing the G-code longhand.

Jamie
 
This is insane! I can't believe the work you've done. Its on a level so much higher than me. I was actually thinking of what a cool design your boat had to start with! :lol: . This is awesome, keep it up
 
Can you adopt me? I think I can get used to not eating grits and drinking sweet tea if there is fab work like that to do, and smallies like that to catch.... :lol:
 
Baptist, the original design was great for two guys to fish out of. The seats were mounted down low so the CG was low and the boat was very stable. The little shelves along the sides were great for storing the open lure boxes. I could have four rods laying out over the bow while fishing with the fifth and still run the trolling motor. The rear seat was about the same, plenty of room in a 1448, but the 9.9 was only good for two miles of river before it hit the bottom. The bad things were the front fishing area was cramped if you were 6'8" tall and the rear had you sitting on a 8" pedestal on the rear bench so the guy in front had to be considerate of the buy in back so he had somewhere to put his feet while fishing. All the weight was in ther back, two 90lb batteries and the 9.9 merc hanging off the back. Another bad thing about the original was it isn't stable when you stand up. That's the biggest reason why I went with a center console with grab rail so you can move around safely.

Bassboy, no adoptions, I just put this up so guys can see how easy some of the stuff is when you think it through.

On to todays fiasco Made the guage face plate first thing and it turned out pretty good. Only thing I didn't like was the extrusion marks in the original plate and it was pretty dinged up so five hours later it's about half as thick thanks to some poor machine work and I still need to sand some marks out of it. I have some textured stainless that I should have just remade the orignal out of hours ago, but I got stubborn.

I also did the front deck skin and it turned out ok, but needs some love before I lay it down for good.

Jamie
 
OK, today was pretty rough. Spent most of it trying to get the new gauge panel flat. Took about a half hour to get the alignment tits drilled and the holes milled and everything was going great until I tried to flycut the dings and marks out of the face of the panel. Then I spent the next five hours trying to polish a turd...

Finally got it smooth enough and went on to the steering bearing box that's also going to house a lamp to shine on the gauges for night running. The pictures are in the camera that's in the garage, but since it was dark out I got to test it and darned if it doesn't actually work. I also decided to make the guage panel removable just in case I decide to do something different down the road. Since I spent so much time with the panel thinking about the stupid thing I now have a bunch of good ideas so it should come together tomorrow.

More to come...
Jamie
 
Ranchero50 said:
Cheeseball, Pm me. The boat and all the work has been paid for through sidework. Feel free to stop by, I'm down off MD ave.

Will do. Yeah that is the area I usually fish myself. I also go as far as Dam 5 in my 12 footer. Used to be walleyes up there too, but I haven't caught one of those in ages.
 
Ok, Console Round III

Steering bearing box tube with the lamp mounted. A lot of machine work for such a simple parts... This is actually a shot of the bottom and the slot on the top face will let light shine on the gauges which don't have their own illumination.
DSC06554.jpg~original


First attempt at the gauge mounting. For some odd reason I didn't weld it in so the gauges would look at me and this is what I got... Duh... The top inside of the console is a section of the extruded stuff I had laying around (nice smooth curve and makes the top stronger). The steering box is just sitting there.
DSC06555.jpg~original


Much better... of course the mounting tabs were done on the mill as was the face panel. The steering box is tacked in place.
DSC06556.jpg~original


In case you're wondering, the steering so far is a 11" wheel off of a Dingo Go Cart and a steering staft U joint from a fox bodied mustang with the rag joint cut off and a wheel put on. Ugly, but effective and what I had to play with.
DSC06557.jpg~original


Matt trying out the new seats and driving arangement. More on the seats later... It's a little tight leg room wise, but if I straddle the console everything fits well.
DSC06558.jpg~original


Even made the switch panel today on the mill and mounted the switches. From the left, Horn, Bilge Pump, Anchor / Nav Lights, Start, Start Enable / E stop, and Trim. The buttons are 20mm industrial switchs from salvaged machines. Also notice the inside of the console has two side plates welded in to finish off the guage plate mounting. Details...
DSC06560.jpg~original


Inside the console with the buttons.
DSC06559.jpg~original


Back in the garage, it's starting to look like a boat instead of just a bare hull.
DSC06561.jpg~original


Finally a shot of the new seats, Temptress Navistyles right from the factory via eBay. Very nice and worth every penny. The lumbar support alone is going to make long trips on the river so much nicer.
DSC06562.jpg~original


I hit the flood limit for pics so more later.
Jamie
 
Trolling motor mounted. I probably whacked off too much of the shaft, but I hope it's in the water, it's still below the original scum line.

DSC06563.jpg~original


DSC06564.jpg~original


DSC06565.jpg~original


DSC06566.jpg~original


More to come,
Jamie
 
Top