1957 Lone Star Commander restoration/mod

TinBoats.net

Help Support TinBoats.net:

This site may earn a commission from merchant affiliate links, including eBay, Amazon, and others.

OldTinBoatGuy

Active member
Joined
Jun 11, 2012
Messages
35
Reaction score
0
Location
Kansas City, MO area
I bought this old 1957 Lone Star, trailer and 25hp Johnson last year from a neighbor who has a rental house where the boat was abandoned when his renters took off leaving behind the boat and quite a few months of unpaid rent. Anyway, long story short, we got together and did the abandoned property paperwork for Missouri and after about a year, the boat, motor and trailer finally have new clear titles and are officially mine! With that, figured I would get started on the restoration I've been contemplating for the last six months or so.

I want to say thanks to all the folks who've posted their mods on the forums, I've learned a lot and got quite a few good ideas for this project.
 
The hard work started today! Removed the engine, the old ratty seats, took out the wood from the benches and power washed quite a few years of dirt and gunk from the inside and outside. Picked up a gallon of Aircraft Stripper and set to work getting the old paint off.


I was really impressed with the Aircraft Stripper, it peeled the old paint off with not too much effort. The hard part was around all the rivets and in some of the creases where the scrapper just wouldn't reach. I ended up using the power washer to clean those areas after a good soaking in with the stripper. I managed to get half the boat done before running out of stripper, but after about 3 hours of scraping and spraying I was about done for a little while anyway. I was a little disappointed that whoever had painted the boat in the past, had really roughed up the surfaces prior to painting. I was kind of hoping to go with the polished aluminum look, but I suppose, given the condition of the hull, I will be painting.

Lastly, I wanted to run something by you guys regarding the interior hull. I've read quite a few posts on here and other sites regarding using truck bed liner material for the floor boards. I am specifically thinking about Herculiner which is running about $77 a gallon. Do you think this would be a good option vs. using something like Gluvit on the seams and rivets? I floated the boat in the pool and didn't find any leaks but that was before removing the paint. I want something that is going to seal the boat and for the most part be a permanent fix. I plan to put in floor boards and a front casting deck which will make access to the bottom of the boat very difficult if it springs a leak in the future. Anyway, curious to see what some of the opinions are, especially since this is my first big mod project.
 
Before taking the engine off, had to build a stand for it:


Moved down to the basement to work on. Since its been sitting for a few years, ordered the carb rebuild kit, got new plugs, a tune up kit and a repair manual. Should have that stuff in early next week and can hopefully get the old Johnson running. It looks to be in good shape on the inside and seems to have good compression. I tried starting it a few times and got a few good backfires and coughs but couldn't get her to start up. Hopefully the rebuild on the carb will do the trick.
 
Well we finished up the majority of the paint removal! Yeah! Learned a good lesson in the process, there is a reason the lesser know brand of "aircraft remover" is about $8 or $9 cheaper than the leading brand! I ended up working a lot harder and a lot longer to get the second half of the boat done with the "less expensive" brand, lol. Anyway, not so bad and my little helper had a blast helping scrape and power wash the boat! Thanks for looking, more to come........... now what did I do with that carb....... :p


Carb rebuilt and ready to go! Thanks to a little help from some of the folks on the forum and a friend from work! Here's hoping there wont be too much more to do to the engine other than some gear oil and a few adjustments here and there.

 
Well, finally got some time to work on the boat or rather the engine. Got the carb back on last weekend and this weekend spent some time getting the engine started. What I wouldn't give for an electric start, lol. It took about 30-45 minutes or vigorous pulling on the rope starter with intermittent adjustments to the carb and the loss of some skin on my fingers to finally get the engine to come to life.

After quite a few colorful expletives, swearing I was going to sell the whole mess, and some help from the Mrs., the blasted thing sputtered to life! Actually she got it started, taking a turn at the pull starter while I held the blasted thing steady and rested my overworked shoulder!

The excitement was fairly short lived as it seems the gear selector may be pretty far out of adjustment or worse. (Had to put in in "Forward" to get neutral to start up the engine.), and of course the engine is not peeing! I didn't get to let the engine run too long for fear of overheating it. (Yes it was in a trash can of water). With any luck these are minor problems, at least I am hoping. Guess I'll order an impeller replacement kit this week and start reading up on tearing down the lower unit and seeing how the transmission works. The adventure continues......
 
I had a little time to play around with power point and I think I've come up with a good design for the mod on the old Commander. I didn't want to over-engineer the boat or overload it with new structure. I think this plan should work. Anyway, its a starting idea. Comments and suggestions are welcome and thanks for looking!


Hey, Rick! I followed your post from FaceBook. I am actually renovating a 1967 Sea Nymph...was outside all day yesterday and today. The more I do the more I want to do. I added a before pick. Looking forward to seeing how it comes out. One of these days we need to go fishing again. -Tom
 
Looks like you've really thought this out. Thats going to make a great boat for you and the boy to fish out of. I've got an old Lone star that looks like to went through a hurricane that I am slowly breathing life back into. Good luck and keep the pics coming. How thick of flat stock are you thinking of using? Do you think it'll flex? I planned on using channel instead for mine. Curious to see your outcome.
 
Hey, Rick! I followed your post from FaceBook. I am actually renovating a 1967 Sea Nymph...was outside all day yesterday and today. The more I do the more I want to do. I added a before pick. Looking forward to seeing how it comes out. One of these days we need to go fishing again. -Tom

Hey Tom, good to hear from you. I'll have to check out the Sea Nymph. As for the fishing, you bet! I miss those days of being able to take off after work and hit the river for a few hours! This little Lone Star is a long way from the old Javelin back in the day, but I think it will be fun and economical. The way that 150hp motor on the bass boat used gas, all the fun money would end up on fuel, lol! This project has been fun so far and yes the more you do the more you want to do. I did a lot more sanding on it yesterday and spent a few hours drilling out rivets and old rusty bolts! The previous owner(s) got happy with drilling holes in the side and I suppose at some point had some sort of structure built in it. Anyway, I removed at least six pop rivets and about 19 assorted sized bolts with rusted on nuts. Lots of drilling. After work today I'll probably spend some time patching the holes so I can finish sanding.

Looks like you've really thought this out. Thats going to make a great boy for you and the boy to fish out of. I've got an old Lone star that looks like to went through a hurricane that I am slowly breathing life back into. Good luck and keep the pics coming. How thick of flat stock are you thinking of using? Do you think it'll flex? I planned on using channel instead for mine. Curious to see your outcome.

Thanks NCTLSpider, I am sure hoping it turns out like I've envisioned it and I am really looking forward to me and my little partner getting out on the water. I would be interested to see pics of your project too. The more I see of these old Lone Stars the more I like them. Now as for the floor, I've tossed around a few ideas and the flat bar stock was the latest. I am thinking, if it is not cost prohibitive, with using 1/4 inch or slightly thicker stock riveted to the ribs in the bottom of the boat, with the thought being that it would stay rigid enough sitting under the plywood and on top of the foam, and provide a good anchor point for the floor boards. I really don't know if flex will be an issue, I may get one piece and test fit it to see how its going to hold up.

I do have a question for you guys, what would you suggest for sealing the outside hull seams? I spent about two hours getting whatever the old sealant was out of the seams, it was pretty brittle. I am considering using 5200 marine sealant or maybe Gluvit. I've never used either one, any suggestions?
 
Got the last of the old rusty nuts and bolts out of the boat and patched the holes with JB Water-Weld. I did a test run on one of the bolt holes a couple of days ago and it seemed to work well enough. Guess we'll see. I also replaced some of the transom hardware with new stainless steel bolts and got a little more sanding done. Gluvit is on the way and I should be able to get the interior prep'ed and sealed over the weekend along with the external seams. With any luck might even get her primed this weekend. As always, thanks for looking.

 
Between all my other projects, my Lone Star is at a stand still right now. I bought the flex steel for the bottom of mine. Its in rough shape, with a number of larger holes i am patching. I plan to use closed blind rivets with 5200 where you used the water weld on the replacement rivet/bolt holes. I've not had much luck with that JB WW stuff before, but I was a kid then, so I may have applied it wrong.

I'm thinking you could get away with 1/8" stock, (1/4 would be nice, just out of my price range), dependent upon how far apart you set them. I'm no expert though! Once i actually get "anything" done,https://www.tinboats.net/forum/posting.php?mode=reply&f=21&t=31316# I'll start posting pictures. Some one on here had also posted pictures of pool noodles attached to plywood, which seems really economical and removable when I have to store outside.

I'd like to try the Gluvit. People seem to swear by it, where as the Flexsteel has mixed reviews.
 
I hear you spider! - The JB water weld didn't work out so well. Over half of the repair spots either didn't hold or for some reason the WW didn't harden correctly. I am pretty sure it was mixed properly but none the less a large percentage of the repairs failed. I ended up re-cleaning the holes and using some good old regular JB weld to fix the holes which I should have done to begin with! Its going to take a little more work to sand the repairs smooth but I think it will be for the best and I doubt I'll have to worry about the repairs breaking.

As for the Gluvit, I am hoping it was worth the price I paid for it! Everyone does swear by it, I just hope it lives up to its rep. I am hoping to get the rest of the hull prep done here soon, get the Gluvit and 5200 applied as needed and get the old girl primered and ready for paint.

I am still contemplating the floor design. I agree the 1/8 stock would probably work if I keep them close together coupled with using some of the pink closed cell foam panels for flotation and support. Aluminum stock is so expensive these days, makes it difficult to use and keep to a reasonable budget.

I'll look forward to seeing the photos of your Lone Star once you get going on it and seeing how its coming along.
 
I did patch the first big hole on the bottom / bow. I read on here someone thought about using a bolt with washers and 5200, so thats what I did. A 3/4" bolt with nylon lock nut and 2 large flat washers, all caked in 3m 5200. Looks like its holding very good. A few more holes to patch, then I can leak test. Just have to get it to the point I can put in a new Plug system. Before that, I need to Steel flex the transom. Just soo many little steps before I can get really started.

I'll try and get a new thread started for my project soon. Now is probably the best time to do it, while the Mrs. is out of town.
 

Attachments

  • mail.jpeg
    mail.jpeg
    43.9 KB · Views: 4,877
  • mail.jpeg
    mail.jpeg
    86.1 KB · Views: 4,877
Wow that is a pretty big hole! Looks like its a good solid fix though, I haven't worked on or with these old aluminum boats long enough to really know what works the best, I am still depending a lot on the collective knowledge here on the forums. Anyway, I'd say that between the bolt, 5200 and Flexsteel it should work out fine.

As always its the little details that seem to take the longest, lol. I am certainly not a big fan of paint stripping and sanding but that has and is still taking up a lot of time, I really want to get to the build out but I want to do it right. I know its an old fishing boat but I want her to look as good as possible. Then there is the engine, got it running but still need to drop the lower unit and replace the water pump or at least the impeller, just haven't had time to get to it yet.
 
Yes, it was a big hole. They had epoxied over it, and it didn't leak at all. When i started grinding the three layers of paint i saw the old weld/patch. It didn't look solid enough for me, so i chiseled it out. This is my first aluminum boat (or boat at all other than a canoe). I'm not as concerned about looks as I am about being able to handle salt water and oyster beds/rocks in the gulf. I plan on poling this little boat in the flats of the gulf for redfish. Dream big, right?

I know what you mean about wanting to build. I've got plans for floors, decks, rod holders, lighting.... but thats all just icing on the cake! Hopefully you'll find some time soon.

Thats funny. I always start with the lower unit and work my way up. I hate not having a good working water pump. The engine is usually the last thing i do.
 
Sounds like you'll have a lot of fun with the boat there in the gulf, hopefully, like mine it will come together soon. I don't think I'll be anywhere near done with it in time to hit the water this year, but I should have her ready by next spring. I have Smithville lake nearby and I've been wanting to fish it for a while but a boat is a necessity, its one of those lakes that is not much good for bank fishing. Either too developed or inaccessible not much in between. I'd like to get down your way for some more fishing too. My wife's grandmother lives over near WeekiWachee and I try to get a little fishing in whenever we get down to see her.

Anyway, lots more to do. Just found a good deal at Walmart on Rustoleum self-etching primer in the rattle can for $4.77 so bought the few they had and put in an order for more. Cheapest I've found it anywhere. Figured I would use it to prime and then spray on some Rustoleum topside.

Well, hope to see more pic's of your project soon and i'll try to get some more work done on mine and post some more. Almost forgot, found a great source locally for tube, angle and flat aluminum at about a tenth of what Lowes and HD want for the same products, example 6063 1/8 1x1 tube aluminum $2.49 per foot at Metal By the Foot https://www.metalbythefoot.com/index.php?category=Aluminum. BTW they do ship, so if you're thinking about using tube or angle they could be worth a look. I don't know what shipping costs but their prices may make it worth while.
 
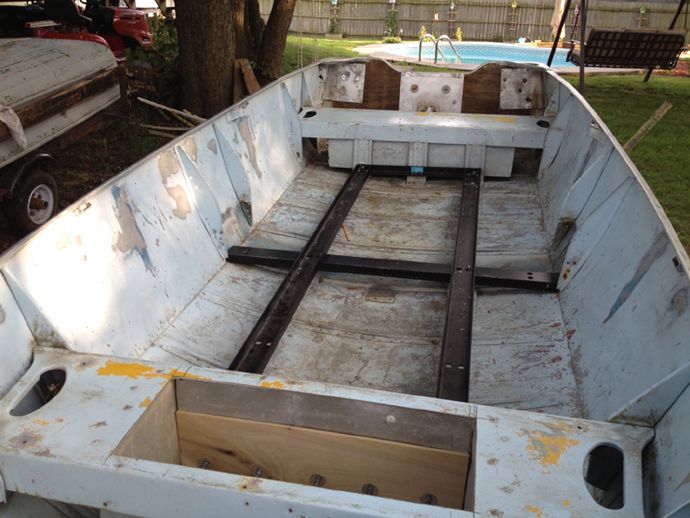
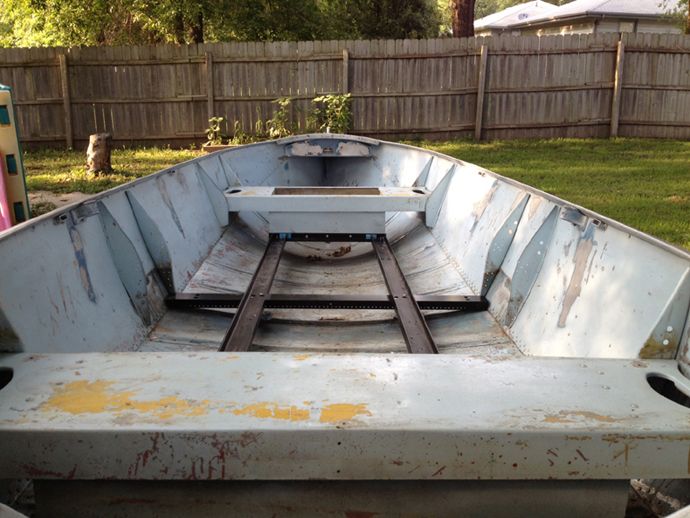
Well, got a lot done this weekend. Finished the sanding on the outside of the boat, finished sanding the repaired spots, (the JB Weld worked great) and the biggest accomplishment is I got the substructure for the center deck installed! I had all kinds of cool plans using tube aluminum, bar stock and so on, but what I actually ended up using was three aluminum rails from a computer server rack system that I picked up as scrap along with some aluminum angle. With that I made a trip to Lowes, picked up some nuts and bolts, a sheet of 19/32 plywood and two 4' x 8' closed cell foam panels.


I ended up cutting out the top of the front seat for a couple of reasons. First, I needed to add some backing/support for the angle I attached to the bottom of the flotation box and secondly I decided to make this my battery box. I figure by installing one or two batteries up front, it will help to balance the load in the boat.


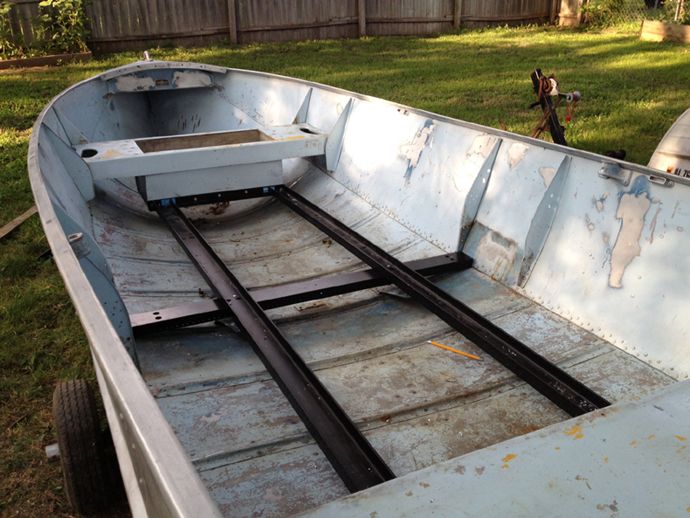
Here is another shot of the rails/channel. I mounted them channel up and I plan to add a wooden insert that the floor and a center seat will eventually be attached to.


After securing it to the front and rear seat with bolts, I used 3/16 x 1 aluminum rivets to connect the cross member to the lower part of the supports where the middle seat used to be and to the rails running fore and aft. Once everything was tightened down it was pretty sturdy and had limited flex. I think it should work out fine and the good part is if it doesn't its just a matter or removing a few bolts, drilling a few rivets and the floor comes right out.

I plan to Gluvit all the seams and then apply 3M 5200 sealant in the transom area and few other places. After that I should be about ready to start primer work and then final painting. Anyway, shes coming along nicely.


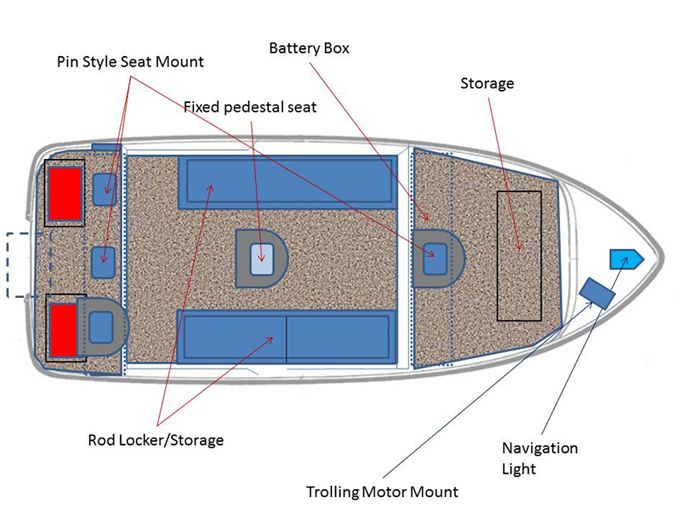
Here's my latest concept of what I'd like to accomplish with the boat, guess we'll see how it works out :p

Thanks for looking and your comments and questions are welcomed.
 
Well got quite a lot more done on the boat! Also scored some good deals on some build items at the Bass Pro outlet store in Springfield, MO! Managed to get two 3/4 pin seat mounts, 12" pedestal and 3/4 pin base mount units for $20.00 each! A new in the box boat cover for $25, normally $70 and another 3/4 pin seat mount for $5.00! Not a bad deal. Also as you can see from the photos, got started on the trailer refurb, all new bunks and some fresh paint! The boat finally has a couple of coats of primer and I got some more of the floor support structure done! Anyway, here's the latest photos and thanks for looking. Comments, questions and suggestions are always welcome!


This is what I started with


Got a little more primer work to do on the inside, ran out of paint so I'll have to finish later this week.


So far, so good. Still have to replace the trailer lights and upgrade the wiring a little but all in all, its coming along well!
 

Latest posts

Top