Lil Bitz, a 15ft john boat modifcation

TinBoats.net

Help Support TinBoats.net:

This site may earn a commission from merchant affiliate links, including eBay, Amazon, and others.
Just a couple of more fishing photos, hope everyone is getting a chance to get a tight line or getting work done on their boats.
 

Attachments

  • photo(32).JPG
    photo(32).JPG
    384.2 KB · Views: 879
  • photo(33).JPG
    photo(33).JPG
    469.7 KB · Views: 879
  • photo(34).JPG
    photo(34).JPG
    434.5 KB · Views: 879
  • photo(35).JPG
    photo(35).JPG
    401.4 KB · Views: 879
  • photo(36).JPG
    photo(36).JPG
    425 KB · Views: 879
  • photo(37).JPG
    photo(37).JPG
    428.8 KB · Views: 879
  • photo(38).JPG
    photo(38).JPG
    535.8 KB · Views: 879
  • photo(39).JPG
    photo(39).JPG
    474 KB · Views: 879
  • photo(40).JPG
    photo(40).JPG
    329.6 KB · Views: 879
  • photo(41).JPG
    photo(41).JPG
    321.5 KB · Views: 879
Not sure if anyone are Gator football fans out there? But I obviously am, and here are a few Gators I meet along the way.
 

Attachments

  • Fred&Chuck.JPG
    Fred&Chuck.JPG
    102.8 KB · Views: 839
  • photo.JPG
    photo.JPG
    367.7 KB · Views: 839
I've actually meet quite a few Georgia Bulldogs at the annual Florida/Georgia game, and they are all cool guys. I have some photos with Hershel Walker, I just don't like posting them on here a I'm a Gator fan myself ha.
 
Can't wait to see you boys this year! What's the record again?


GO NOLES!!!!!!!!!!!!!!
 
Yup you got us this year, I'm a die hard Gator fan and alumni but I don't run my life around whether we win or lose bud.
 
So today I finally started on installing herculiner bed liner in my jon boat. I removed the center bench, where the live well sits, and to test out I started with a quart of black bed liner (which I plan on using under all of my seats and front deck). I decided to use black in areas that have a utility purpose and I won't be walking on top of, and white on areas that will be exposed to my feet and the elements so it won't get so hot.
 

Attachments

  • photo(2).JPG
    photo(2).JPG
    317.9 KB · Views: 707
  • photo(3).JPG
    photo(3).JPG
    410.5 KB · Views: 707
  • photo(7).JPG
    photo(7).JPG
    364.2 KB · Views: 707
After removing the center rail, I scrubbed it good with a brillo pad and soap. Then I reapplied 5200 caulking to all the seams, and let this set up overnight. Then in the morning I lightly sanded all surfaces with an orbital sander with 120 grit sandpaper. After this I wiped the entire area down with mineral spirits, let it dry, and wiped it down once again. From someone who has installed this on trucks before, cleaning and prep is 100% of the work, but makes a huge difference in how long the product lasts and how good it looks.
 

Attachments

  • photo(8).JPG
    photo(8).JPG
    361 KB · Views: 706
  • photo(9).JPG
    photo(9).JPG
    389.7 KB · Views: 706
  • photo(10).JPG
    photo(10).JPG
    354.4 KB · Views: 706
  • photo(11).JPG
    photo(11).JPG
    409.9 KB · Views: 706
  • photo(12).JPG
    photo(12).JPG
    403 KB · Views: 706
  • photo(13).JPG
    photo(13).JPG
    535 KB · Views: 706
  • photo(14).JPG
    photo(14).JPG
    465.4 KB · Views: 706
Shortly after reapplying 5200 caulk, I realized one of the rails wasn't completely secured to the boat any longer, so I busted out the tack welder and reconnected it to the boat. The clamps held it in place, and after tacking it back, I also 5200ed it to make sure it will stay connected...
 

Attachments

  • photo(15).JPG
    photo(15).JPG
    556.8 KB · Views: 706
  • photo(16).JPG
    photo(16).JPG
    551.5 KB · Views: 706
Some photos of the cleaning process, again most important part is the prep work (and also the most boring).
 

Attachments

  • photo(17).JPG
    photo(17).JPG
    328.1 KB · Views: 847
  • photo(18).JPG
    photo(18).JPG
    375.5 KB · Views: 847
  • photo(19).JPG
    photo(19).JPG
    319.4 KB · Views: 847
  • photo(20).JPG
    photo(20).JPG
    272.6 KB · Views: 847
Finally I taped off the areas I wanted the bed liner to stop, and shortly there after applied the bed liner. I did so with both a brush, and a mini roller. With the brush I dabbed along areas which I couldn't roll do to being in the corner, or seams and what not. Then I rolled the bulk of the areas, I did both steps one time then I let the product cure for 30 minutes and reapplied. I actually did these steps three times with one quart which gave me a nice thick waterproofed coat.
 

Attachments

  • photo(25).JPG
    photo(25).JPG
    312.8 KB · Views: 847
  • photo(21).JPG
    photo(21).JPG
    385.6 KB · Views: 847
  • photo(22).JPG
    photo(22).JPG
    354.8 KB · Views: 847
  • photo(23).JPG
    photo(23).JPG
    338.1 KB · Views: 847
  • photo(24).JPG
    photo(24).JPG
    299.5 KB · Views: 847
  • photo(26).JPG
    photo(26).JPG
    411.8 KB · Views: 847
  • photo(27).JPG
    photo(27).JPG
    488.5 KB · Views: 847
Sorry about the quality of these photos, it's mostly due to the carport my boat lives is in direct sunlight all the time. I'm really happy with the results, and I've already started prepping areas where my feet will be sitting, to hopefully coat the rest of the boat in white next week.
 
I finally got to work on my boat some, then like yesterday my work called me in. I really dislike the holidays, at a hospital everyone has pseudo-illnesses to get out of work and go shopping. But either way I got some work done, prepping the rest of my boat for bed liner, hopefully I can get some Herculiner down tomorrow.
 

Attachments

  • photo(29).JPG
    photo(29).JPG
    280.5 KB · Views: 830
  • photo(30).JPG
    photo(30).JPG
    302.1 KB · Views: 830
  • photo(31).JPG
    photo(31).JPG
    394 KB · Views: 830
  • photo(32).JPG
    photo(32).JPG
    349.5 KB · Views: 830
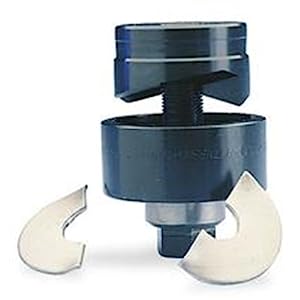
Next I'm trying to punch holes through the seats to run conduit through, to of course protect my wiring but also to look neater without wires just run through the bottom of the boat. What I love about this knockout set is it cuts through the aluminum like butter, unlike hole saws which tend to bounce on and off the aluminum and burn their way through.
 

Attachments

  • photo(33).JPG
    photo(33).JPG
    570.8 KB · Views: 829
  • photo(34).JPG
    photo(34).JPG
    343.8 KB · Views: 829
  • photo(35).JPG
    photo(35).JPG
    542.1 KB · Views: 829
  • photo(36).JPG
    photo(36).JPG
    608.6 KB · Views: 829
  • photo(37).JPG
    photo(37).JPG
    335.6 KB · Views: 829
  • photo(38).JPG
    photo(38).JPG
    469.2 KB · Views: 829
  • photo(39).JPG
    photo(39).JPG
    405.9 KB · Views: 829
  • photo(40).JPG
    photo(40).JPG
    448.2 KB · Views: 829
Thank you sir, not as tight as you or Mojo's work but I do the best I can with it.
 
That is a cool tool. I used a hole saw kit and like you said, it jumped around and i slung WD40 all over the place keeping it lubed up. Keep up the good work I like where you are taking this.
 
[url=https://www.tinboats.net/forum/viewtopic.php?p=336743#p336743 said:
rscottp » Yesterday, 23:24[/url]"]Cool tool. Never saw one before, how does it work?
slug splitter, hole puller, slug buster, lots of different names... drill a pilot hole first, then put the die and bolt through- then on the other side of the metal, thread the punch onto the bolt until its tight. then tighten with the wrench- the bolt pulls the punch through the metal against the die

cant use it in a blind application but they are great when you have access

pretty expensive to purchase for personal use unless youre an electrician.

41CI2btMVFL._SY300_.jpg
 
Top