14' Deep V Build and Trailer (Done)

TinBoats.net

Help Support TinBoats.net:

This site may earn a commission from merchant affiliate links, including eBay, Amazon, and others.
Another build I just saw for the first time. #-o Not sure how these keep slipping past me.

I've never seen a trailer with that much tubing. :shock:

You've done a bunch of work, and it's looking great. I hope you and your boy will have lot's of great memories on the water from the hard work you're putting in now. =D>
 
All I can say is wow, that looks awesome. Keep the pictures coming, I would like to see the foam your talking about.
 
:lol: Hey summers, thats a great job you're doing...keep it up. I also have a Mercury 25HP motor that had the same problem. At sometime in the past the foot was removed and the little washer wasn't reinstalled. Above that latch you will see a rod going up into the motor. This is the reverse lockout rod. If you look closely you will see two little tabs on the rod. I cann't remember if the washer sits on top or below the tabs.The washer holds the tabs and rod up when you are going foward. When you shift into reverse the rod comes down and holds the motor locked in position. Remove the foot, take the rod out and put the washer back on, reinstall the foot...no more problems. The boat looks wonderful! Some of the best aluminium work I've seen in a while. Please don't spare the pictures!! :WELCOME:
 
Well I went crazy this weekend and did all the carpet, now I am letting it sit so it dries. A few people came by and did not believe that it was the same boat that I bought last August. Next weekend I am hoping to do the electrical and the chairs. I would have some updated pictures but I left my SD card in the computer when I grabbed the camera to take with me for the weekend. I am going to take this Friday off so I can make sure that I have more then enough time to do it all right.

Thanks everyone for the support,

After I had the carpet in the boat and I could see the frame work come together it felt like I was in the home stretch. I will make sure that I have a bunch of pictures for every one.

also wanted to tell everyone about the contact cement I used for the carpet this stuff was fantastic to work with. I used a foam roller and I used about 3/4 of the gallon for a 6'x21' worth of Marine carpet. Also this stuff is so flammable its 80% by weight VOCs so you need to wear a organic vapor respirator and have great ventilation. I had a 2500 cfm fan running about 10 feet away with a cross breeze inside the barn. It has a warning on the lid to tell you to turn off your main gas line before you open the lid, its no joke. but it was worth it.

Dap Contact Cement Gel
0QEaGhFuVdsihTuVpQ82QzDM6faN1XF6lpuU2Glx4DRt2Jp1lELvDvJ2e1wpQAyyxTBsbBV338X46SzoIA2m014KiHLqAnijQezAGvdSZCSivh1dhdyVCByR1GZavwFvWUpdMOxMnIZkdhCSLCGryMDC-fpkUm1gk1NrDELKPn4onnWvFCDblLV0TDAyj1przZcn3merYBw
 
Well the last few weekend I just decided to knock it out and go full steam there were a few all nighties mixed in but I am glad to say this project is done.

Here are a few shots of the complete work and work in progress.
doing a quick test fit after the glued the carpet down.
Image00017.jpg


I got the battery moved to the front those are group 27
Image00005.jpg


I installed the seat bases I also used some left over aluminum to act as a backing on all the seat bases
Image00001.jpg

Image00016.jpg


Installing the trolling motor was way easier then i thought it was going to be.
Image00031.jpg


Image00025.jpg


Image00027.jpg


Image00035.jpg


Image00036.jpg
 
I completed all the electrical today and my last seat base for the center bench arrived tonight so i am going to do that when i get caught back up with every thing else. I even found time to start the motor and let it run for while I had not started it in over a year and with about three good pulls it was running. although my electric start was not working so I am going to have to look into that.

I am going to take some pictures of the finished electrical later this week, I had to make sure that all my wires and switch were hidden because my son thinks that they are there for his amusement.

Here is a shot of the boat once it was all done it a little dark.

Image00033.jpg


My next set of pictures are going to on the water from now on. Thanks everyone for your help.
 
This is amazing! I would love to have this boat. Great job! All you gotta do now is catch some fish!
 
WOW :shock: The boat looks great! =D> I had no idea it was that wide until I saw the seats side by side in the rear. That must be one stable boat, and with the 25, shoot, your going to be moving. Very nice.
 
nice looking boat man hell of a job, going through all your pics i didnt see any floatation foam in it i just put some in mine cause it was all removed, just a thought... looks great!!!!
 
I used a two part foam I did not take any pictures of the foam because you have to move a little fast during the process. I used enough two part foam to float a little over 500 lbs worth of dead weight based on the manufacturer specifications.

I just noticed a problem with my motor it seams that the reverse lever lock is not engaging when I when I shift the motor into reverse. The motor will shift into reverse but the lock is not engaging. The shifting pin moves proplery but the lock won't move.
 
Completed electrical
Hiden rear 12 volt
Image00003-1.jpg


The switch has everything except for the fish finder on because it has its own power switch. I have one open switch left, one for the (2) 12 volt, hatch lights (LED) and deck lights (LED) and nav lights and the last for the bilge pump.

The power to feed all the fuse box is from the furthest back battery and the trolling more uses the front battery, I can get a volt reading off the fuse box to see how voltage of the rear battery and the trolling more has a battery indicator on it.

The trolling motor plug and the fuse box/ bus bar were from a few things I had seen on here from some other builds.

The red key like item is just that a power on/off for every thing except the power to the electric start for the motor that is hard wired in.

The plug in the top right is for the on board charger. All I have to do is plug in the extension cord.

Image00002-1.jpg
 
I was able to fix the reverse lock it seams as I had lost a small spring and was able to fix it this evening. I was able to track down the revers lock lever from a local boat shop and I am going to have them check out why my electric start is not working, its kind of a funny thing i call told them my deal about the electric start the guy says come on down and we can have a look. I pull up with my little tin in the parking lot and there about 20 other boats in the parking lot mostly ski and wake boats I point to my boat and the guy says now I under stand you when you said what keys. so we ordered the lever i told him that i could install it and not to waste his techs time with little stuff that i can do. The guy responds with I wish more people said that. It works out great becaseu i was not going to be able to get out on the water his weekend due to previous arragments.
 
That's a good looking helper you got there. Do everything you can with him, he will be grown and gone before you know it.
 
thanks toothpick, I try and take him every where with me hes a good kid and right now all he wants to do is just help no matter what I am doing.

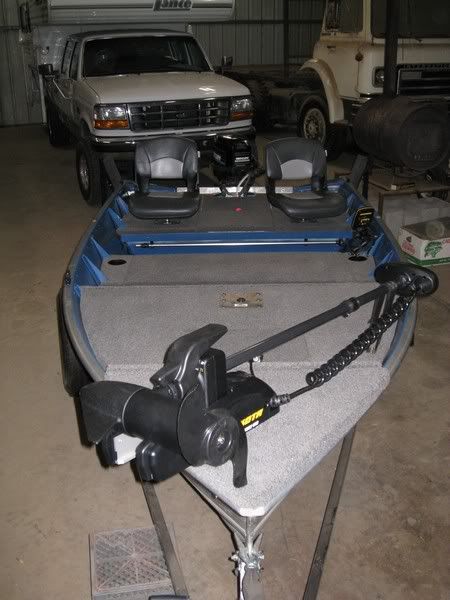
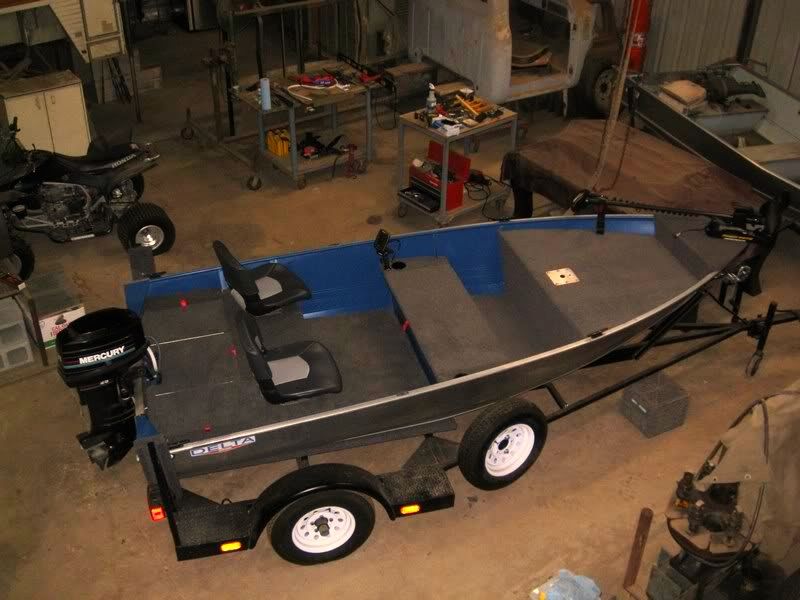
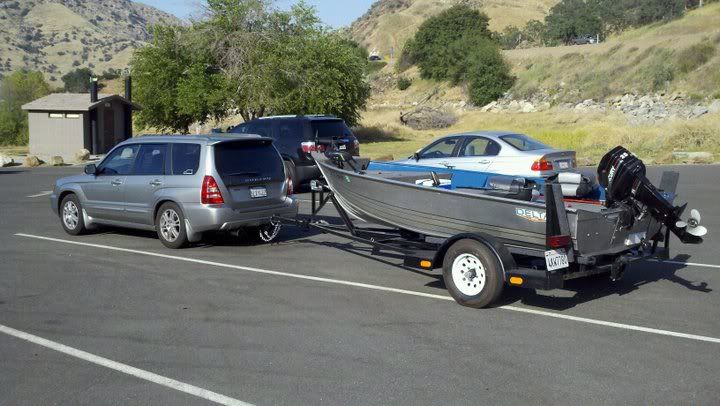
On a side note i had a few open hours tonight so I took the boat out for the first time since the day i bought it. With this being my first boat it did take me a while to get the feel of the tiller. I did get a few positive feedback complements from a few of the fiberglass owners at the ramp. Even more was the look when I launched the boat with my subaru forester. One guy kind of a wise guy says that little thing going to pull that boat out of the water I just smiled and said yep and I get 25 mpg in the city as he was leaning up against his one ton crew cab.

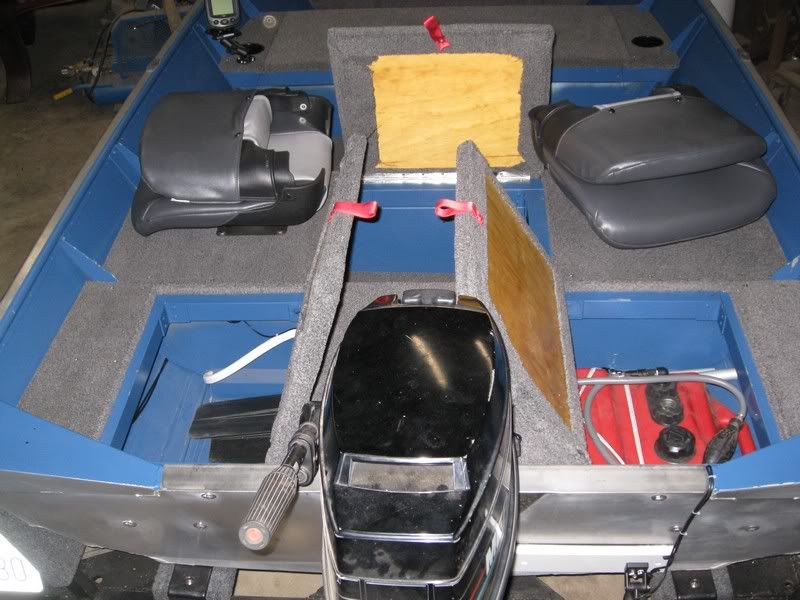
I did not have any luck catching in fish but I have to say it was nice to just be on he water, with just me in the boat its heavy to the side i sit so i am going to have to watch it. My next learning curve is going to be playing with the tilt. The only bad thing from today is it looks like my transducer is not low enough while i am on plane because it just reads 0 but works perfectly up until that point. I got moving from the no wake zone and turned it on started to watch the depth 40, 50, 80, 130, 170, 240, 490, then i reached the plane. i knew that the lake was deep just not that deep. I am going to fiddle with it and see what i can do. I know there are no pictures but i was just to excited to think about stopping to take a few pictures.
 
To be fair its a far from stock forester, 20 psi on a VF43. Now that the boat is done I am going to swap the stock 5sp out for an STI 6sp.
 
Top