'89 Tracker Pro 17 Investigation (lots of pics to come)

TinBoats.net

Help Support TinBoats.net:

This site may earn a commission from merchant affiliate links, including eBay, Amazon, and others.
I did take a close look at the bottom of the boat when I bought it and a few times more when I floated it looking for leaks and installed the new trailer bunks. I didn't notice any cracks between the rivets. I was aware of the issue as it was noted by several other threads on here during my research. I think that it has been relatively lightly used from the condition of most of the hull. This boat has transferred hands several times, as close as I can tell from the ghosts of old reg numbers on the hull, I'm at least the 4th owner.

I don't think that you would suffer any weld quality issues if you only welded from the outside, but I'd be really concerned about any of the foam igniting. If you got the old waterlogged stuff in there, you will probably be ok, but I wouldn't chance it. There aren't many places in the bottom panel of the hull that are more than 1" away from some kind of foam, and aluminum loves to spread the heat around.

I'm not sure how significant your cracks are, but would you be better looking at something like Steelflex? The likely hood of visually finding all of the smaller cracks visually isn't very good, so you'll probably be constantly chasing them as they continue to show up.

Good Luck!
 
Well, I've been slowly fiddling here and there, wrapping up some of the small details before finishing up for the winter.

I spent a couple of days re-routing the wiring in the bilge and cleaning up the plumbing for the livewell. It took longer than I expected mostly because of the funky angles that I had to contort my body into while trying to install various rivets and screws. I got the 2-bank charger re-installed and used a couple of small plastic cleats to use as a cord wrap for when the unit isn't plugged in. I'll end up tucking the trolling battery in the location where the VRO oil tank was originally installed.
120118-IMG_1066.jpg

On the other side of the bilge, the battery is not going to easily fit in the other compartment with the new battery boxes I purchased. The top of the battery box interferes with the wiring coming through the access hole. So I decided to move the battery into the main bilge area and I'll use the box strap to hold it in place. I may take a couple of pieces of aluminum angle to lock it into position as well.
120118-IMG_1067.jpg

And lastly, I installed my Anchormate to the bow. I ended up using a couple of pulleys that I had previously purchased and installed in my 14' Meyer. I chose the port side of the bow, even though it's certainly a tighter fit, so that the trolling motor will be a little farther away from my anchor rope when both are in the water. I'll tend to drop the anchor when I get to a spot that I like and want to fish for a little bit, and I've had issues in the past with the anchor banging up against the TM when I drop or lift it up.
120118-IMG_1068.jpg120118-IMG_1069.jpg120118-IMG_1070.jpg

I think that this is going to be about it for the winter. I'm going to drain the carbs and wrap her up. I've got a little bit of a wish list to work on when spring rolls around, but we're getting some forecasts for snow, and it's time to bring the car back in.

Things that I've got left to do come spring time:
- Fasten down the bilge pump
- swap out the lower unit
- add the power TNT unit to the motor including relays/wiring as necessary
- add a couple of AL angle pieces to the console to help hold accessories
- add rod holders to the side of the console
- swap out the bow roller
- consider adding vinyl gutter to the bunks instead of standard slides

I'll add a few pics all tidied up before putting her away.
 
Well, I wrapped her up for the winter. Still a few things left to do, but the basics are all there. I'm very pleased with the end results and I can't wait to get her on the water in the spring time. I'm sure that our family will have lots of fun, and plenty of room until the kids get a little older.

I have a thought to take the cover from my Johnson parts motor, which is in better shape and paint the top black, with a maroon stripe, using the paints I used on the side rails. I wouldn't cover the decals, just use some color to tie the whole thing together.
120122-IMG_1112.jpg

Here are a bunch of pics to show how it looked before covering:
120122-IMG_1103.jpg120122-IMG_1104.jpg120122-IMG_1105.jpg120122-IMG_1106.jpg120122-IMG_1108.jpg120122-IMG_1109.jpg120122-IMG_1110.jpg120122-IMG_1111.jpg


I bought a few D-con baits and put them in likely locations, as well as a bunch of mothball sets around the boat. And finally I used a couple of saw horses and a 10ft 2x4 to frame up and then wrapped the whole thing in a tarp. All wrapped up for the winter:
120122-IMG_1113.jpg

I'll be sure to update a little more when I pull her back out to finish everything up.

Have a great winter!
 
Well, after lots of anticipation, I finally got the boat out on the water today. I LOVE IT!!! It's nice and stable, handles very well, and has good pickup.

I tried getting it out there last week, but I couldn't get it running except for holding the choke in. I figured I needed to do a full carb cleaning. I was a little hesitant to get into it due to the link n' sync that would be involved, but it wasn't as bad as I thought. In the end, I swapped the carbs off of my parts motor, as they were cleaner to start with. I finished it all up this week and put it on the water today. Purrs like a kitten, and growls like a tiger when you push her.

The whole family got out today and had a picnic on the water and caught some sunfish and baby bass. Here's a pic of the final product:
IMG_20120414_104326=a.jpg
I apologize for the mess on the deck, We were setting out for a family trip.

And a few pics of the kids having fun on deck:
IMAG1213-a.jpgIMAG1210-A.jpg


Now while everything was working well, I've got a project for next winter. While routing the plumbing, I drilled a test hole into the bottom of the transom. The wood came out clean, but wet. I've done some solid checks on the transom and don't find it to be weak in any locations, but I'll replace that this winter as a precaution.

But that will be after taking in this year's limit!!! Good Luck to all!
 
I love resto stories with happy endings!!!

The boat looks good, and it looks like the kids were having fun.

That transom was probably wet from all the water it took on before the resto. Keep your boat dry and in a sunny warm location and recheck the transom this fall. That wood will eventually dry out under the right conditions, but I don't know if your summer will be long or hot enough for that.

There's a new product coming out this year called NewWood that is specified for marine applications like transoms, keep an eye out for it.

https://www.newwood.com/

It's available on the west coast now, and is supposed to come eastward soon.
 
kofkorn said:
Thanks for the encouragement guys! The main reason for this thread bulldog is that I couldn't find the info I was looking for on this site originally, so I figured I'd put it up here to help out the next guy. That and the ability to have a good record of what I've done for future reference by myself :) It's amazing what you can forget about once you cover it up...
Just wanted to say great job on the rebuild, and thank you so much for all of the postings/pictures. I just purchased this same exact boat, and the floor is shot. I will be taking on this project sometime in the near future, but thought all of your hard work deserved a thank you post from another tracker owner :wink:
 
Thank you for the compliment. I really enjoyed doing the rebuild and honestly, I got more help out of the replies to my comments than I expected. I would definitely suggest you start your own thread and post any challenges that you encounter. Certainly a great group of guys here and I'm sure that most problems have been resolved before.

Good luck! and you you have any questions or need additional details, send me a PM.
 
So it's been 2 years on the water now with the tracker and I wanted to provide an update. I love the size and stability of the boat for two guys fishing. It's tight when I have my wife and kids on it, but we've had some fun anyway.

I made a couple of upgrades since the rebuild. The largest was adding a Minn Kota Powerdrive with I-pilot to it. I love the compass feature and use it almost exclusively. If I'd known ahead how I use it, I would have gone for the Co-pilot instead. I rarely use the GPS tracks or anchor lock features.

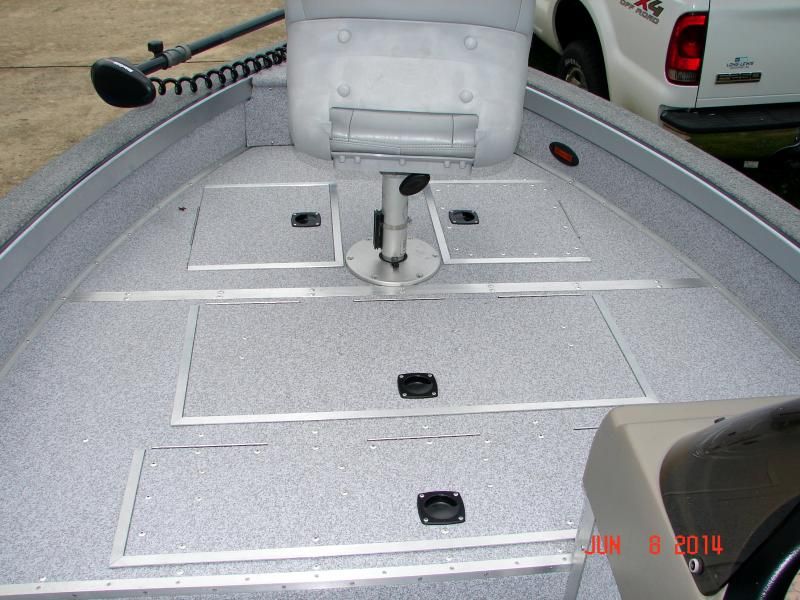
I also added an additional hatch onto the casting deck to access the storage below the deck. The small vertical door at the back of the casting deck was almost useless and made the storage area only useful for rarely used items. With the new hatch, I use it far more than before.
IMG_20140615_151848.jpg
IMG_20140615_151905.jpg

The Nautolex has held up very well. There is no evidence of wear at any location, and when it's dirty, a quick soak with a hose and a brush with a broom will clean anything up. The only complaint is that it is quite rough and I can only kneel on it for a very short period of time, however, it is also very good for standing with out slipping.

The one issue that I have with my build is the edges of the vinyl have come un-glued. This happened quite quickly, within the 1st two or three warm months. So I would definitely recommend NOT using the 3M spray adhesive. It never fully cured and started letting go at the first sign of heat. Any of the edges that were glued using the Nautolex adhesive or were mechanically held in place with rivets have held up really well. I would suggest taking the time to use the Nautolex and letting it cure while the edge is clamped in place.
IMG_20140615_151833.jpgIMG_20140615_152232.jpgIMG_20140615_151651.jpgIMG_20140615_151723.jpg

Additionally, the shims I used around the live well have completely come apart. Even with the good soaking I gave them with the epoxy, they barely made it through the summer.
IMG_20140615_151729.jpg

The good thing is that all of these spots are covered up when the hatches are closed, and it still looks great :)

And the fish certainly haven't cared...
IMG_1092.JPG2012-06-09 09.50.08.jpg2012-06-09 08.31.30.jpg2012-06-09 06.11.12.jpg2012-07-07 07.39.13.jpgIMG_20140601_121151~01.jpgIMG_20140518_194058.jpg

I'm going to be pulling in plenty more in the future too!
 
This was a really great read and the boat looks really nice. I created an account just to post how much I enjoyed this. I appreciate all the pics/info you have provided. It has really inspired me to finish mine. I took mine apart with the intentions of doing what you did here but got overwhelmed with all the work involved so I gave up for a while. I am going to go start on mine tomorrow. Hopefully I can get mine to turn out looking something like yours. Thanks again for all the info.
 
I'm glad you got motivated to finish yours up. These are great boats and honestly, while it took a while, the work wasn't really hard. Good luck with your rebuild and be sure to post any questions you have. This is a great group for helping.

Good luck!
 
Thank you. I have posted a thread to see if I can get a few answers to the questions I have. Please check it out if you have time. I would like to get your opinion on them.

I also have a question on the 3m spray adhesive you used. You said it didn't work well for you, do you think it was due to the vinyl or the product itself? I was going to use that with my carpet but started having second thoughts after I seen the results you had. I'm wondering if maybe the rubber backing on the carpet would help it from coming loose.
 
It doesn't matter what type of adhesive you use, loose edges that aren't fastened mechanically will curl eventually. This is inherent with the Nautolex vinyl and is explained in the installation directions that come with the vinyl.

That's one of the reasons I trimmed my hatch covers out with aluminum angle around the edges:

I fastened the angle with rivets to the lid and this sandwiches the vinyl between the lid and the angle. This pic is 2 1/2 years after the vinyl was installed.

The vinyl on your lids will eventually curl all the way off of the lid if you don't do anything to them.

I see you also have some curling/separation at your flat butt joints in the vinyl too, this will also get worse if not taken care of. A piece of flat aluminum bar stock or even a wooden strip screwed down over the butt joint will prevent further curling.

As far as the adhesives go, I used the Nautolex 88 adhesive of some of my vinyl and was not pleased with it. I found the 7 day set/cure time unacceptable for my schedule and the 88 produced gas bubbles under the vinyl that had to be rolled out daily until the adhesive had cured. The 88 is also latex/water based and isn't nearly as water resistant as the solvent based Dap Weldwood Contact Cement. I'm not talking about spray can adhesive, the Weldwood is the stuff in the metal paint can that you brush on. Don't be stingy with it, porous surfaces (the back of the vinyl) take 2 coats and smooth surfaces take one coat.

Nautolex vinyl is a wonderful product, but there are some strict rules that need to be followed when installing it.

This is a link to my installation if anyone is interested:
https://forum.tinboats.net/viewtopic.php?f=21&t=21629&p=288212&hilit=+tracker+pro+deep+v#p288212
 
kofkorn,

New " Old Timer" to this forum.
Great job, thanks for sharing your info and photos.

I have a question, just bought a 1993 Bass Tracker Pro 16. Narrowed down a leak, somewhere on the livewell drain, which empties off the side of the boat, below the waterline.

I just want to plug this line off from the outside, and use the livewell for storage. Do you think one of those expandable drain plugs would work?? Or??????

Thanks and Regards,
pescador
 
Hi Pescador,

My livewell drains below the waterline on the port side of the transom. I don't see any reason that a normal drain plug wouldn't work perfectly to seal off the livewell. The only thing I'd be careful of was to make sure that you don't expand the plug too much and crack the plastic fitting. A 20 year old plastic fitting will be brittle, and as it's below your waterline, that could make for an interesting trip.

If you're looking for a permanent solution, you may be better off using some 5200 around the plug instead of expanding it. It would be a bear to get out if you wanted to remove it, but you wouldn't have to worry about ruining the fitting.

Good luck!
 
kofkorn,

WOW! I thank you so much for your information. I have never used this 5200 product, but I will search for information. This is exactly something I was looking for. Is there a special name other than just 5200?

Regards,

pescador
 
It's 3M 5200 Sealant:
https://www.google.com/shopping/product/2209713402074509928
You can pick it up at Home Depot, or most hardware stores. Definitely available at a local marine shop.

It's intended for marine use and is approved for under the water line. It will stick to most anything and can usually only be removed by cutting it off. So if you glue your plug in place, be prepared to destroy the entire fitting to get it out.

Before you glue it in place, I would take some sand paper and remove the gunk from inside the fitting first. Then use the 5200 and let it set overnight at a minimum; 1 week is better if you are able.

I bonded a mount for my fish finder to the back of the transom with nothing but this sealant. Haven't had any issues and it's held perfectly.

Good luck!
 
Top