EricZ's Bass Tracker Pro-16 Build

TinBoats.net

Help Support TinBoats.net:

This site may earn a commission from merchant affiliate links, including eBay, Amazon, and others.

EricZ

Member
Joined
May 1, 2013
Messages
23
Reaction score
0
Hi everyone,

I'm Eric from Minnesota, and I've been lurking around here for awhile now. Figured it was time to start a thread of my own.

About this time last year I bought a 1988 Bass Tracker Pro 16 that was in pretty rough shape. The boat itself is perfect for what I need; something small with big casting platforms that isn't slow. I fished out of it all last summer, adding a trolling motor, fish finder and a few other things.

The plan initially was to redo the floors, replace the transom, fix the console and move the trolling motor batteries forward (back end sat pretty low) over the winter. The layout IMO wasn't as good as it could be, and that started the ball rolling to where it is today.

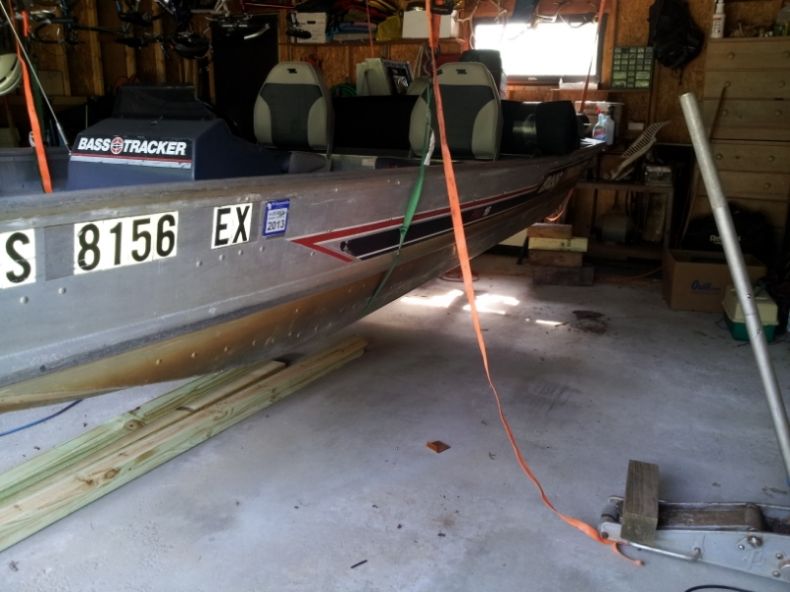
The trailer was so bad that I couldn't even put the boat in the water until I replaced the bunks. I figured not being able to use the boat was a pretty good incentive to completely redo the trailer.

Anyways, here is what I started with


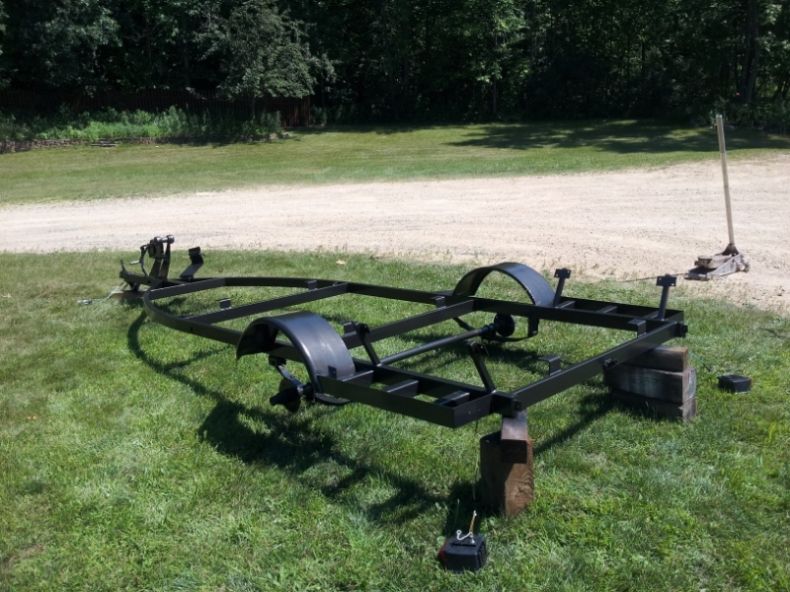
and the trailer.... (notice the rotten bunks)


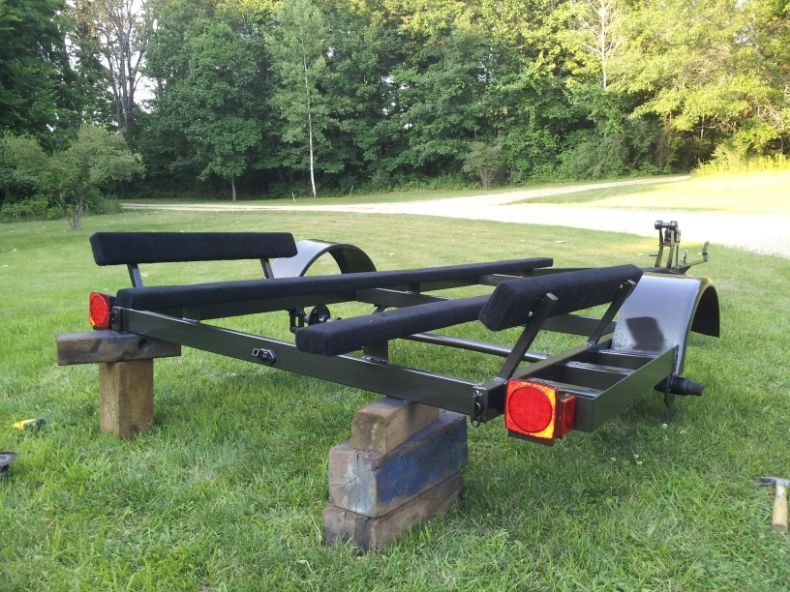
I used the rafters in the garage and some tie straps to get the boat up in the air while I could work on the trailer. All of the decals were ripped off, all new wiring/lights, paint, tires, and bunks. It cleaned up pretty nice.
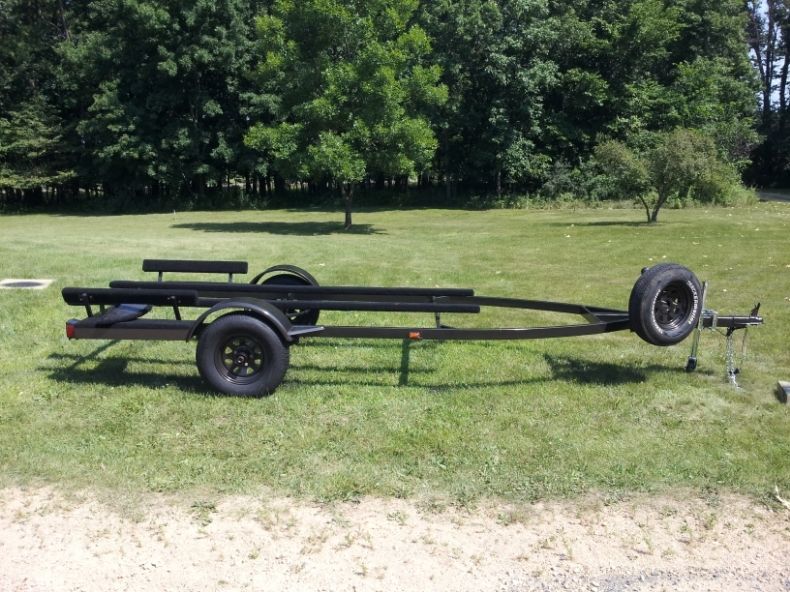


And done.

That's exactly how I used it all summer. In December I started gutting it, and I'll post pics of that tomorrow.
 
Once I pulled it in the garage for winter, it was time to gut it. The transom and floor were soft, and a lot of the carpet was peeling off.

Anyone familiar with these boats knows how much of a pita getting to the transom can be. After getting a little creative it came out in pieces.


Gutted


Mocking up the small Beavertail float pods


And welded


Setting in the new transom. It's 2 chunks of 3/4" marine grade laminated together.


Transom cap rewelded.
 
Welcome to the site...
Looks like you know what your doing,nice work.
 
Thanks guys.

This forum has helped me a lot throughout this build. Any issue I've run into has already been covered on here, it's super helpful.

So after the transom cap was welded, I flipped it over and started cleaning the bottom of the hull. The previous owner must have let it sit in the water; she was really stained.


A couple hours, a burned out grinder, and a bunch of wire wheels later....


Taped off for Steelflex. I went with the stuff that has teflon in it, and put it on as thick as I could get it.


Steelflex is pretty incredible stuff. Once I got it back on the trailer I could literally slide the entire boat across the bunks with one finger.

Next was buttoning up the transom.
 
[url=https://www.tinboats.net/forum/viewtopic.php?p=317121#p317121 said:
Keystone » Today, 05:50[/url]"]You do excellent work!

What part of the state you in? I'm in Albert Lea.

I'm up in Taylors Falls. It's about an hour northeast of the cities. Any good fishing down there?


Once the transom was buttoned up, it was time for framing. I thought for a long time about how I wanted everything laid out, and wasn't quite sure of what exactly to do when I started, but I had enough decided to get the main framing in.


The rough framing of the new bigger casting deck. I brought it 32" further back than the old one, which after fishing it for a summer started to feel a little small.


And the back end
I

Unfortunately I don't have an aluminum welder at home, I have to run down to work to use one. Even though it took more time to rivet everything together, and isn't quite as strong, it was way more convenient.


Majority of it done
 
The next week or two after the main framing was done was spent bending up compartments, and framing where I needed to as I went.


Then the 1/8" floor went in.


I knew that getting enough foam in was going to be a problem so it was packed in everywhere I could get it.


Front compartments and trolling motor battery trays.


More foam


And the rod locker
 
After scouring ebay for two weeks I finally found a nice new console. The old one was too far gone to mess around with.


Cut to fit


And Installed


Bent up interior panels


The trolling motor I got off of craigslist had a 54" shaft, which was way too long. Cut it down to 34".


The next step was paint, I'll post some pics of that tomorrow.
 
Coming along real nice!

Yes, there is plenty of decent fishing down here. Allot of small pothole lakes as well as some decent sized lakes too.
 
Looking great! Just curious, what made you mount the pods that high off the boat rather than flush? I know this is a debated topic. So I don't want to hack your thread on such a nicely going build
 
Thanks guys.

It's been a lot of work, but I'm really happy with the way it's turning out. This is my first boat, and definitely didn't understand the break out another thousand saying until now. It's all worth it though.

[url=https://www.tinboats.net/forum/viewtopic.php?p=317583#p317583 said:
vahunter » Today, 06:16[/url]"]Looking great! Just curious, what made you mount the pods that high off the boat rather than flush? I know this is a debated topic. So I don't want to hack your thread on such a nicely going build

I did a ton of research before I fired up the tig. The reason I raised mine up about an inch and a half is because I didn't see the need for all of that surface tension when on plane. The pods should be completely out of the water when on plane. I also didn't think the stern would sit low enough in the water to get the greatest benefit by mounting them flush on the bottom, if that makes sense. I can post some other pictures of em if you'd like.


Back to the build,

First time it had been out of the shop in a couple months, heading for paint. A buddy of mine who does auto body owed me a favor. I bought the paint and he sprayed it.

Before


The finished layout


While the boat itself was being painted, I set in on prepping and painting the motor. It runs awesome, but looked terrible.


Basecoat done


Got er back from paint. I had my buddy spray 2 coats of self etching primer, 2 coats of epoxy sealer, and two coats of PPG Omni white. This is just the basecolor, there are 3 other colors and clear on it now.
 
The fun really started after I got it back from paint. I was going to just wrap the boat in digital camo vinyl, but after reading some boat wrap horror stories I decided against it. Anyway, I picked up two shades of gray, black, and 100 yards of vinyl paint mask.

Luckily I found a marpat pattern online that I could go off of. There was way too much gray and black in the pattern for me, so I went in and cleaned it up a little bit.

Anyway, here's the first stencil cut.


Dark gray on the motor


Taped off for light gray


Sprayed


So two and a half months later, and I'm finally finished with the boat. It's funny how the little things like work and the girlfriend can get in the way.

I'm gonna pick up where I left off, with the paint. After the motor was finished, I started in on the hull.

Taped the first color


Turned out like this


Repeat for the light gray


and the black


and done
 
This is the most beautiful thing I've seen in my entire life. Dear God please don't let my girlfriend see what I just posted! :p
 

Latest posts

Top