New 1967 Polar Kraft

TinBoats.net

Help Support TinBoats.net:

This site may earn a commission from merchant affiliate links, including eBay, Amazon, and others.

Led_Junkie

Active member
Joined
Jun 21, 2013
Messages
33
Reaction score
0
Location
Southeast Alabama
Hey there everyone, i've been lurking for the last 2 weeks or so reading prior posts and stumbled across one that had a similar issue to the one I have.

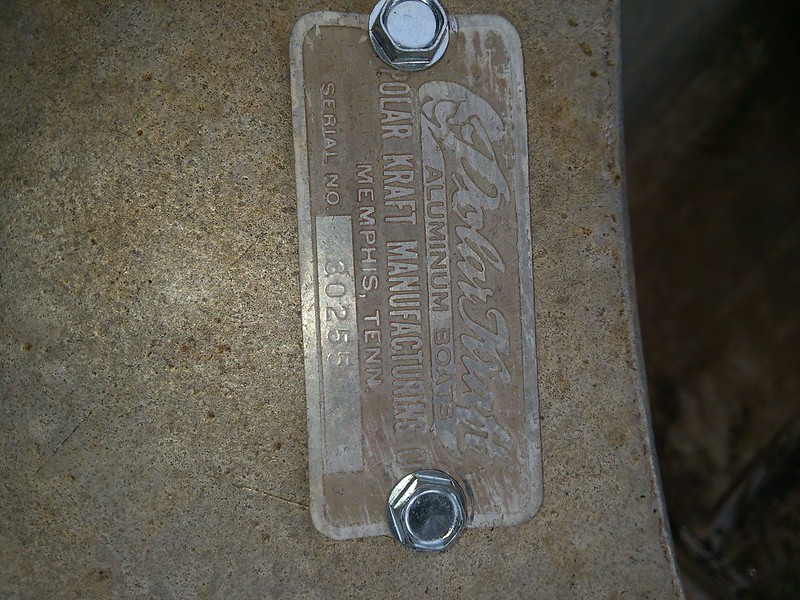
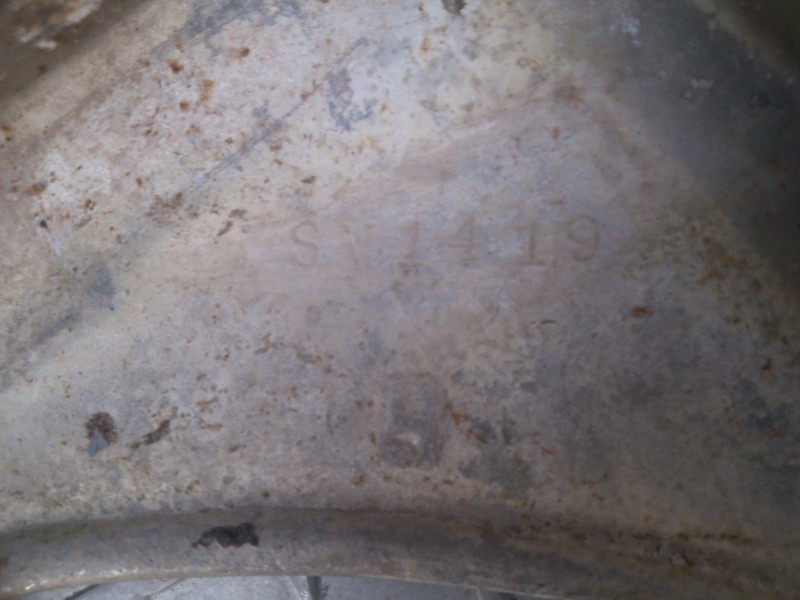
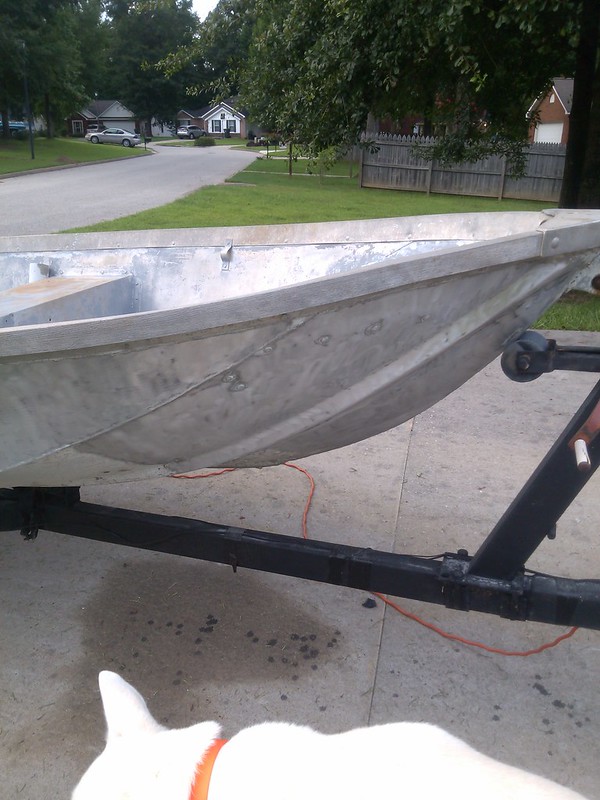
I just purchased a 14 1967 Polar Kraft JS V-Hull and I'm pretty excited. Needs paint and a transom. I have already figured how to fix the transom with Exterior grade plywood and Spar Urethane. The problem I have is the PO had sometime replaced the transom but I think the cap was too badly damaged so it was replaced with a 3/4" U-channel cap. The PO also used a straight 3/4" transom, which was fine for the electric trolling motor, but it didn't fit to the keel braces.

That really doesn't matter now as the thing is rotted, the trouble is the 3/4" cap. Should I try to use it by shaping the 1-1/2" transom to fit to the 3/4" cap or should I try to fabricate or pay to have a new cap fabricated. With limited hand tools I will most likely have someone do the fabricating if it comes to that.

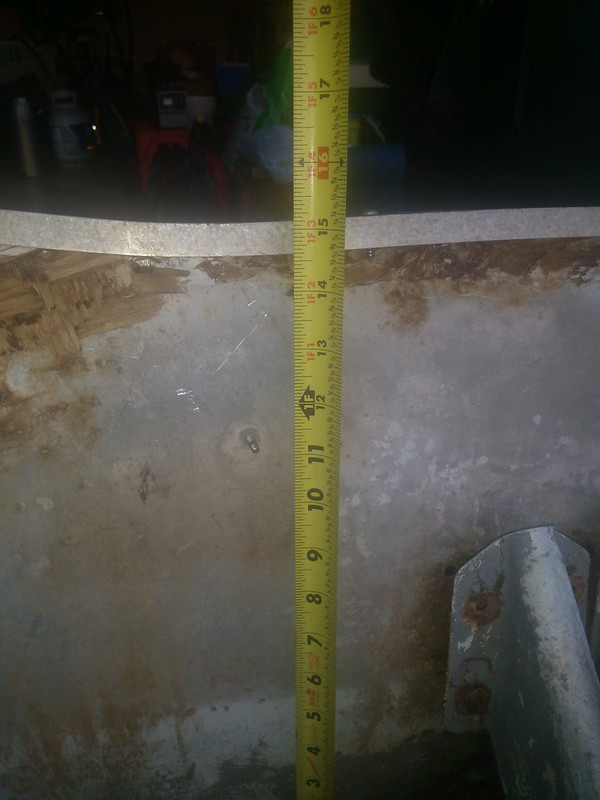
I thought about making the transom straight cross the top as it will simplify things but may raise my transom too much currently it is 15" I assume I need to get an exact measurment to be sure.

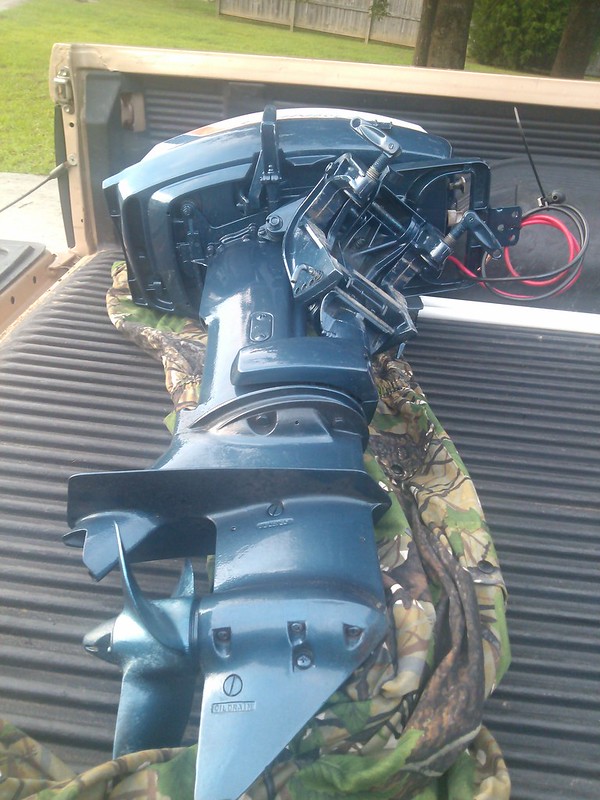
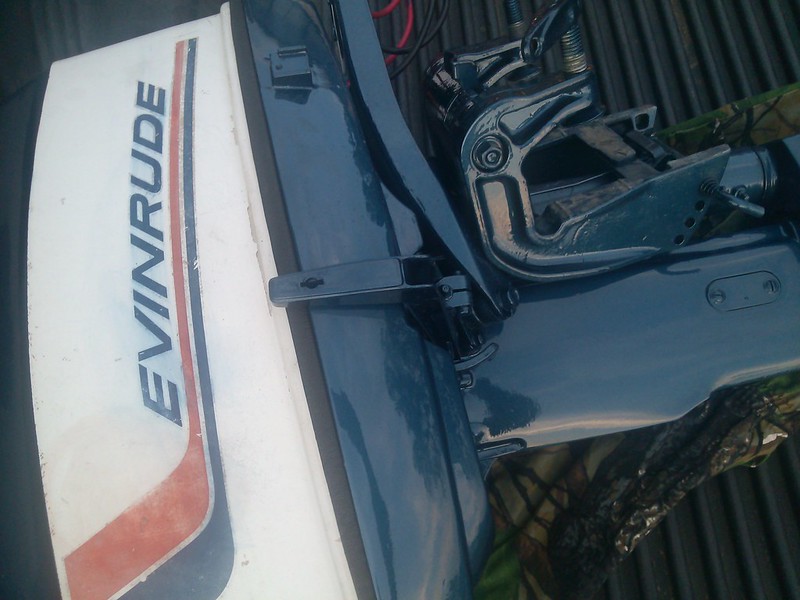
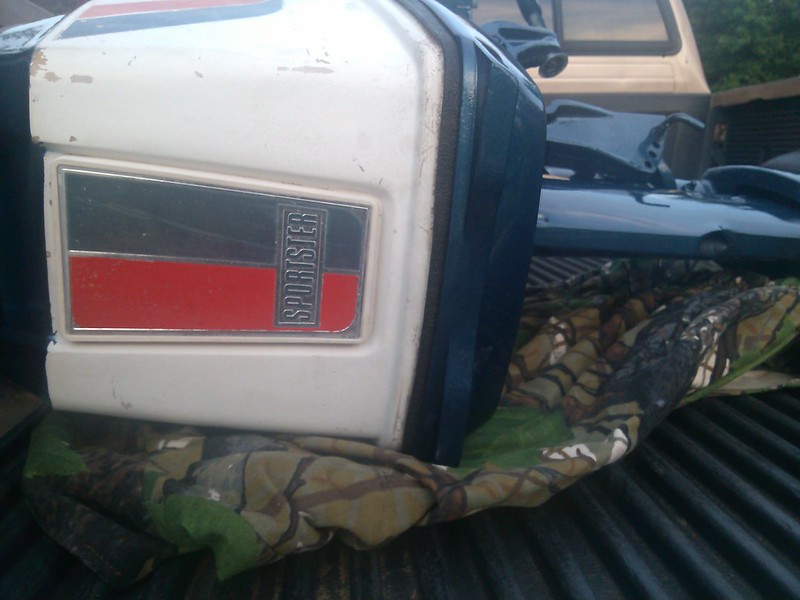
I am planning on running a 25hp tiller steer but need to get the transom fixed first. Thanks for looking :) Great site Ive read like 30 pages in the boat house so far... TMI...
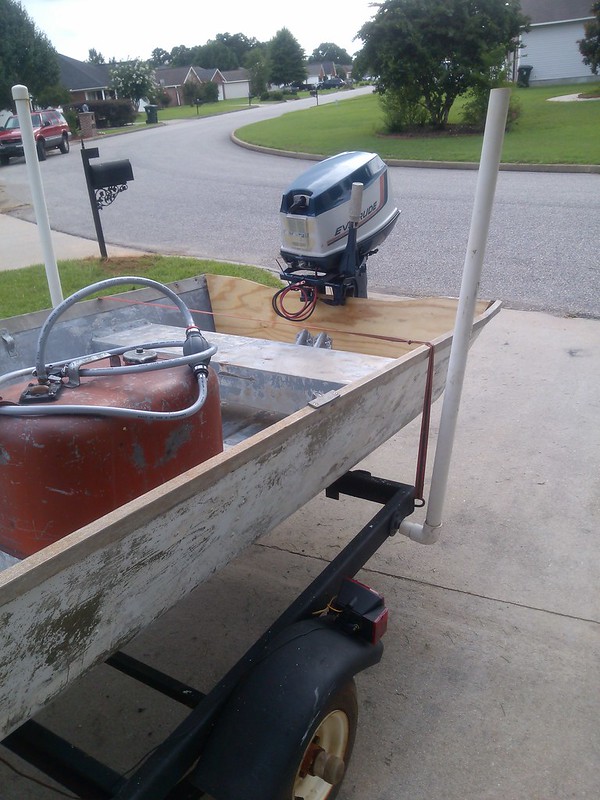
 :D
Here are some pics.
 

Attachments

  • 14 Polar Craft.jpg
    14 Polar Craft.jpg
    21.5 KB · Views: 1,817
Well I confirmed the transom is 15 inches high in the center of the transom and the support is 1 1/2 thick. I am kinda at a loss at what to do. Should I:
1) try to find to fabricate a cap 1 1/2 wide
2) try to cut a bevel from 11/2 to 3/4" with my table saw.
3) use a joiner to plane the edge down using a jig.
I am really thinking out loud here. So bear with me. :LOL2:

Tomorrow I'm going to harbor freight to get some grinding pads and a brass wire wheel. I may get the 32 dollar rivet gun as I am sure I will need it. I had read where folks used the impact hammer with good results too. I'm planning on cutting 4 rivets that hold the cap corners on then I will be able to finish removing the rotten wood. I took bolt cutters and cut out the bolts I could then busted off the frozen nuts with a ratchet and vise grips.

I'm stopping by the cash and carry lumber yard and procure a sheet of 3/4 exterior and a jug of gorilla glue. Then halving the wood and gluing it up and clamping to cure in the 140* garage.

Then a good pressure wash to knock off the loose paint and I'll begin to strip the remaining paint.

The rollers on the trailer are crap so they have to go and I eyeballed some yellow urethane ones today but didn't know the size so I left with fishing tackle only lol. The trailer needs work too but lights are new(ish) as are the bearings and tires/ wheels. I'll pressure wash it once I get the boat upside down in the grass but it is krusty in places. I found a great trailer for 250.00 but need to buy my motor first.

I too pics and will post once I upload them.
 
Most motors are not exactly 15 or 20 inch's long. Measure your motor and see if making the transom flat across will work ok. The transom cap can be made from 2 pieces of aluminum angle over lapping each other.
 
Thanks for the tip. I do not have the motor yet it is having an electric starter installed as well as other thing done so I can't measure anything yet.

I did manage to get the old transom out and the new transom cut and glued. I also hauled out the pressure washer and washed 1/2 of the boat until lightening drove me inside. It looks like there are 3 layers of pain to remove. The top layer isn't adhearing well so it is flaking off and blowing off easily with the water. The other two are more stubborn so it looks like I'll be using stripper.

While removing the corner caps I noticed that each cap was marked with the model and corresponding side. So while my title just stated it was a '67 Polar Kraft SV it is really an SV1419 which gave me enought to identify it on the Fiberglassics site https://www.fiberglassics.com/library/Polar_Kraft.

Following my normal routine I screwed up and then made lemonaide out of my lemons. I managed to cut my transom board short 2xs :roll: So after thinking of my wasted 3/4" plywood I grabbed a sheet and laid it inside the boat and waddaya know? Perfect fit for the decking I wasn't planning on installing lol.

During the pressure wash I discovered a few spots that may prove to be problematc, all previous repairs. On looks like it should hold tight the others are questionable at best. I'll take pics and post them. I had problems posting pics from home as all I have is an iPad and my phone. So it maybe tomorrow before pics can be posted.

I'll be buying some Glovit shortly to fix the leaks, followed by priming and painting. Cutting the platforms and decking will be later but ongoing. The pressure washing reveiled the transom support size so I'll be making that out of the 3/4 "scrap".

Question of the rivet replacement, should I use a air chisel and bucking bar or the HF pneumatic rivet gun? I should be able to enlist my 11 Year old to help with the bucking lol

The trailer is in better shape than I hoped. I blew off a bunch of rust and grime hiding the spring packs and rollers, bunk supports. Packs are good, hardware needs attention but can survive a bit, but the bunkk supports are toast. So these will be replaced and bunks recarpeted I have a bunch of green carpet leftover from my camper to use for that. The winch only have 1 bolt in the mechanism itself so iI will replaces that. I knew the rollers were gone a good visual confirmed this.

Nickle and dime stuff adds up quick don't it lol.
9105466732_d8f13d0374_c.jpg

9105465904_9d61b3f283_c.jpg

9103239575_76dbfd2500_c.jpg

9105464152_fcb9fb0065_c.jpg
 
I had an idea for the transom cap. I can get a piece of 1-1/2" square tubing then have it cut about an inch deep then bolt it across the side to the transom after it is formed. Finished pressure washing the boat for the most part. This reveled another possible problem, an epoxy plug. I don't think it will be a problem though I didn't see it from the inside.

On the plus side I discovered the trailer is a tilt trailer. Now I need to find some expanded steel so I can tote my 4 wheeler easier lol. Bunks are wasted I was working one up and down realizing that the metal was fatiguing as opposed to hindging. The main center roller was split I two the pin was pretty rusted and bent. The others roll but in bad shape. I need to go to Academy sports.

Hoping to get the motor soon.
 
Removed the tramsom from the clamps. Confirmed the delivery of the motor next week. Had to cut grass so no further progress made. I need to cut the transom and begin to apply the Spar Urethane so I can mount the motor. Roller and Bunk parts are at the store waiting to be purchased.

Slowly but surely. Lots of stuff on the fire different projects and commitments everything needs attention. lol
 
Not too much to post about today I did manage to regisiter the boat; no small feat. I stopped by the store and bought some sanding belts for my belt sander and sanded the transom and hit it up with the orbital sander. The plywood isn't the best quality and there is a lot of small voids in the wood. I'm not planning on filling them just choosing the best side to put forward. Once I choose my paint for the inside of the hull I will shoot it with the paint, but for now I am just going with the spar ureathane.

I plan on joining an edge and then cutting the transom to fit tomorrow. I think I am going to revert to my origional plan and keep the transom cap and using the joiner the cut a rabbit to the proper thickness. When I spoke to the PO he told me the boat had the orgional transom and the 1 1/2" thickness only went as high as the transom braces then it was 3/4" the rest of the way up. So by my making it 1 1/2" it will be a lot stiffer transom.

Right now I need to clean all the goopieness out of the transom cap. Going to be a busy weekend, I was supposed to have maintenance day out @ my hunt camp but we are getting rained out so more time to work on the boat. With the arrival of the motor Tuesday I want the transom to be as ready when I go get it. That way I can have the boat yard help me mount it.

Woohoo.
 
Busy weekend. Got the transom cut as well as the transom saver and the new bunk ends. I sanded and began to apply the spar ureathane as well. I also removed all the epoxy and silicon left on the hull once I removed the old transom. I sanded down all the corrosion and weathered paint that the pressure washer missed. The area between the support and the transom was the worst.

Once that was done I plugged the hull and filled it with water to cover the rivets and much to my amazement there was only 2 leaks, and none were rivets! They were both in the stern from being dropped off the trailer. One was pretty bad almost a stready stream, the other would just slowly weep until a drop would form. Both had been repaired by welding previously and the wounds reopened by mishandling. I am debating on having it welded again or utilizing some other method such as epoxy. I can't put it in water with the leak as bad as it is, or I would spend more time bailing water than fishing lol.

I had palnned to start fitting the foredeck and prepping it for paint but lost track of time. I'll give it a shot tonight. I really need to finish applying to spar ureathane so I can get the transom attached and move this wood out of my way so I can do anything finish wise to any other material.

I had another idea for the transom cap. I may try to employ a tailgate cover from a pickup. I might buy a diamond plate one then "massage" it into place. I think the width may be perfect, I'll have to measure. If that doesn't work i may look into have one made...I dunno. It doesn't look like I'll be using the other. My joiner fence will not move forward or back only at right angles for some reason I thought it was a better tool than it is. lol I could make a jig for it worst case, but I already cut the drop in the center portion so if I did want to remove the wood I'd have to employ a router. I don't have a router so that makes that an easy decision.

No pics. I laid my phone down and didn't find it until after all the work was done.
 
For those who cannot properly identify your Polar Kraft, I found that the manufacturer had stamped the model number underneath the corners of the transom cap. Each one stamped with the model number and a R or L for the side. It is hard to see in the photo as it is inverted but it is forged into the casting directly below the 1. My title only stated it was an "S" model but one can clearly see that it is indeed an SV1419 :) pretty cool.
9193818552_6742e3df1d_c.jpg


Trailer as it was before I replaced the rollers. The hardware is rusted up good, bunks trashed, rollers are garbage, winch... pulls but the locking mechanism is broken so it goes away soon. Springs are in good shape, but new are only 30.00 a side. But for now they will work. Rollers are being replaced, center one was broken in 1/2 so it is new. Lights are new. Bunks are being finished I have Spar Urethane being applied. The supports are completly rusted through so those need to be replaced.
9193816594_fffe4d0e91_z.jpg


The tilt function works great, although I need to mount a line near the hitch so I can operate the lever from the winch.
9191016663_3460529176.jpg


Here is a shot the leak. It really leaks, almost a steady stream of water. I do not whether I should weld or plug with epoxy. the other leak is similar in nature and on the next chine. If any one has any suggestions please let me know.
9191013129_47a0114e74_c.jpg


Due to the rain and other obligations I missed my deadline for getting the transom completed before the arrival of the motor. I am going to pick it up this evening. I'm excited anyway :D

I managed a few more coats of Spar and got my license endorsment yesterday, which in Alabama is no small feat just lemme say /facepalm

I need some SS hardware to bolt the transom up after a few more coats of Spar, but I don't know how much I can get done today at least a few coats of Spar at least.
 
9197990448_0b4bb0c0ec_c.jpg

9197988370_2c454bcc35_c.jpg

9197986782_f51e28e0d6_c.jpg

I have my motor finally!! 1972 (I looked up the model #25253) 25Hp Evinrude Sportster with electric start. Fresh paint but needs the cowling redone, rebuilt carb, rebuilt fuel pump, push button starter, battery lead, new impellor, plugs, fresh oil in the lower unit, he replaced the cowling seal with some thing he called Jiffy wrap or something like that due to the origional fell apart in his hand. It looks origional but it is a bit snug.

He took me over the entire thing for about an hour showing me everything under the cowling explaining how it all worked and why, then we ran it in the tank. He told me that the water dumps from the lower front so you have to be aware but one can add a pee hole topside to get a good visual but that was up to me. He would do it if I wanted, whenever if I decided too. If fires up quick and runs great he put it in gear and blew a bunch of water out of the tank until the water got too low. Not a real world test I know but it was good to see it push the water.

It came out of a Crosby with a forward console so the electric key start stayed with the boat as the owner traded it in for a different motor, one that I was going to buy in the beginning but didn't have the money at the time. He added the push button start and battery leads, then went through the motor. Compression is good I do not have numbers to post but I will soon.

The guys shop is not too far from the house on the way to the river so if I have problems he is less than 15 minutes away. He is a performance boat shop that repairs fiberglass boats mainly, but does some outboard work. He has been around for 15 years and has a good cutomer base so I feel comfortable dealing with him. The day I was there looking at the motor he had cut out the hull of a fish&ski and was redoing the stringers and floor. A week later he had Master Craft in the shop prepped for paint, a big center console being worked on, my motor in the tank, painted ready to run. Not bad for a 2 man team.

As far a progress, I picked up the motor, applied more Spar then was called inside @ 9pm to make fruit smoothies lol.
 
Whew! Long weekend overload, but fun and somewhat productive. The rain killed me. 5 days I was off and it rained every day. 3 of the days the rain was constant :( I worked in it as much as I could until the lightening came then I moved into the garage can worked applying Spar Urethane enough to finish the transom and the bunk ends. The humidity levels were so high with the constant rain it was taking double the time to dry the Spar. I began to lightly thin it with mineral spirits and that helped somewhat but I still could push the drips out with my finger pretty easy after 12 hours. My 220 grit paper would gum and smear too so I had to resort to 24 hour cure time between coats.

I stripped the stern end of the hull down the metal and the transom is now ready to be installed I just need to buy the hardware. I tested the gunwales and they proved difficult to remove the paint from. The stripper isn't the greatest but it was working, but I decided to have the hull media blasted. I looked at the leaks again and decided that they should be welded after all. They were welded previously so it shouldn't be a problem to do it again.

One word to those who like to smear silicon sealant everywhere. Don't. I removed a large quanity of silicon and underneath every thin smear was corrosion. Not light powdery corrosion but deep pitted corrosion. So a word to the wise; don't do it. Use a proper sealant for use with Aluminum. The Silicon trapped moisture which reacted with the aluminum and now it is pitted. Plus it was a PITA to get off.

The hull is not beyond being seaworthy but eventually it will have to be repaired if I cannot stop it. I am going to apply some acid followed by a wash with baking soda, then let it oxidize before covering it with the transom. I wont be hard to replace the stern just I dont want to anytime soon.

I stripped the FL numbers off and really want to take the area down to bare metal before applying my new AL numbers. The paint is in real bad shape but I am not going to paint the hull until this winter. I'll get a new registration sticker in JAN so when I remove it I'll just take everything off when it is media blasted. I may just have it blasted now if it isn't too much to do.

I need to round up a battery, gas tank and some fuel line still. The whole buy the boat, then being forced buying the motor as soon as I did really killed me (I didn't plan on that and it really sucked my funds dry. Plus with the 4th I had to buy fireworks, right?? lol BOOM!). So now I'm broke and cannot provide power to the boat yet, sadly.

I need some lights too. I want LEDs but man, everything I have seen is twice the regular price. I'm gonna check one of those Chinese sites. I hate buying chinese crap and I do my best to buy American, but sometimes you just gotta do it. LED lights all come from china, might as well cut out the middleman.

Out of all the Harbor freight stuff I stated I was going to buy all I bought was 4 C-clamps and some sandpaper. <sidebar> I'll never buy HF sandpaper again either. It took longer to install the paper on the sander than it lasted, no kidding. It would cut for about 30 seconds then nothing. I'd flip the sander over and the paper would be smooth. cheap china crap. <sidebar/> I purchased my jig saw at Sears, it was a Craftsman model btw. Probably made in China too but the quality was probably better, who knows, because I didn't look at the HF models.

I'm going to buy the Stainless hardware to install the transom and mount my motor. I need a lock for it and a way to lock it. I'm appreciative of all the posts and comments thus far so if anyone has a method I'll be glad to listen.
 
Man all of this rain has been killing me. I haven't been able to do much but I managed to squeeze some work in when I could. Its frightening working on an Aluminum hull when lightening is flashing so that is when I stop.

Anyway here are some updates. I had a friend cut me some vinyl AL Numbers and while I was @ the hardware store I picked up a paint stripping head for my angle grinder,some 5200, and some SS hardware. I finished the final coats of Spar on everything installed the transom and the backing plate, drilled the holes, added 5200, and bolted everything up. I managed to drill all the holes correctly only screwing up the 1st hole somewhat. Once I mounted the motor I realized that it would have been best to keep the transom higher rather than cutting the drop as I did but, oh well. Also where the backing plate was origionally mounted was not an ideal place for the new one, well that and I should have made it larger too but that is an easier fix costing some hardware and sweat. It will work for now. I can always add a miniJack which I had thought about doing earlier but wanted to wait until I got the motor mounted.

I purchased a Blem battery from Interstate for the starter, picked up a used 6 gallon tank it came from the guy I bought the motor from he gave me the quick release for the motor too and it came with about 1 1/2 gallons of fuel too. He had been using it to run the motors in his shop (and mine) but switched to a 3 gal one he mounted onto his stand so he could roll everything around as one unit. I also bought fuel lines, deck & anchor lines too. I picked up some JB Water Weld Last night before the danged thunderstorm <grrr> I managed to empty the boat of accumilated water dry off the leaks with the torch and form some of the putty to the hull in the two leaky spots on the chines.

I know I said I was going to have them welded but the spots were so thin I could pull it with my nail. yes it still can be welded at a later date but 7 bucks and on the water vs trying to find someone to weld it then having to remove the motor ect. I said screw it I'll fix it right later. I just want to get on the water.

I used the stripper pad on the grinder to knock off the paint and it worked like a champ. It was like a heavy Scotchbright pad and wore down pretty quick. I would say that if I had 4 more I'd be able to strip off the remaining paint in a few hours. I did a 4ft section from the bow aft down to the bottom of the gunwale in about 45 minutes. The pads were 9 bucks a piece but considaring how fast they worked and how slow the gel stripper was working I'd say it was a good tradeoff. I'm going to but more but my current mantra is : I just want to get on the water. Paint stripping will come later.

I need to apply the registration numbers and buy some life preservers and saftey gear then I'm ready finally. A cover is in line for purchase too. I need to install the handles and the corner caps as well becuase for some reason I purchased the wrong size hardware like a dummy, but that shouldn't take long to install.
Here are some pics:
I still need to get around the rivets as the paint was tough to get at there and by the top rail.
9315110854_3f5985e926_c.jpg

You can see the origional green showing now. Since I pressure washed it the paint is real brittle so a putty knife will easily knock paint off but the pad is oh so much faster! You can see that the motor is as high as I can mount it and the Cavitation plate is still about an 1"- 1 1/2" too low. no pics of that yet sorry.
9312316319_7e542c5e54_c.jpg

Here you can see my mistake with the backing board. But it is working at the height the motor is at.
9315107500_5cb747b2cb_c.jpg

I'll have to change the backing plate looking at it now regardless as the MiniJack will still need to mount squarely I am sure. I'll cross that bridge later.
 
Lookin' good! I had the same issue with my motor, so I built a small transom riser/jackplate to lift the motor the extra 1", or so I needed. Do a search here in the forums for lots of great DIY designs. Ideally, you 'd like the anti-vent plate found just aboe the prop to be level, or slightly higher than the keel.
 
Thanks for the location of model information My boat was sold to PO as 1968 14 ft PK, but there's nothing obvious to show it's a PK. And the boat is 12 ft long. So, it's not yet daylight, but I went out with mirror and flashlight to look under the corner caps. I can clearly see R and L, but no numbers. Need to scrub a little to see if they show up.
 
Hmmmm, I guess I didn't even know Polar Kraft built V hulls and I live about 5 minutes away from the last factory for them here in TN/MS. I've always associated them with jon boats. It looks real good LJ!
 
Top