1960 ish 12' starcraft

TinBoats.net

Help Support TinBoats.net:

This site may earn a commission from merchant affiliate links, including eBay, Amazon, and others.
so I did do some of the stripping and made good progress, but then real life got in the way. I hope to get back on it this weekend and get some more pictures posted. I also got some of the wood for the seats milled last night. it's all white Oak that we are milling down to 1 inch thick. it's going to take a few weeks for it to dry the rest of the way but once it is done we will edge glue with either a spline or biscuit joiner so it's all quartersawn stock. We got about half of it milled up Monday night. I also acquired a siphon feed paint sprayer so that should make the painting on the boat and trailer go much quicker when I finally get to that part.
 
Ok so it's taking way longer for this simple project than I anticipated. But, progress is being made I am nearly done with the striping on the boat. I got the ancient bearings and races replaced and installed with stainless steel bearing buddies. I finally have a full wiring plan and everything is place to spray the hull once the striping is done. The big news though is the white oak is finally dry enough to start the glue up for the seats and the transom.Glueup.jpeg

Sent from my SM-G892A using Tapatalk
 
Ok so it's taking way longer for this simple project than I anticipated.


Work on an old tin expands to meet the time available. At some point, you have to say "enough."


Best wishes; nice work so far.
 
so just some pictures to let you know progress is still being made :)
IMG_20180501_175848.jpg


sanding the flattest areas with the palm sander

IMG_20180501_175857.jpg


IMG_20180501_180252.jpg


IMG_20180501_195806.jpg


following up with the abrasive disk and wire wheel, I used up the first small drill mounted wire wheel on the transom seem rivets so I moved to a larger angle grinder stainless steel wheel. I have to be super careful or it will take the rivet heads right off, but it does make short work of the paint though.

IMG_20180501_195825.jpg


IMG_20180529_183350.jpg


IMG_20180529_194626.jpg


IMG_20180529_194640.jpg


Completely finished on one side!!

IMG_20180603_135717.jpg


IMG_20180603_135732.jpg


and well into side 2

IMG_20180603_135706.jpg


I also got the transom caps removed and all of the extraneous nuts and bolts that I didn't find the first time around. I have a ton of holes that I now need to patch or rivet. what kismet said about a project like this filling all the available time is ringing true. the Kokanee are on and this thing is still upside down :cry:

I will get there though.
 
You do nice work. You obviously have a lot more patience than I do, but so do most people.

Is that a vibrating sander, or a Random Orbital Sander? I love my Random Orbital Sander(s).
 
richg99

it is a full random orbital, it's the older version of this one from Harbor Freight
https://www.harborfreight.com/5-inch-random-orbital-palm-sander-93431.html

I have beaten the heck out of it on a couple of projects now and for $29 it's still working great. With some 80 grit diablo sanding mesh from HD it takes the paint off in a hurry without damaging the underlying material. I still have to come back and do the details with the wire wheel and angle grinder though. I am really trying to limit that though because the wire wheel really gouges badly, I tore a whole section up that I had to go back and try to clean up with the abrasive pad so now I am just using it around the rivets. I will try to get a picture tonight of each of the tools I am using and how they affect the paint and aluminum. I know it's pretty basic for most of you guys but hopefully, it will help another newb like me.
 
Tasks for today get the old bunks that are pressure treated 2X4s off finish the second set of bearings replace and install the bearing buddy and get the rust off and ready for paint.

IMG_20180707_135248.jpg

For the record, if anyone is wondering, yes using pressure treated wood on a trailer for an aluminum boat that goes in salt water is a really bad idea. I have serious pitting where the paint was worn off and the wood was directly on the metal, not bad enough that I have to patch but only just barely.

IMG_20180707_135451.jpg

I ran out of daylight to get pictures of the after but I will get some and post them tomorrow. it's hard to see just how bad the rust is and how much better it is after several hours of the grinder with a wire wheel and cup wheel but it really made a huge difference. Honestly, if I had left it much longer there wouldn't have been enough metal left to work with. It's a really old trailer and we have used it in salt water for the last 10 years or so. I had hoped to get tot he painting part today but I ran out of daylight before I ran out of ambition hopefully tomorrow if I get lucky.

so success on the bearing. fully packed with the grease shown. looked like the best stuff I could get at the local BiMart

IMG_20180707_135150.jpg

of course, I should have waited on the bearings until after painting but hindsight is 20/20

any advice on how to set up the new bunks? I really don't know know if there is a right way the previous owner had this setup but I never really liked it.
 
So some after shots of the trailer with several hours of cup brush and wire wheel to knock off all the lose rust. I actually got down to clean metal on the fenders but pretty much everything else is black oxide. I wasn't going to but I think I need to do a coat of ospho before doing the Rustoleum Rusty metal primer any thoughts would be appreciated.
4dda6f307103241b23e6fca5d7bd8392.jpg
cd55df666226b59f85cc6001591fa855.jpg


Sent from my SM-G892A using Tapatalk
 
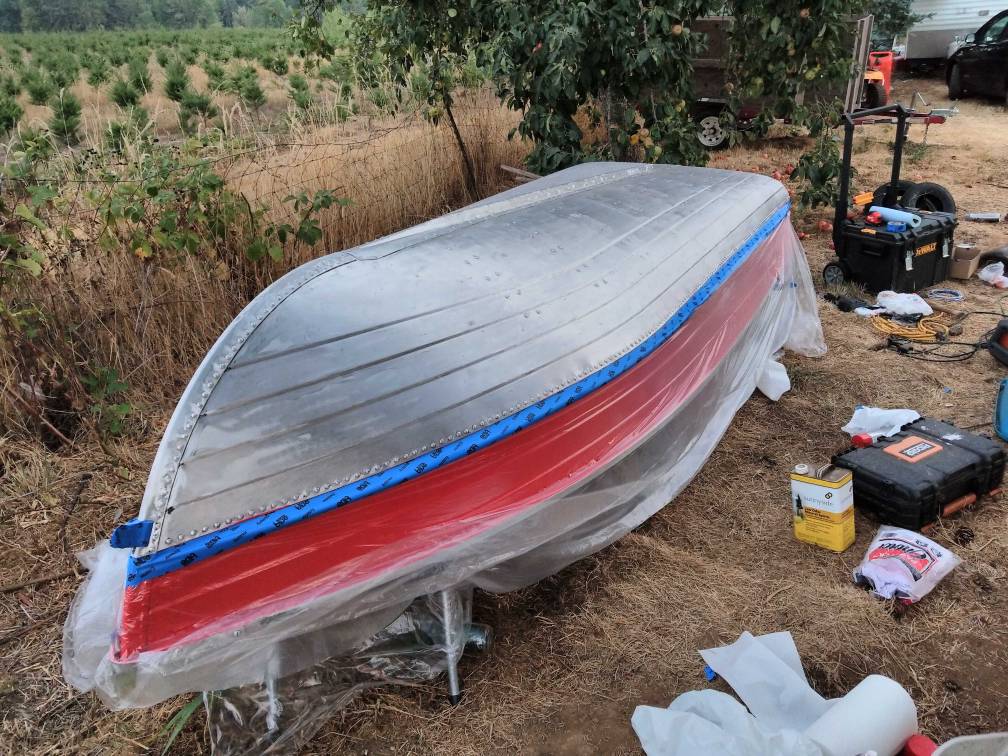
So I finally got some time this weekend to finish stripping the last few feet of the hull. so i got that done and one more pass on both sides since it has been sitting for a few weeks before going for it with the paint.

IMG_20180803_204554.jpg


I went back over both sides by hand with some 80 grit just to rough it up one more time just before painting.

IMG_20180803_204601.jpg


then some masking, I decided to go to the bottom of the chine sense that is where the seem is and it made for a nice look between the topside paint the bottom paint I plan on doing next.

IMG_20180804_160214.jpg


IMG_20180804_160206.jpg


I decided to follow the line straight across the transom because I thought it would look nice and provide a little barrier between the aluminum and whatever I use for a transom pad.

IMG_20180804_160157.jpg


Then three full coats of the aluminum etching primer.

aluminum-rust-oleum-professional-primers.jpg


For what I covered I did 3 coats and went through about 4 cans

IMG_20180804_162040.jpg


IMG_20180804_162047.jpg


Then it was onto the color topcoat again I went the Rustoleum pro in gloss red. From what I understand the pro stuff is much harder and more durable than the standard rattle cans and flows a little faster and evener. It seemed to do really good and I am pretty happy with the results.

safety-red-rust-oleum-professional-general-purpose-spray-paint-7564838-c3_1000.jpg


From what I understand the pro stuff is much harder and more durable than the standard rattle cans and flows a little faster and evener. It seemed to do really good and I am pretty happy with the results.

IMG_20180804_170508.jpg


IMG_20180804_170523.jpg


IMG_20180804_170539.jpg


IMG_20180804_170554.jpg


so after all was said and done I did find a few flows but not enough to make it worth going over the whole thing again. All in all though not bad for my first ever time working with metal like this.

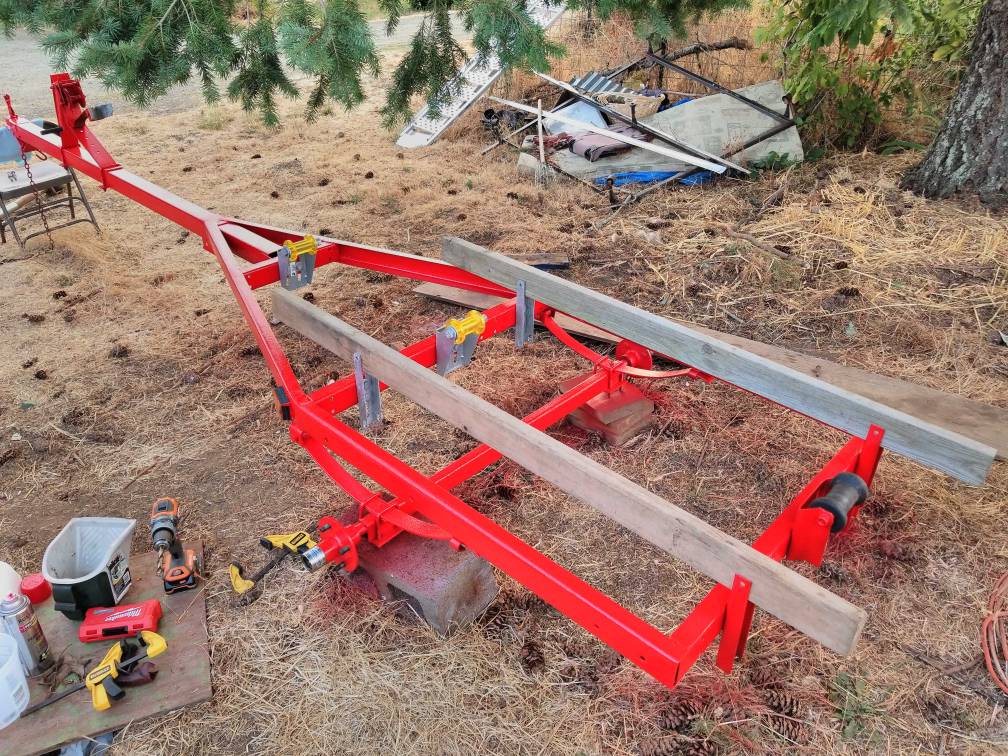
now onto the next steps, I am ordering some steelflex ultra slick to do the bottom below the chine, and the normal steel flex for the inside with the nonslip additive. In the week it will take to get here I hope to finish off the trailer since I am finally down far enough that I can start painting it. In between coats on Saturday I did both wheels. the local tire shop pulled the tires off for me for free since I trashed the valvestem trying to clean them up with the wire wheel on the angle grinder. Here is the before and after and after paint.

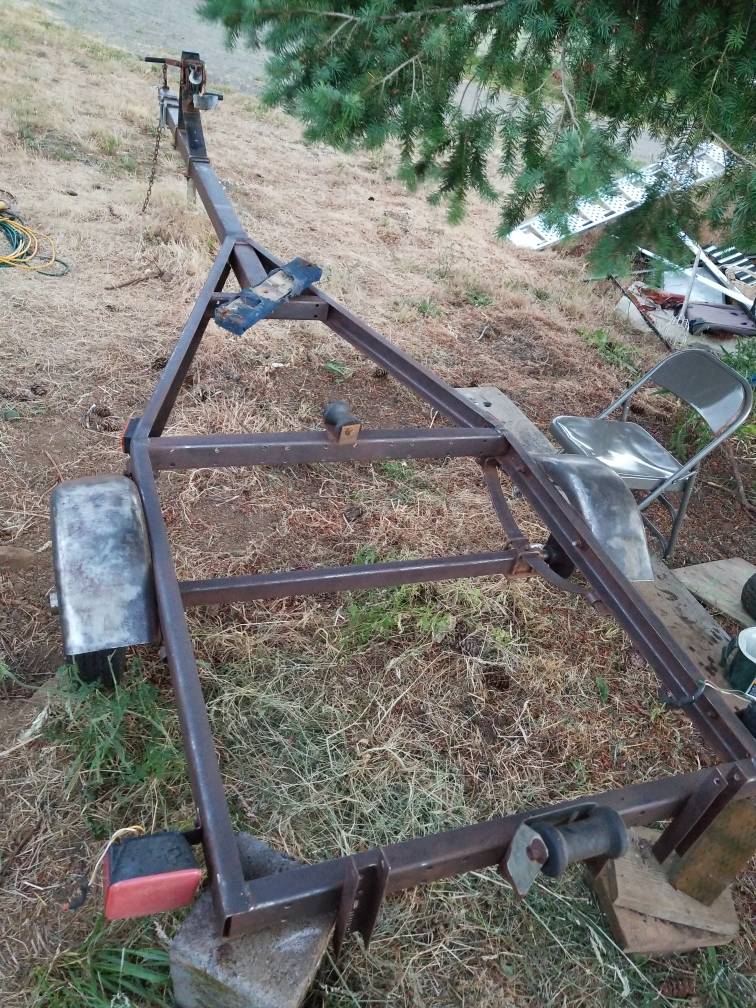
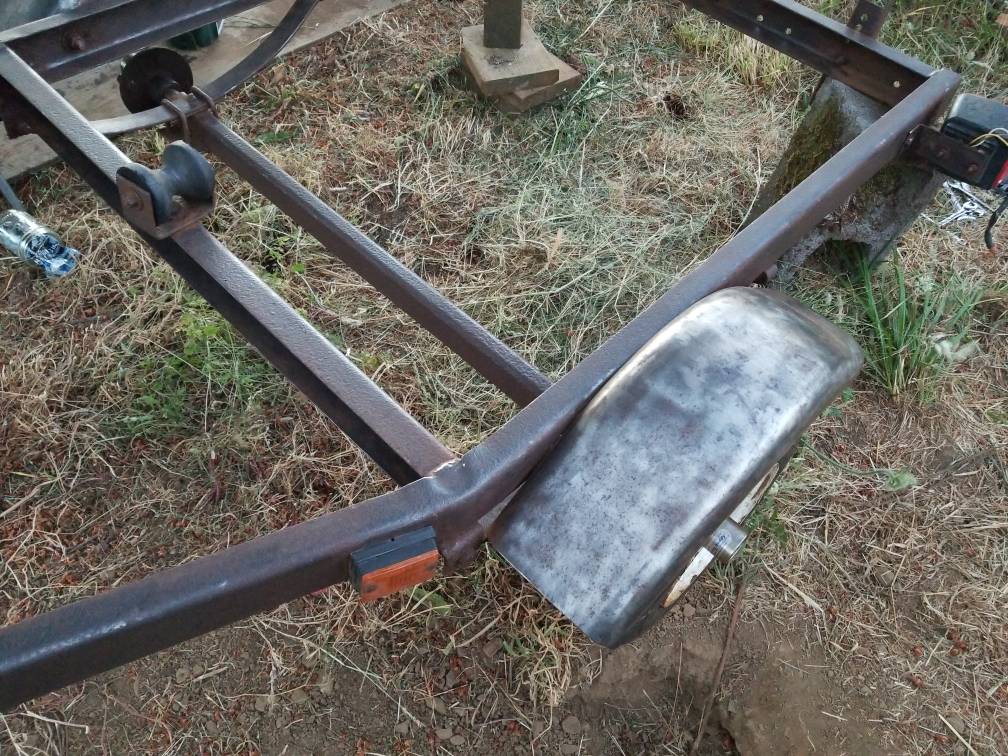
So the before after just one season in the salt, Chinese steel at its best.

IMG_20180804_105827.jpg


and after some work with the angle grinder and wire wheel, down to clean metal ready for paint

IMG_20180804_105833.jpg


now for some paint. I went with the Rustoleum cold galvanizing in the hopes that it really does provide "superior corrosion resistance" as it says on the can I figured for 5 bucks it was worth a try it can't be worse than the original paint. If it doesn't hold up I will just replace them with proper hot dip galvanized next year.

IMG_20180804_122157.jpg


IMG_20180804_122137.jpg


so hopefully tonight it will be more painting and new bunks so I have somewhere flip the boat onto so I can work on the inside.
 
So made Some progress Sat. on the trailer got the fenders off and the final prep done and laid some paint down. I went with the Rustoleum rusty metal primer and a top coat of matching red that I used on the boat so now they match hopefully it will look good when I finally get them back together.

so after three coats of the primer, it started to look really nice

IMG_20180818_152308.jpg

I masked off the bearing buddies and the keel roller hopefully this will help keep at least some of the corrosion off the hubs as these are really hard to find and if they fail I will have to replace the spindles as well.

IMG_20180818_152302.jpg

Just for reference in case someone else wants to do this it took about 4 15 ounce rattle cans of Rustoleum to cover it in three coats, and about 3.5 cans of the pro stuff for the topcoat color.

IMG_20180818_152320.jpg

IMG_20180818_192854.jpg

I think it came out OK but I started to get a bit tired near the end and I think I could have done a little better but for rattle cans it was OK.

IMG_20180818_192926.jpg
 
So the family went over to the coast for a little quick git away, and I just happened by the marine supply in Newport and got everything to keep rolling. I got two new keel rollers on adjustable mounts so I can get everything lined up much easier and super heavy duty galvanized, also all the hardware for mounting the rollers. I should have got the galvanized bolts to mount it to the trailer but I can get those back home. 2 new bunk mounts also galvanized and the hardware for mounting the 2X4 bunks, coat-it epoxy for the bottom to help seal up and leaky rivets and protect it when it gets dragged up on the beach. they had the Tined marine grade wire for about the same price as Amazon but by the foot so I didn't have to buy as much. they were short on a few things but this is enough to keep me busy until next payday :)

Any advice on applying the coat-it would be much appreciated I am Just putting it on below the chine.

IMG_20180820_180832.jpg

So the folks at Englund Marine were super helpful and patient with all my newbie questions. I don't know about the other locations but the store in Newport OR was great!
 
All masked off and ready to go for tomorrow. I am doing it in coat-it after talking to several driftboat builders that know way more than I do about protecting aluminum boats. I have to wait until tomorrow night when the temperature drops below the 90 deg. It has been today.
106ee2063b55382b7f93d6e0f038ebd9.jpg


I am hoping the dark gray goes well with the red I have already done. I guess it's a little late now as there is no way I am starting over just to change the color.


Sent from my SM-G892A using Tapatalk
 
So I think I have everything ready for doing the coat it tomorrow I washed it twice with simple green to degrease it tonight and went back over all the spots I found that I had missed the first time around with a small brass wire wheel. I have some phosphoric acid gell to do one last etching right before I start tomorrow. I am a little nervous as this stuff is expensive and I don't really get a second chance if it goes sideways. The temp should be perfect tomorrow after work, right around 70 and overcast so no direct sun to overheat the metal. I have my dad coming over to help mix while I roll it with a foam roller. I did one quick dry walkthrough tonight just to make sure I have everything in place. Any final advice on applying the coat it tomorrow from you guys that have done this before?

Sent from my SM-G892A using Tapatalk
 
So the sanding and paint removal on the outside of the boat was so emotionally scarring it took nearly a year for me to get back at it and do the inside. Well, that and some family issues but back at it, I am.

got the seats back from my friend that was helping me with them that is hand cut western OR white oak with 6 coats of polyurethane but of course, as you can see there is a still a lot of paint to get out this is what was left after an aggressive pressure washing. My Dad came down to help me get over the aforementioned emotional issues. That nice black and white shirt was mostly black by the end of the night :)

20190529_184558.jpg


A money shot of the seats they really are way too nice for the blood and guts fishing boat that this is.

20190529_184612.jpg


but I am making some progress getting it a bit more shiny. I have hung out on this board for a while now and I a really envy you guys that seem to be able to get the old paint to just fall off. I tried several different paint stripers but nothing seems to work other than just elbow grease and the angle grinder with a stainless wire wheel. I also used the sanding pad you see in the picture there it worked great for the flat areas but there isn't a lot of flat areas as you can see so many hours sitting in odd positions trying to get into the chine and around all the rivets, ribs and seat mounts not to mention the bow. I am fairly sure it need to get a blood test now to see how much aluminum I have ingested.

20190601_103630.jpg


I took a short break from the agony of grinding (have a mentioned how much that part stinks) to test fit the seats and transom. I had to spring the hull apart a bit to get them to fit but it seemed to be OK.

20190531_092333.jpg


At this point, I am pretty much done with the paint stripping and it is clear that I am not going to get it to be uniform and while sitting in it it was also clear that the glare is severe to the point of discomfort. So I decided to just go all the way and paint the inside as well. I mean I am already at a ridiculous amount of time on this project so why not just take it to the next level. So, facing my irrational fear of spray painting I decided to go whole hog and prime and coat with raptor liner. Nothing like jumping in the deep end just to see what happens right. So off to the local automotive paint supply to pour a little more money down this black hole AKA "boat". The good news is they were really helpful and happy to take as much of my money as was willing to give them. I really wish I had found these guys sooner I would have done the outside way different and I would have saved me a lot in buying rattle cans. I walked out with the 4 liter kit of tintable raptor liner with free schutz applicator gun, 16 ounces of tint, automotive grade degreaser and a quart of 2K catalyzed primer. The 2k catalyzed primer they sold me went on really great and way easier than I would have ever imagined. the bad news is I mixed up way more than I needed it only took about half of that to get a good layer on. This is where my ignorance might show. It said that a quart was right for 60 Sq feet but I only used about half of it, did I do it wrong and should have used it all or was it fine with just 2 coats?

IMG_5862.JPG


both me and my Dad took a turn as it was a bit of a pain stretching across to get the opposite side and my back was tweaking after the fun morning of grinding

IMG_5864.JPG


IMG_5868.JPG


then it was on to the raptor liner. I only got a video of this process so you have to go to the link to see it. Again, it is obvious I have no idea what I am doing so any suggestions on technique would be appreciated

http://faculty.bus.oregonstate.edu/spraguea/photos/06012019183924.MP4
http://faculty.bus.oregonstate.edu/spraguea/photos/06012019184046.MP4

A few hours later we were done.

20190601_194008.jpg

IMG_5873.JPG


all and all it turned out pretty good a few spots were a little light but it looks great!

Now hopefully this wed. after the liner cures some more I can get the seats installed but between now and then I will get the floatation mounted under the seats.
 
Top