1974 14' Mirrocraft Deep V

TinBoats.net

Help Support TinBoats.net:

This site may earn a commission from merchant affiliate links, including eBay, Amazon, and others.

Tanzini

Active member
Joined
Jul 5, 2012
Messages
31
Reaction score
0
I'm just starting to convert my boat. I've been a lurker for quite some time and I'm constantly inspired by all the builds on here. I've already removed a few benches and started framing the rear deck as well as rebuilt the transom. I plan to go pretty minimalistic and just have a front and rear deck with some hatches.

I'm unsure of what thickness plywood to use. I'd like to get away with the thinnest I can without any bowing. Anyone have any recommendations?

Here she is as of now.

2013-05-25172729_zps509a1a65.jpg

2013-05-25172905_zps119252f5.jpg

2013-05-25172746_zps18fa477d.jpg

2013-05-25172549_zps1f2ea4e8.jpg

2013-05-25172532_zpse6ae4998.jpg
 
Well, it's been nearly a year since my initial post and I haven't worked on it much until recently. I summoned all my willpower and dragged the boat to my work where it would be more convenient for me. I had no plans whatsoever and I'm just playing this whole thing by ear and figuring it out as I go. I managed to decide on the back deck configuration and start the general layout of the front. This is what I've finished in a few days.


I made an attempt to paint the inside with some left over gel coat. I'm not feeling the color too much. I also manage to hinge the rear deck hatches and finish the mid deck hatches.


Thats very nice work! I like your recessed foot control box and your storage and access areas. I actually like your inside colour :) Are you going to carpet the wood or similar?
 
[url=https://www.tinboats.net/forum/viewtopic.php?p=352141#p352141 said:
TheMaestro » Today, 03:54[/url]"]Thats very nice work! I like your recessed foot control box and your storage and access areas. I actually like your inside colour :) Are you going to carpet the wood or similar?

Thanks! I intend to give all the wood a few coats of spar and then I'll be carpeting them as well.

Update:

Decided to put a pedestal base for a butt seat on those windy days.
 
I finished all of the hatches and framing. I plan to do the final fitment and drill all the pilot holes before I spar the wood.
 

Attachments

  • 2014-05-19 20.36.51.jpg
    2014-05-19 20.36.51.jpg
    1.8 MB · Views: 5,685
  • 2014-05-19 20.37.26.jpg
    2014-05-19 20.37.26.jpg
    1.9 MB · Views: 5,685
  • 2014-05-19 20.37.24.jpg
    2014-05-19 20.37.24.jpg
    2 MB · Views: 5,685
Manage to put the first coat of paint on all the pieces.
 

Attachments

  • 2014-05-21 20.45.47.jpg
    2014-05-21 20.45.47.jpg
    1.9 MB · Views: 5,602
I made an attempt to varnish transom. This marine varnish stuff is thick and likes to leave bubbles unless you work painstakingly slow. I'm thinking of adding a plate of stainless across where the motor mounts for added bling.
 

Attachments

  • 2014-05-23 18.09.42.jpg
    2014-05-23 18.09.42.jpg
    1.2 MB · Views: 5,541
I got most of the carpeting done. I ran out halfway through and went to Lowes to find they changed the color on the backing from white to black. The color difference is enough to be noticeable but I'm out of options and tried to make the two tone work for me. I also repainted the inside. I'm going to carpet the floor and the trolling motor deck as well.


I forgot to post how I did my carpeting. Initially, I had trouble with getting too much bulk in the corners and the quality looked like crap. So, frustrated I tried to find any tips on my phone and found this website (https://www.techguys.ca/howto/carpeting.html.) This is the one that really made me see the light. So anyways here are the pics of my process, I hope this helps anyone.

I wanted the carpet to be straight and neat on the underside so I used a couple pieces of stainless cut down to 2 inches wide to give me the extra to wrap around. The small piece proved exceptionally helpful on the curvier pieces.


I would mark the piece as well to let me know accurately where to place the piece after I had finished putting the adhesive on.


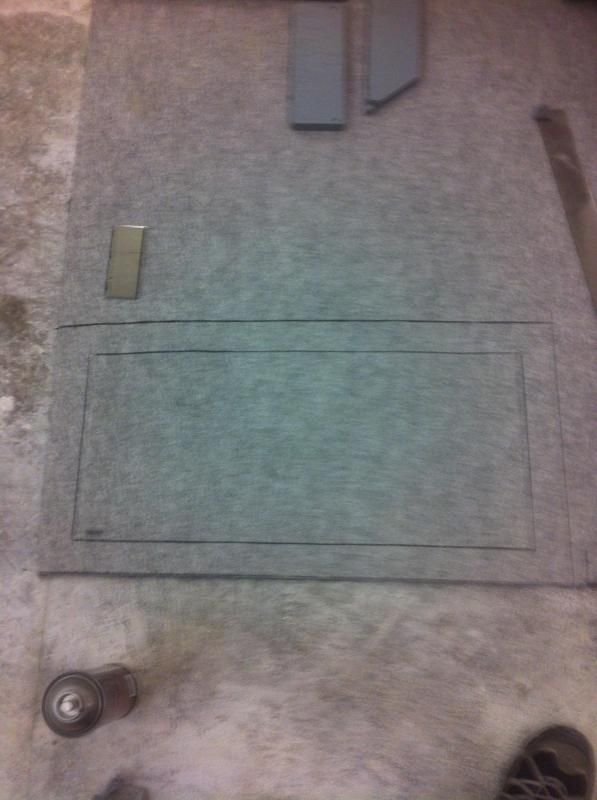
After placing the piece onto the carpet I would work from the middle towards the corners until the carpet was loose on the corners and looked like this.


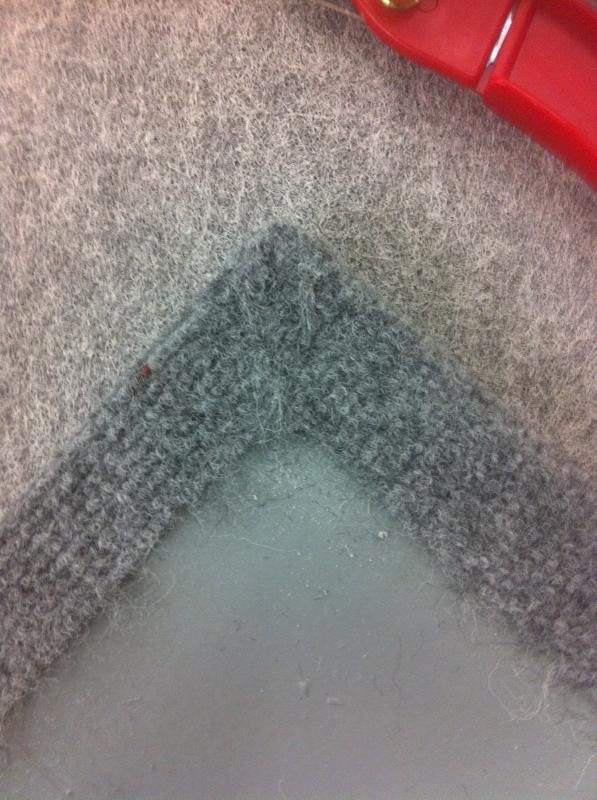
I would then grasp each end of the "ear" and pull the carpet up and onto the bottom of the piece. I would press it down flat and get a flap on each side.I would work each inside of the flap towards each other, making sure I was pressing the carpet down as I did so.


I would then use a roller to really work the corner down until i would get a neat square, letting me know that the carpet was tight and down on the corner.


Here's were I sort of deviated from the website I linked. I forgot to take a picture so bear with me. I would lift the flats up vertically and my cut parallel to the piece. Sort of holding my knife flat on the piece and cutting the flaps off. This would be my result.


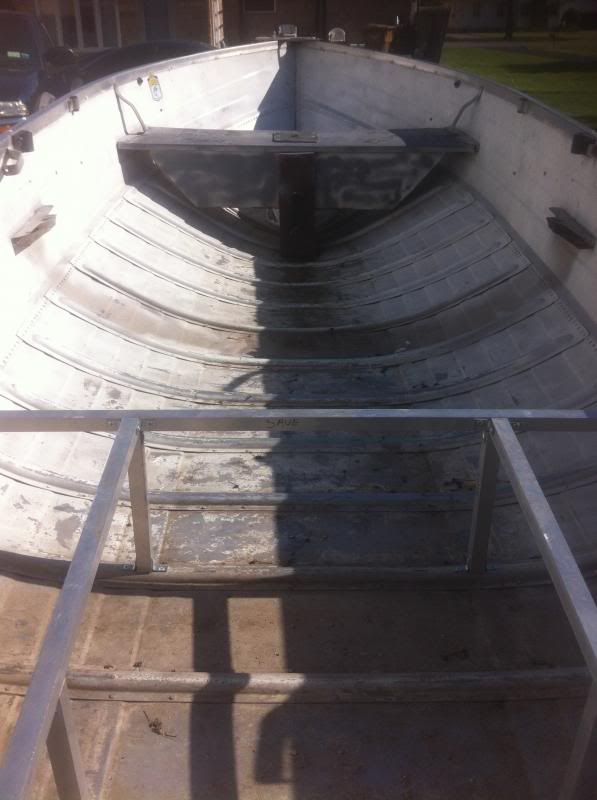
I would then put in a few staples in with the gun where the seams met. Generally, this method allowed tight corners with minimal bulk and an underside that looked straight and even. Hope this helps.
 
What size aluminum pipe did you use for the frame? I have a 16' Mirrocraft that I was looking at doing and I was wondering what size aluminum piping to use.
 
[url=https://www.tinboats.net/forum/viewtopic.php?p=354730#p354730 said:
CPLWisco » 04 Jun 2014, 21:02[/url]"]What size aluminum pipe did you use for the frame? I have a 16' Mirrocraft that I was looking at doing and I was wondering what size aluminum piping to use.

I used 1 inch aluminum square tubing.

Well, the new trolling motor pedal was a bit wider than my old one so I had to widen the box and slot...which I already put carpet on. After, that I managed to carpet the box and put in the grommet for the wires.


I recently tested out the new trolling motor and it's pretty sweet. 70lb thrust on a 14 foot boat is pretty funny. I was able to get it up 3.6 mph with three batteries, my friend and myself onboard. The boat felt pretty balanced and the seat was a much needed comfort item. I have yet to take a run with the gas motor and see how it handles while on plane.
 
I took her out today on Lake Erie to put her through some sea trials and I'm rather content. My top speed suffered pretty bad from the added weight with a 5-6 mph drop. However, the added weight seems to have added some stability to the boat. The pedestal seat and the larger trolling motor makes a bit trickier to see while underway but it's manageable. The seat makes life great on bigger water with this boat size and I highly recommend it. I can now maintain my position and meticulously fish a boulder in a while boat traffic wakes continuously hit the boat. I've been forgetting the photograph my progress but I'll be sure to take some new ones when I work on it again.
 
Top