Restoring my 1988 Blue Fin Bass Dominator

TinBoats.net

Help Support TinBoats.net:

This site may earn a commission from merchant affiliate links, including eBay, Amazon, and others.
Rat said:
Marine ply Vs Outdoor ply. For building decks and stuff (boxes storage etc) that is well supported there is no reason not to use regular outdoor grade ply. Marine ply is superior in every way, more plies per inch, uniform ply glue thickness, usually not warped, better woods etc. But it costs much more; and for what we use it for anyway, regular ply will pass with flying colors. Make sure it is outdoor ply (not treated) as this ply has waterproof glue, even though you will be waterproofing it anyway before the carpet goes on. There are tons of different waterproofing opinions on here as well. If it were me, and I was doing what you are doing, I would use Boiled Linseed Oil.

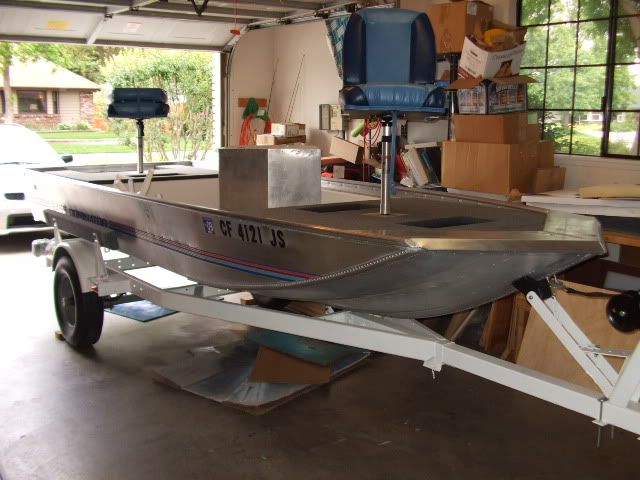
BTW, you stole that hull man! That thing would be $3000 easy where I live.
Please let me add:
I use the regular exterior grade (waterproof glue) plywood on all my restorations and it holds up great! I make sure I seal it excellent before I install it too. First I dry fit the wood and drill the attachment holes BEFORE I seal it, then I use Marine Spar Varnish (available at Lowes), $27 bucks a gallon here. I seal EVERY piece like this, for the first three coats, mix 50% mineral spirits and 50% varnish, this will allow the varnish to DEEP soak the wood much more than straight out of the can, then I start building up my "straight" coats sometimes 3 or 4 coats until I have a perfectly slick finish on the wood (no grain showing at all). This will give you the protection you need from the elements. Note also I always take my router and a corner rounding bit and go over the outside edges of the wood too, this makes less wear on the carpet or covering when foot pressure is applied to the area( less likely to cut it) than the 90 degree angle left from a straight cut. It also has more "eye appeal". Let me stress the importance of sealing EVERY penetration BEFORE INSTALLATION! Last, the EDGES ARE THE MOST IMPORTANT in sealing!
 
Bassdominator, I don't know what happened to you but this is a great project man, you did real good, and that cleaner kicks a$$. I had a Force motor exactly like that one and had that whole motor apart and put back together, I know it pretty good and it's quirks if ya ever need advice for it. Keep an eye on the engine base and fuel pump housing gaskets.....
 
I might be buying the same thing-88 Blue fin for $1,300 and wondering if it is worth it or should I spend twice as much and get a nice boat that has been garaged and taken care of. How did your boat turn out? pictures?

Duckman59
 
Wow, does this thread bring back memories. My first bass boat was a 1988 Bluefin Bass Dominator. I caught a ton of fish in that boat. :)
 
How's the boat coming along? I bought the same boat today with a 50 horse on it and I can't wait to get started on it! Thanks for giving me an idea of what's under all that carpeted plywood. I'm already planning the new layout.
I can't really tell, about how much space is there underneath that floor at the console level. I can't decide if I want to try and use some of it for storage or just put some floatation in there.
Anyway, keep up the good work. I can't wait to see what else you come up with for the Dominator.
 
sorry i was away for so long guys!!! between a break up and school full time this boat project has moved fairly slow. Alot of progress however has been made. The boat its self is nearly complete which just leaves the hard part....ELECTRICAL!!!!!! Due to running out of carpet though we have been stuck where we are now.

We did more on this build than we planned with the paint etc but here is what has been done up to today
- primed and painted the galvanized trailer with auto motive roll on paint ( amazing results!!!! highly recommended )
- new bunk boards with carpeting
- removed old bent tongue and fabricated a new one
- replaced old tow hitch with a new one
- new electrical and led lights on the trailer
- braised and patched a dent on the bottom of the boat
- acid washed the years off the aluminum
- used gluv it to seal all the rivets up
- new foam all around
- painted the interior compartment white as well as the engine compartment ( makes it look cleaner and stay cooler on hot days )
- new barring buddies
- built a new seat box
- New deck boards and boat carpet through out
- New live well and aerator pumps, all new fittings as well as hoses
- new bilge pump hoses and fittings
- new threaded seat mounts, adjustable posts, and opted to reuse the old seats for now.
- 200 WAT STERO!!! - didnt need that much power but that one had the best reviews plus I have to listen to my country while I fish BAHAHA

I uploaded upwards of 70 images from our build to date onto photo bucket please check them out and tell me what you guys think!
https://s620.photobucket.com/albums/tt281/lyonsdennn/

WHATS NEXT YOU ASK?!?!
- make sure it floats HAH
- finish carpeting
- install seat box
- install counsel
- fix 35 hp force impeller
- order a new windshield
- order new trolling motor
- order two new fish finders
- install all of them
- install and run all of the steering cables and hardware for the Force motor

Overall the boat looks great and its moving forward but it is just hard when you run out
 
DSCF5625.jpg


https://s620.photobucket.com/albums/tt281/lyonsdennn/
 
Lookin good man. I have the same boat. Works well. Did mine in 3 months. Been fishing with it for 3 years now. Leaks thru the rivets but nothing the bulge can't handle between fishing spots. I just did a boat in camping at banks lake here in Washington state and had it pulled up as far on shore as I could get it and it turned into an ocean shore with 3 foot waves crashing on the sandy beach. The lake came up six feet on shore too. Oops. All happened at night. Sucked!!! The waves break over the back of the boat and the water ramps right up that oddly sloped tail. Careful in rough water. Luckily I had a 5 gallon bucket. About half the boat was full. Definately an adventure. Made it out though. I vacuumed carpet for hours... Haha
 
Awesome job on the boat. Thought I would add my .02 worth. I am currently working on a 86 Sea Nymph FM161 16' aluminum and will be redoing all the wiring. Ive done a few fiberglass and aluminum rebuilds in the past 3 or 4 years and one thing that I found that greatly helped with the wring is.....

1. PVC piping. Anywhere you have long runs front to back, center to back, center to front etc. see if there is a spot to hang a piece of pvc out of view. this makes it extremely easy to keep your wires protected and neatly tucked away. This also makes it a lot easier to run more wiring in the future if you dont already leave a few extra pairs in the pipe.

2. If you can get the measurement of how much wire you will need to run to each electronic device you are putting in. Add a few feet for those just incase you need more and also for wire repair in the future. Cut your length and have a friend hold one end of your positive and negative pair and place the other end in a drill and slowly twist the pairs together then tape here and there and number the ends of each pair accordingly and put a spare pair or two in for additions later but marking them will let you know that #1 on one end corresponds to #1 on the other end of the run.

Ive done this on 7 or 8 boat rebuilds in the past few years 2 of them being my own and it GREATLY reduced the headaches involved with securing and tracing the wiring down later. Picked up these tricks when I used to install custom auto audio and lighting.
 
Top