flatbotm's 1542 build

TinBoats.net

Help Support TinBoats.net:

This site may earn a commission from merchant affiliate links, including eBay, Amazon, and others.
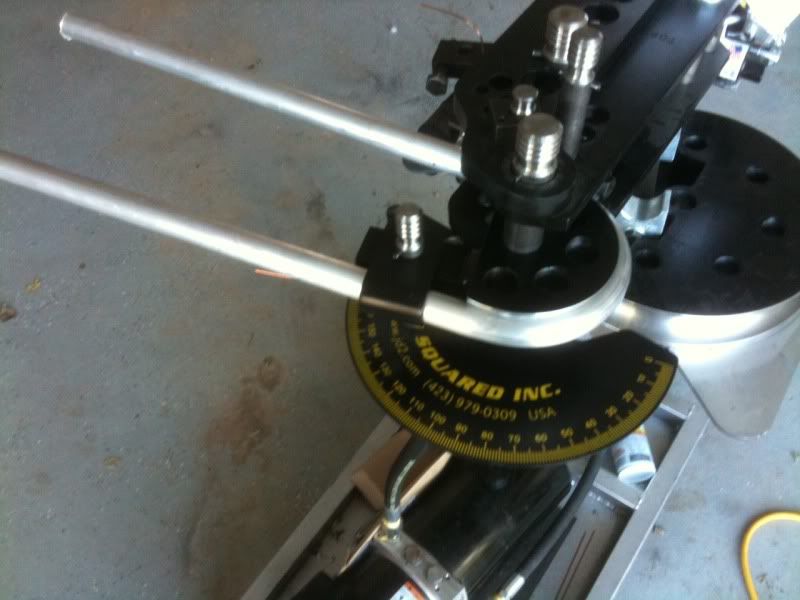
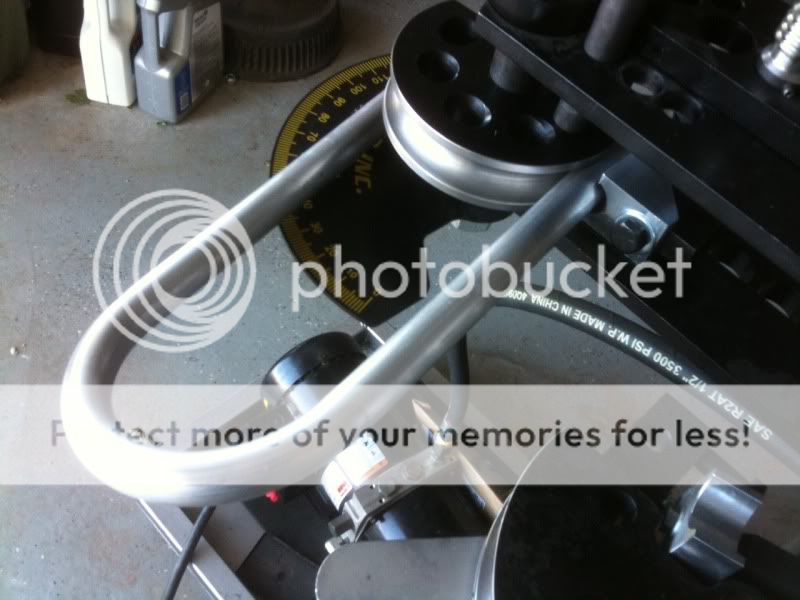
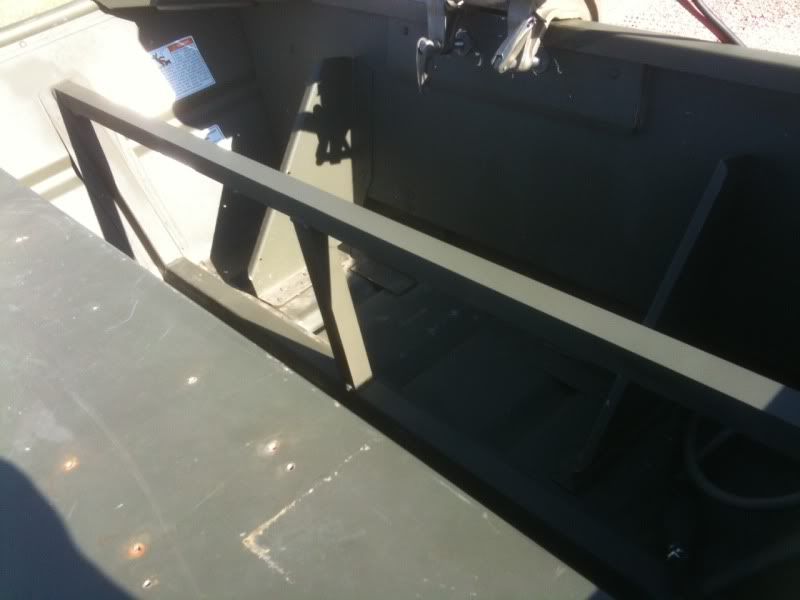
Hey, Flatbotm, on what bends I used the JD2 Bender on I found that the aluminum wanted to dig into the follow bar and scrape the aluminum, to remedy this I had to apply a little grease on the backside of the tube to slide along the follow bar more freely. Maybe you wont have this problem. My problem was probably due to the fact my dies are tube and not pipe which have slightly different o.d.'s. For the most part I used a Greenlee bender which worked great. Your right a 3" radius is going to be tight, the bends on my rig are around 9" radius which I think made a smooth transition bend. Good luck, let us know how it comes out.
 
Always good to meet another jeeper express. I can't sell my jeep cause it would take too much effort to start over again and I'm a little tired of building 4x4s. I've had 3 crawler projects back to back and I'm really enjoying the boat because it's something new for me. Thanks for the compliment I really am just feeling my way thru this boat build.

Rod thanks for the tip on the grease. I bought 1 in tube and my die is for 1 in tube so maybe it won't scratch it too bad. If not jd2 makes delrin(cutting board material) inserts to remedy that problem. They are a little Pricy so hopefully the grease will work. I bought such a tight radius because originally bought the 1 in die to build a baja style roof rack for the scout project.
 
I got a few more hours on the boat tonight. I finished the center section and got a coat of the sikkens on it. It really changes on the second coat the first one is real transparent but you can kinda see what the bead board is going to looking I liquid nailed all the grooves same as the front. Now its on to the rear section while Im waiting for the console to show up. I have some more seat bases to mount in the mid section but I need the console for mock up. Watching swamp people right now.

photo-143.jpg


photo-144.jpg
 
"Watching swamp people right now."
How'd you like it when that gator grabbed Joe's gun and took it in the water? Great show, and great job on the boat as well.
 
Thanks ncfishin. Yea swamp people is great you get to see a bunch of different tins hard at work. I've been watching and getting ideas for my top. Alot of our boats on here are too plush for gator country. It looks like most of them are set up so they can hose em out at the end of the day. I'm bummed the season is about over.
 
Swamp people is great. Those are some hard working boats.

flatbotm, Did you stain/paint the underside of the boards? Under there is likely to be the most constantly wet area of the boat.
 
Yes I put a heavy coat of stain on the bottom and ends of the boards. The only part that isn't stained is the tongue and groove parts which is sealed up with liquid nails. I'm going to do a second coat on the top side today. Still wish I had gone all aluminum but the wood was free and it's hard to beat free. I have enough aluminum to do the back platform or I have the bead board trying to decide which to use.
 
I decided to do a little aluminum project today to see what kind of weight I could shave off the front deck by replacing my hatch doors with aluminum ones. I used 1/8 1.25 square tube and 1/8 aluminum sheet.

I used a bandsaw to cut the box at 45 degree angles.

photo-145.jpg


I cut the sheet with the plasma using a piece of 1in aluminum box and some clamps as a guide

photo-147.jpg


I welded it all up using a miller 30a spoolgun

photo-148.jpg


I laid the box out on a square table and welded it on all sides. The I ground the welds off on the side that I sheeted.

photo-149.jpg


With the sheet I welded the corners on the top side and ground the welds smooth and then welded the hell out of the underside.

Here is the finished product minus handles, hinges and paint. I think I am going to herculine them and the paint them od green same as the boat.

photo-150.jpg
 
Here they are in the boat.

photo-153.jpg


photo-152.jpg


photo-151.jpg


The original doors made from the t and g weighed 31 lbs combined. They had two cross boards each underneath tying them together adding to the weight. The new aluminum doors weigh 16 lbs combined so I only saved 15lbs for a half of a Saturday spent fabbing. I was hoping for more but I guess I will appreciate it every time I open a door.
 
Thats alot of weight to save off of such a small area.
Nice work your doing.
I kinda like that tongue and grove look,seen it on some boats on youtube,overseas I think.
I bet in cedar or hackmatack,it would last forever.
 
Thanks Zum I like the t and g look too. If it hadn't been free I would have saved my money for alumimum. JJ I don't know if I will be able to go all aluminum for a while because that southern yellow pine is good wood and I don't know if I can just tear it all out and discard it. It will have to show some wear and tear before that happens. I am thinking of replacing areas piece by piece. How I cut into the deck for the two hatches Im thinking of cutting the deck out for others. So 15 lbs is alot? Those two hatch doors were at least 1/4 if not 1/3 of my whole front deck. So if I did a few more I will have eliminated half the weight. Ive thought of cutting into one of the stock seats like you did jj for a battery box or something. Should I skip the wood and go all aluminum on the rear deck? I have enough aluminum collected to do it. I have about 10 ft of the 1.25 square tube left over for supports. My console should be here next week then I will be getting to the rear deck and maybe a seat storage box like you have jj. Possibly aluminum? Thanks for the encouragement
 
I think thats a big weight savings.
Lets say we go to the 1/3 size(hatch)...15X3=45lbs saving on a front deck would be huge.
The aluminum has to weigh something,small boats like ours;it's all about the weight saving.
I bet the feel and sound of the wood,especially none carpeted,is probably going to be cooler and less noisy.
Another good thing about going with the free T/G is,you can put down what you think you are going to like and later on change the little things,you didn't really like or keep it the same;when/if you ever decide the aluminum route.
 
I see your point Zum over a whole boat aluminum could give you significant weight savings. I compared the thinner t and g I used in the mid boat to the materials to do the midboat in aluminum and they are close in weight. The wood is much cooler than the aluminum when sitting in the sun. The aluminum becomes too hot to touch. So what do you guys think aluminum or t and g for the rear deck?
 
I bent my first piece of aluminum today with the bender and I was really happy with the results. Applied a little white grease on the part of the tube that meets up with the follower die. It didn't really scratch it at all. Almost like it polished it. I bent a 180 or close to it just to see how it would do. Building the bimini top shouldn't be too bad as soon as I get a concrete plan. I've been going back and forth between the style like Derek posted and something more like Joe and Tommys design from swamp people. Any thoughts on what would function better for fishing? Heres some pics of the bend.

photo-154.jpg


photo-155.jpg
 
Seems no one wants to give any input on the bimini top design? My wife is out of town this weekend and I have until tuesday night to go fab crazy. So if someone comes up with something that I end up using for my bimini design and it hasn't been already said or posted. I will bent you up something for free! You pay for the tube and the shipping and the bend or bends will cost you nothing. Nothing extravagant just a grab bar, light bar, grab handles, something that doesn't need a 8 foot box to fit in.
On another note I received my console from Alumacraft on Wednesday and unfortunately it came damaged. So far Alumacraft seems to want to help by sending me a replacement console. The verdict is still out thou.
Here's a pic of the console close to where I am thinking of putting it. A few inches forward of this.
photo-163.jpg
 
I did a little prep for the rear deck today. I welded a crossmember in on the rear rib of the boat to support the t and g. I also stained the underside and ends of the boards so I can lay them down tomorrow. I welded a center support on the rear deck support that is not shown in the pic. I also plan to attach some angle iron to the transom to support the deck on the back side.

photo-165.jpg


photo-166.jpg
 
It's coming along nicely. This is the first t and g build I remember seeing.

No clue on the bimini, but good luck with the rest of your build!
 
I like the looks of the wood planks on there. I haven't seen that style yet. I found some bimini designs on ebay that you might be able to rip. Someone on here also posted they had some they were willing to share...but for the life of me I can't recall who it was! :(
 
Thanks guys. The t and g is great it doesn't warp because of the grooves cut in the back side. Its really strong once it is all glued and screwed. The one down side is it is pretty time consuming to install and if your off a 1/8 of a inch on the first board it turns into a inch by the end. I found that out the hard way.

Here are some pics of the sub structure on the rear deck and the rear deck installed. Tomorrow I will install the pedestal seat base and stain the top side.

photo-167.jpg


photo-168.jpg


photo-169.jpg
 

Latest posts

Top